Breaking into marketing without prior professional experience might seem like a daunting challenge, but it’s far from impossible. Many aspiring marketers feel stuck, wondering how to even get their foot in the door. This guide is designed to demystify the process, offering an accessible and actionable easy method for finding marketing jobs without experience. We’ll explore how to leverage your existing skills and develop new ones to land that dream marketing role, even without a traditional background.
The No-Experience Advantage: Discovering Your Marketing Potential
Let’s be clear: "no experience" doesn’t mean "no skills." You likely possess a wealth of transferable abilities that are highly valued in the marketing world. Think about your hobbies, volunteer work, academic projects, or even personal online endeavors. These are often untapped resources for building a marketing portfolio and demonstrating your aptitude.
What Constitutes "Marketing Experience" When You’re Just Starting?
In the context of an easy method for finding marketing jobs without experience, we’re redefining what counts. It’s not just about paid roles. It includes creating content for a personal blog, managing social media for a club, organizing an event, or even running a successful online sale for a craft. These activities showcase initiative, creativity, and an understanding of audience engagement.
Why Finding Marketing Jobs Without Experience Matters More Than You Think
The marketing landscape is constantly evolving. Companies are increasingly looking for fresh perspectives and individuals who can adapt quickly. They understand that traditional experience isn’t the only indicator of potential success. A demonstrated passion and a willingness to learn can be just as valuable, if not more so, than years spent in a similar role.
Your Step-by-Step Guide to an Easy Method for Finding Marketing Jobs Without Experience
This section lays out a practical, actionable plan to help you secure your first marketing position. We’ll break down the process into manageable steps, focusing on building your skills and showcasing your talent effectively.
Step 1: Identify Your Transferable Skills and Interests
Before you start applying, take stock of what you’re already good at. Are you a natural storyteller? Do you enjoy analyzing data? Are you creative and visually inclined?
- Communication: Excellent writing, speaking, and interpersonal skills are fundamental in marketing.
- Creativity: Developing new ideas, designing visuals, or crafting compelling copy.
- Problem-Solving: Identifying challenges and devising effective solutions.
- Organization: Managing projects, timelines, and resources efficiently.
- Tech Savvy: Proficiency with social media platforms, basic design tools, or productivity software.
Consider which areas of marketing genuinely excite you. Do you love social media, content creation, email marketing, or perhaps data analysis? Aligning your interests with specific roles will make your job search more focused and enjoyable.
Step 2: Build a Relevant Skillset Through Online Learning
The internet is an incredible resource for acquiring marketing skills. Numerous free and affordable online courses and certifications can significantly boost your resume. These demonstrate initiative and provide you with practical knowledge.
- Google Digital Garage: Offers free courses on digital marketing fundamentals, SEO, and more, with certifications upon completion.
- HubSpot Academy: Provides comprehensive training in inbound marketing, content marketing, social media marketing, and email marketing, all with free certifications.
- Coursera and edX: Offer specialized courses and professional certificates from top universities and companies, often with financial aid options.
- YouTube: A treasure trove of tutorials on specific marketing tools and strategies, from graphic design basics to SEO optimization.
Focus on skills that are in high demand, such as social media management, content writing, SEO basics, and email marketing automation.
Step 3: Create a Compelling Portfolio (Even Without Paid Projects)
This is arguably the most crucial step in your easy method for finding marketing jobs without experience. A portfolio showcases your abilities in action. Think of it as your personal marketing showcase.
- Personal Blog: Write articles on topics you’re passionate about, demonstrating your content creation and SEO skills.
- Social Media Accounts: Manage your own professional social media presence, showcasing your ability to engage an audience and create compelling posts.
- Speculative Projects: Create marketing materials for a brand you admire or a hypothetical business. Design social media campaigns, write sample ad copy, or develop a mock website landing page.
- Volunteer Work: Offer your marketing skills to local non-profits or community organizations. This provides real-world experience and portfolio pieces.
Your portfolio should be easily accessible, ideally through a personal website or a dedicated platform like Behance or a curated Google Drive folder.
Step 4: Network Strategically and Informational Interviews
Networking is key to uncovering hidden opportunities and gaining insights. Don’t be afraid to reach out to people in the industry.
- LinkedIn: Connect with marketing professionals, join relevant groups, and engage in discussions.
- Informational Interviews: Reach out to people working in marketing roles you’re interested in and ask for a brief chat. The goal is to learn about their career path and gain advice, not to ask for a job directly. This is a fantastic way to get your foot in the door and make a memorable impression.
- Industry Events (Online and Offline): Attend webinars, workshops, and local meetups to connect with like-minded individuals and potential employers.
Remember to be genuine and focus on building relationships.
Step 5: Tailor Your Resume and Cover Letter
Your resume and cover letter are your first impression. They need to highlight your transferable skills and any projects you’ve completed, even if they weren’t paid marketing roles.
- Highlight Transferable Skills: Use a skills section to list relevant abilities and provide examples of how you’ve used them.
- Showcase Projects: Dedicate a section to your portfolio projects, explaining what you did, the tools you used, and the results you achieved (even if they were personal goals).
- Quantify Achievements: Whenever possible, use numbers to demonstrate impact. For example, "Increased personal Instagram follower engagement by 20% over three months."
- Customized Cover Letters: Never send a generic cover letter. Tailor each one to the specific job and company, explaining why you’re a good fit and how your unique background can benefit them. Express your enthusiasm for learning and growing within their organization.
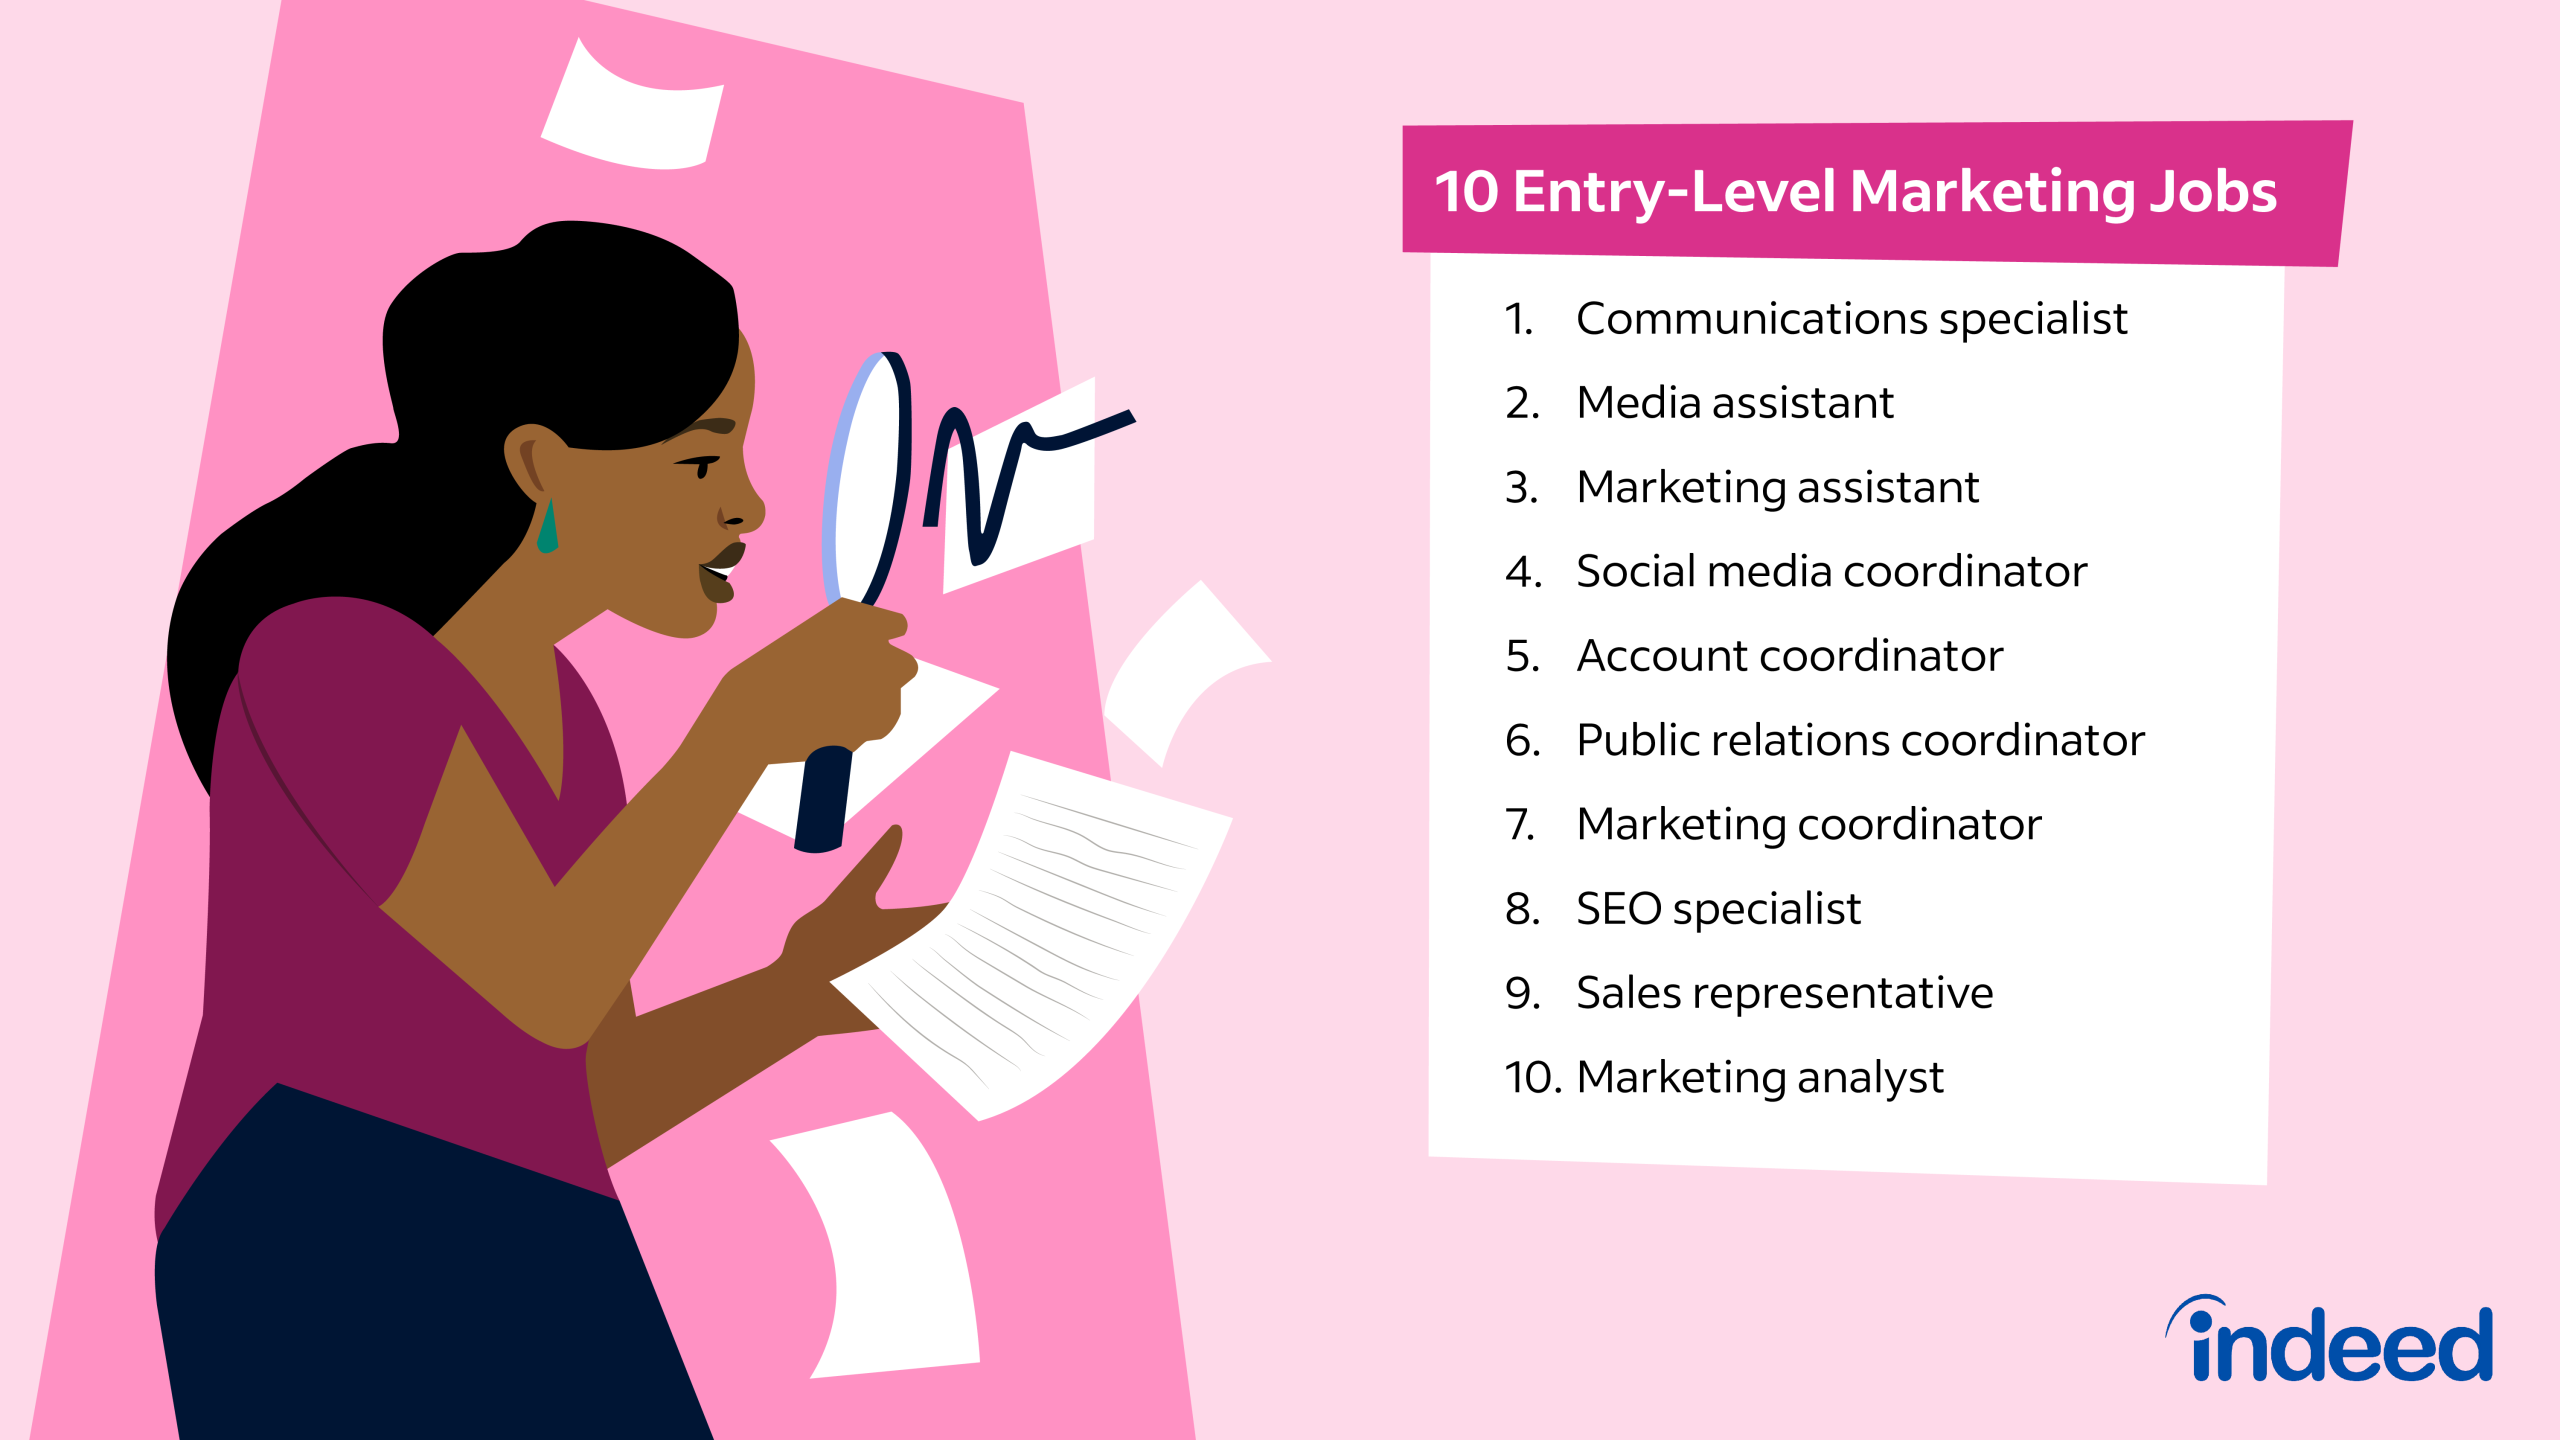
Step 6: Target Entry-Level and Intern Roles
When you’re just starting, be realistic about the types of positions you’re applying for. Entry-level marketing assistant roles, marketing coordinator positions, and internships are excellent starting points.
- Internships: These are designed for individuals with limited experience and provide invaluable hands-on training and networking opportunities.
- Entry-Level Roles: Look for positions that explicitly state "entry-level" or "no experience required."
- Assistant Roles: Marketing assistant positions often involve supporting various marketing functions, allowing you to learn on the job.
Common Mistakes to Avoid in Your No-Experience Marketing Job Search
Even with a solid easy method for finding marketing jobs without experience, certain pitfalls can derail your efforts. Being aware of these common errors can help you navigate the process more smoothly.
Mistake 1: Undervaluing Your Existing Skills
Many people underestimate the marketing value of their non-traditional experiences. Don’t dismiss your ability to organize events, manage social media for a hobby, or create engaging presentations as irrelevant. These are all valuable marketing competencies.
Mistake 2: Applying for Every Job You See
A scattergun approach is rarely effective. Focus your efforts on roles that genuinely align with your developing skills and interests. Tailoring your applications takes more time but significantly increases your chances of success.
Mistake 3: Not Having a Portfolio
In marketing, showing is more powerful than telling. Without tangible examples of your work, it’s difficult for employers to assess your capabilities. Invest time in creating a strong portfolio.
Mistake 4: Fear of Rejection
Rejection is a normal part of any job search. Don’t let it discourage you. View each rejection as a learning opportunity, and use feedback to refine your approach.
Expert Tips to Master the Art of Landing Your First Marketing Role
Go beyond the basics with these advanced strategies to truly excel in your job hunt. These insights will help you stand out from the crowd and impress potential employers.
Tip 1: Specialize Early (But Stay Flexible)
While it’s good to have a broad understanding, identifying a niche you’re particularly drawn to can help you focus your learning and portfolio development. Whether it’s social media marketing, content writing, or SEO, specializing can make you a more attractive candidate for specific roles. However, remain open to learning and exploring other areas as you gain experience.
Tip 2: Quantify Everything Possible in Your Portfolio
When showcasing your projects, go beyond just describing what you did. Focus on the outcomes. Did your blog post get a lot of shares? Did your social media campaign increase engagement? Did your volunteer efforts lead to tangible results for the organization? Numbers speak volumes.
Tip 3: Craft a Personal Brand Online
Your online presence is your digital resume. Ensure your LinkedIn profile is complete, professional, and showcases your marketing aspirations and skills. Consider creating a simple personal website that acts as a central hub for your portfolio and resume.
Tip 4: Practice Your Interview Skills Relentlessly
Many employers will assess your communication skills and enthusiasm during interviews. Practice answering common interview questions, especially those related to your motivations, learning style, and how you would approach marketing challenges. Prepare questions to ask the interviewer, showing your engagement and thoughtfulness.
Real-Life Success Story: Sarah’s Journey into Digital Marketing
Sarah had always loved writing and managing her personal blog about sustainable living. She had no formal marketing education but had developed a knack for SEO and engaging her small but dedicated readership. When she decided to pursue a career in marketing, she leveraged her blog as her primary portfolio piece.
She created a dedicated "Portfolio" page on her blog, highlighting her most popular posts and explaining her content strategy. She also took free online courses in social media management and email marketing. Armed with her portfolio and certifications, she began applying for entry-level social media coordinator roles. Many companies were impressed by her demonstrable passion and ability to connect with an audience, leading her to land her first paid marketing role within three months.
Your Marketing Career Awaits: Embrace the Easy Method
Finding marketing jobs without experience is an achievable goal when you approach it strategically. By understanding your transferable skills, actively building new ones through online learning, and showcasing your abilities with a strong portfolio, you can effectively demonstrate your potential to employers. Don’t let the lack of formal experience hold you back. Embrace this easy method for finding marketing jobs without experience, stay persistent, and your marketing career will soon be underway. Your journey into the exciting world of marketing starts now!
