Add Transitions in Adobe Premiere Pro is crucial for creating engaging videos. Learning how to effectively use transitions can dramatically improve the visual flow and impact of your footage. This guide explores the various transition types available in Premiere Pro, from simple fades to more complex wipes and dissolves. We’ll cover how to choose the right transition for your video segments, apply them flawlessly, and master techniques for smooth, professional results.
You’ll learn everything from basic application to advanced customization and even common mistakes to avoid.
Understanding the nuances of transition duration and positioning is key to achieving a polished final product. We’ll dissect the interplay between transition type, video content, and the overall visual impact, equipping you with the knowledge to make informed decisions. Learn how to craft compelling transitions that enhance your storytelling and keep your viewers captivated.
Introduction to Transitions in Premiere Pro
Transitions in video editing software, like Adobe Premiere Pro, are crucial for seamlessly connecting different video clips. They act as bridges, smoothing out the abrupt changes between scenes and creating a polished and engaging viewing experience. Without proper transitions, a video can feel jarring and disjointed, hindering the overall narrative flow. A well-chosen transition can significantly enhance the visual appeal and impact of a video.Transitions are fundamental tools in video editing.
They are used to direct the viewer’s attention, emphasize key moments, and guide the narrative flow. By carefully selecting and applying transitions, editors can create a cohesive and visually appealing final product. The right transition can help build anticipation, highlight a specific point, or simply add a touch of elegance to the overall presentation.
Types of Transitions in Premiere Pro
Various transition effects are available in Adobe Premiere Pro, each serving a specific purpose. These effects are categorized into different types, and understanding their nuances is key to choosing the appropriate transition for each scene change. Selecting the right transition is crucial to maintain a smooth viewing experience and highlight the intended message of the video.
| Transition Type | Description | Example Scenario |
|---|---|---|
| Cut | A sharp, immediate change between clips. | Switching between scenes in a fast-paced action sequence. |
| Dissolve | Gradually fades one clip out while another fades in. | Creating a smooth transition between two similar scenes, or when a scene is ending and another is beginning. |
| Wipe | A line or shape moves across the screen, revealing the new clip. | Introducing a new character or location in a narrative, adding a dynamic visual effect. |
| Push | A clip “pushes” another clip off the screen. | Highlighting a dramatic reveal or emphasizing a significant change in setting. |
| Box | A rectangular box slides across the screen to reveal the next clip. | Introducing a new element, like a title card, or changing the focus to a specific part of the screen. |
| Zoom | The screen zooms in or out to reveal the new clip. | Highlighting a specific detail or emphasizing a change in perspective or focus. |
| Iris | A circle or other shape expands or contracts to reveal the new clip. | Creating a dramatic effect, often used for titles or important reveals. |
Choosing the Right Transition
Picking the perfect transition is crucial for a smooth and engaging video. It’s not just about aesthetics; the right transition enhances the narrative flow, guiding the viewer’s eye and emphasizing the intended message. A poorly chosen transition can disrupt the viewing experience, drawing unwanted attention to itself instead of the content. Understanding the factors influencing transition selection is key to achieving a polished final product.Selecting the right transition requires a careful consideration of the video’s content and the desired impact.
Different transitions evoke distinct emotional responses and visual effects, making the decision crucial in storytelling. Understanding how transitions function and their impact on viewers is essential to achieve a desired result.
Factors Influencing Transition Choice
The choice of transition is heavily influenced by the content being connected. Understanding the relationship between the video segments is essential for selecting the most effective transition. A smooth transition for scenes showing a progression should differ from one used to highlight a sharp change.
- Content Continuity: Transitions should seamlessly link segments, mirroring the narrative flow. A scene of someone walking into a building, for example, might benefit from a subtle, gradual transition to a scene inside the building, whereas a sudden appearance of a character requires a more abrupt transition. Continuity should align with the narrative to avoid disrupting the viewer’s experience.
- Visual Impact: Transitions should complement the visuals and audio, enhancing the overall aesthetic. A fast, sharp transition can be suitable for action sequences, whereas a slow, subtle transition might be better suited for a contemplative scene. The transition should amplify the visual message and not detract from it.
- Emotional Impact: Transitions can evoke specific emotions. A jarring transition can create a sense of unease or excitement, while a smooth transition can convey calmness or continuity. The emotional context of the scene is important to consider.
- Editing Style: The overall editing style of the video should be considered. A video with a fast-paced, energetic style might benefit from more abrupt transitions, whereas a video with a slower, more contemplative style could use softer transitions. The choice should reflect the overall editing approach.
Comparing Transition Types
Different transition types offer various visual impacts and durations. The right choice depends on the desired effect.
| Transition Type | Visual Impact | Typical Duration (seconds) | Suitable Content Examples |
|---|---|---|---|
| Cut | Sharp, abrupt change. | 0.1-0.5 | Action sequences, quick cuts, sudden shifts in scene. |
| Dissolve | Gradual fading between scenes. | 0.5-2 | Emotional transitions, showing a passage of time, soft shifts in mood. |
| Wipe | A line sweeps across the screen, revealing the next scene. | 0.5-2 | Visual emphasis, introducing new elements, transitions between contrasting scenes. |
| Zoom | Zooms in or out on a particular area. | 0.5-3 | Highlighting a specific element, guiding the viewer’s attention, drawing focus to a detail. |
| Push | One scene pushes the other off-screen. | 0.5-2 | Creating a sense of motion, suggesting a change in perspective, transition between different locations. |
Applying Transitions in Premiere Pro

Adding transitions in Premiere Pro smoothly connects different video clips, creating a polished and engaging final product. Transitions are essential for maintaining a professional flow in your video editing, guiding the viewer’s eye and enhancing the overall visual appeal. Mastering transition application is crucial for creating dynamic and visually compelling videos.Applying transitions effectively involves understanding the various options available and knowing how to adjust them for optimal results.
A proper understanding of transition duration and placement ensures a seamless viewing experience, minimizing jarring shifts between scenes. This section will guide you through the steps of adding and adjusting transitions in Premiere Pro.
Applying Transitions Directly
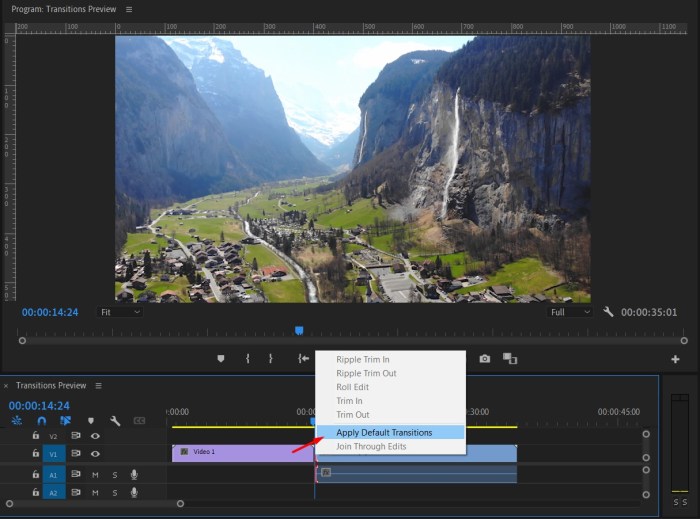
Direct application is the simplest method for adding transitions between clips. This method is particularly useful when you want to quickly add a standard transition. To use this approach, position the playhead at the point where you want the transition to occur. Select the transition from the transition panel. Click and drag the transition from the panel to the timeline between the clips you want to join.
Learning to add transitions in Adobe Premiere Pro is super helpful for making videos look smooth and professional. Recently, I’ve been obsessed with the new Freddie Gibbs track, “Where Have You Been ft. Sasha Go Hard” new freddie gibbs where have you been ft sasha go hard. The beat is so infectious, and it’s inspiring me to experiment with different transition styles in my video editing.
Hopefully, these new skills will make my next project even better!
Premiere Pro will automatically insert the transition at the playhead location. This method offers a fast and straightforward way to add transitions, ideal for basic video edits.
Using the Transition Panel for Precise Adjustments
The transition panel offers more control over the transition effect. This panel allows for precise adjustments to the duration and placement of the transition. After selecting the transition from the panel, drag it to the desired location between the clips. A visual representation of the transition appears on the timeline, illustrating the effect’s impact on the video.
Adjusting Transition Duration and Position
The duration and position of a transition directly impact its visual effect. Adjusting these parameters allows for a more refined and professional look. Premiere Pro provides tools for precise control. You can adjust the transition’s duration by dragging the transition’s handles on the timeline. Dragging the transition’s handles changes the transition’s duration.
To adjust the position of the transition, you can drag it along the timeline to reposition it precisely between the clips. This allows you to fine-tune the timing of the transition for optimal visual impact.
Methods for Applying Transitions
| Method | Description | Advantages | Disadvantages |
|---|---|---|---|
| Direct Application | Drag and drop transition from panel to timeline | Fast, simple, ideal for quick edits | Limited control over duration and position |
| Transition Panel | Use the panel to select, preview, and adjust transitions | Precise control over duration, position, and effect | Requires more steps |
This table summarizes the different ways to apply transitions, highlighting the pros and cons of each method. Choosing the appropriate method depends on the specific needs of your edit.
Transition Duration and Position
Mastering transition duration and position in Premiere Pro is crucial for creating a smooth and engaging viewing experience. Precise control over these elements ensures that transitions seamlessly integrate with the surrounding footage, rather than jarring the viewer. This meticulous attention to detail can transform a simple video into a polished cinematic masterpiece.
Precise Control of Transition Duration
Precisely adjusting transition duration is key to maintaining a consistent flow within your video. Longer durations can add a sense of anticipation or drama, while shorter durations create a quicker, more impactful transition. The optimal duration often depends on the specific transition and the visual elements involved.
To fine-tune the duration, use the transition’s controls in the Premiere Pro timeline. These controls usually include a slider that allows you to adjust the transition’s length from a fraction of a second to several seconds. Experiment with different durations to find the one that best suits the desired visual effect.
Adjusting Transition Position
Accurately positioning a transition is essential for aligning it perfectly with the clips it connects. Improper placement can disrupt the visual continuity, leading to a less polished final product. By adjusting the position, you can make transitions align precisely with specific points in the footage, rather than awkwardly cutting between clips.
Positioning is often done by dragging the transition’s starting and ending points in the timeline. This allows for precise control over the transition’s duration and timing. Adjusting the transition’s position can also subtly influence the overall pacing and rhythm of your video.
Creating Smooth Transitions
Creating smooth transitions without abrupt cuts requires careful consideration of the duration and placement of the transition. A well-executed transition should gradually fade between the clips, avoiding any harsh visual breaks. Experimentation is key to finding the optimal duration and position that seamlessly blends the two clips.
For instance, using a transition like a wipe with a gradual sweeping motion can create a smooth transition. Conversely, a zoom transition, when positioned precisely, can also create a seamless visual flow. Understanding the different types of transitions and their properties is essential for achieving the desired smoothness.
Examples of Varying Transition Duration and Position
Varying the duration and position of transitions significantly alters the visual flow of your video. A short, quickly executed transition can create a sense of urgency or action, while a longer transition can build anticipation or emphasize a particular moment.
Learning about transitions in Adobe Premiere Pro is super helpful for video editing, but sometimes, the office environment can feel like a life of crime! Office culture a life of crime can really impact your productivity, so choosing the right transitions can help you create smooth, engaging videos. Mastering these transitions in Premiere Pro is key for a polished final product.
Consider a scene where a character is walking into a room. A short cross dissolve, positioned just as the character steps through the doorway, can create a quick and efficient transition. However, a longer fade, positioned over the entire walk, can add a dramatic feel to the moment. By experimenting with these different durations and positions, you can create various effects and evoke diverse emotions.
Advanced Transition Techniques
Mastering transitions in Premiere Pro goes beyond simple fades and wipes. Advanced techniques unlock a wider creative palette, enabling you to craft more engaging and dynamic video edits. By understanding custom transition creation, combining effects, and animating transitions with keyframes, you can elevate your projects from basic to breathtaking.Custom transitions offer unparalleled control over the visual shift between clips.
They allow you to design transitions that precisely match your project’s aesthetic and storytelling needs. This section delves into the methods and possibilities, empowering you to build transitions that are not only functional but also visually compelling.
Custom Transition Creation
Understanding the building blocks of custom transitions is crucial. By combining various effects, you can craft unique transitions that convey specific moods and enhance the narrative flow. This often involves layering effects and adjusting their parameters to achieve the desired result. Experimentation is key to finding your signature transition style.
Combining Multiple Transitions
Combining multiple transitions for more complex effects can create highly engaging and memorable transitions. This approach allows you to achieve visual effects that would be impossible to create using a single transition. For example, a transition could start with a fade-in, then transition to a dissolve, and finally conclude with a slight zoom. This sequence provides a more nuanced visual experience for the viewer.
Keyframing Transitions
Keyframing provides unparalleled control over the animation of transitions. Instead of a static effect, keyframing allows for smooth, dynamic transitions, allowing you to animate the transition’s parameters. This includes adjustments to opacity, position, scale, and rotation. By setting keyframes at different points in the transition, you can create sophisticated visual movements. Consider how you might use keyframes to create a transition that subtly changes color or shape as it progresses.
Custom Transition Techniques Table, Add Transitions in Adobe Premiere Pro
| Transition Technique | Visual Result | Description |
|---|---|---|
| Cross Dissolve with Color Shift | A cross-dissolve effect that gradually changes color as the transition occurs. | This combines a cross-dissolve transition with a color correction effect, animated using keyframes. The color shift can be subtle or dramatic, depending on the keyframe settings. |
| Animated Wipe with Distortion | A wipe transition that distorts the image as it sweeps across the screen. | A wipe transition is animated using keyframes to create a dynamic and visually engaging effect. Distortion effects can be applied to the wipe, making the transition even more striking. |
| Mask-Based Transition with Motion Blur | A transition where one clip is masked and animated to reveal another, with motion blur added for a smooth effect. | A shape mask is used to control the transition between clips. By animating the mask, the transition can be dynamic. Adding motion blur to the masked area creates a more professional and sophisticated look. |
| 3D Tilt Shift with Perspective Shift | A transition that simulates a 3D tilt-shift effect with a perspective shift between clips. | By combining 3D effects with perspective shifts, the transition provides a strong sense of depth. This technique can be effective in transitions between locations or time periods. |
Transition Effects and Customization: Add Transitions In Adobe Premiere Pro

Beyond the basic transition types, Premiere Pro offers a vast array of effects that can significantly enhance the visual flow between clips. Understanding how to customize these effects is key to creating professional-looking edits. This section dives into the world of transition effects and their customization options, providing you with the tools to elevate your video productions.Premiere Pro’s transition library isn’t just a collection of visual effects; it’s a toolbox for crafting seamless and impactful transitions.
Different transition types offer varying degrees of visual flair, and customization options allow you to fine-tune each effect to match the specific aesthetic of your project. By adjusting properties like color, opacity, and speed, you can create unique and engaging transitions that truly stand out.
Different Transition Effects
Premiere Pro boasts a diverse range of transition effects, from subtle fades to dramatic wipes and dissolves. These effects offer a wide spectrum of visual styles, enabling you to create dynamic transitions that match your project’s overall tone and aesthetic. Understanding the variety of options available is crucial for making informed choices. Examples include cross dissolves, wipes, pixelate transitions, and more.
Each effect can be further customized to achieve a unique look.
Customizing Transition Properties
The core elements that determine the appearance of a transition are its color, opacity, and speed. These attributes allow for significant control over the visual impact of the transition, enabling you to perfectly integrate it into your video’s aesthetic.
Color Customization
Transition color allows you to match the transition’s hue to the surrounding clips or to create a distinct visual effect. The color can be adjusted to complement the overall color palette of your project or to introduce a contrasting element. For example, a warm, golden transition can enhance a scene set during sunset, while a cool, blue transition could be effective during a nighttime sequence.
You can choose a solid color or use a gradient for more sophisticated effects.
Opacity Customization
Transition opacity dictates the transparency of the transition. Adjusting the opacity can create subtle or dramatic effects, influencing the level of visual separation between the clips. A lower opacity value will make the transition more transparent, blending the clips together more smoothly. Conversely, a higher opacity value will make the transition more pronounced, emphasizing the change between scenes.
For instance, a highly opaque transition might be used to separate scenes with vastly different visual themes, whereas a low opacity might be ideal for transitions between closely related shots.
Speed Customization
Transition speed controls how quickly the transition takes place. A faster transition creates a more dynamic and energetic effect, while a slower transition can add a sense of calm or deliberation. The speed can be adjusted to match the pacing and rhythm of your video. For instance, a fast transition could be used to move quickly through a sequence of events, while a slow transition could be used to emphasize a particular moment or emotion.
Learning about transitions in Adobe Premiere Pro is super helpful for creating smooth videos. It’s all about those seamless cuts, right? But sometimes, in editing, we get caught up in following certain patterns or myths about what makes a good video, when maybe we should be more inspired by the freedom of not having to adhere to specific rules, like in the m no mythologies to follow concept.
Ultimately, mastering transitions is about finding what works best for your vision, not following any specific rules.
Modifying Transition Appearance
To modify the transition’s appearance, Premiere Pro offers various controls. These options allow you to tailor the transition to specific project requirements. The tools available enable you to adjust the position, duration, and other parameters to ensure the transition effectively bridges the gap between scenes.
Transition Presets and Libraries
Transition presets and libraries are invaluable time-savers in Adobe Premiere Pro. They allow you to quickly apply professional-looking transitions without having to meticulously adjust every parameter. This significantly streamlines your workflow, especially when working on projects with multiple transitions or tight deadlines. Furthermore, they often include a range of transition styles, ensuring you have a variety of options for various scenes.
Using Transition Presets
Transition presets are pre-configured settings for transitions, offering a variety of looks and effects. They save you the time and effort of manually adjusting transition parameters, allowing you to focus on the overall project’s creative vision. They are available within Premiere Pro’s transition panel, making them readily accessible during editing.
Creating Custom Transition Presets
Creating custom transition presets allows you to save your favorite transition settings for repeated use. This is particularly useful for maintaining a consistent visual style throughout a project. This feature empowers you to build a personal library of transitions tailored to your specific aesthetic preferences. To create a custom preset, apply the desired transition and adjust its parameters, including duration, position, and opacity.
Then, save it as a new preset.
Examples of Pre-made Transitions and Modifications
Pre-made transitions are readily available in Premiere Pro’s transition panel. For instance, the “Dissolve” transition is a common choice for smooth scene changes. You can modify a pre-made transition by adjusting its duration. A subtle change in duration can drastically alter the visual effect. Likewise, you can adjust the opacity of the transition to achieve a softer or sharper effect.
By combining different transition types, you can achieve unique and engaging visual outcomes. For example, a “Wipe” transition combined with a slight color adjustment can add a dramatic touch to a scene change.
Common Transition Presets and Their Applications
| Transition Preset | Description | Typical Application |
|---|---|---|
| Dissolve | A gradual fading transition between clips. | Smooth scene changes, transitions between similar scenes. |
| Wipe | A transition where one clip “wipes” another off the screen. | Creating a dramatic effect, emphasizing a change in subject matter. |
| Cross Dissolve | A transition where both clips are blended simultaneously. | Creating a soft and seamless blend between scenes. |
| Box | A transition where a rectangular shape moves across the screen. | Emphasizing a sharp change in action or scene. |
| Zoom | A transition that zooms into or out of a scene. | Creating a sense of movement or emphasis on a particular element. |
These are just a few examples; Premiere Pro offers a wide array of transition presets. Experimenting with different transitions is essential for finding the ones that best suit your creative needs.
Avoiding Common Transition Mistakes
Transitions, while powerful tools for enhancing video flow, can easily disrupt the viewing experience if misused. Knowing the common pitfalls and how to avoid them is crucial for creating polished and engaging videos. This section will explore these mistakes, offering practical solutions to help you refine your Premiere Pro transitions.
Overusing Transitions
Excessive transitions can make a video feel jarring and distracting. A viewer’s eye needs time to process information and a constant barrage of transitions can break the narrative flow. Instead of relying on transitions to bridge every cut, consider the natural rhythm of your video. Focus on clean edits that emphasize the story’s progression, rather than artificially speeding it up with unnecessary transitions.
Effective storytelling often relies on the subtle and strategic placement of transitions.
Choosing the Wrong Transition
Selecting a transition that doesn’t suit the content or the visual style of your video can negatively impact the viewer’s perception. A sharp, sudden cut might be appropriate for a fast-paced action scene, but it would likely feel out of place in a slow-paced documentary. The visual language of your video should guide your transition choice. Consider the emotional tone, the pace, and the overall aesthetic of your project.
For example, a subtle wipe transition might work well for a romantic scene, while a zoom transition could enhance a suspenseful sequence. Careful consideration of the content and style of your video is paramount in achieving a smooth and engaging viewing experience.
Incorrect Transition Duration
Transition duration is critical for maintaining a natural flow. Transitions that are too short might feel abrupt and jarring, while those that are too long can slow down the pacing of the video. The ideal duration varies depending on the type of transition and the content it’s connecting. Experiment with different durations to find the sweet spot that balances the visual effect with the overall rhythm of your video.
For example, a short dissolve transition might be perfect for a quick scene change, while a longer one could create a more dramatic effect.
Improper Transition Placement
Placing a transition in an awkward or inappropriate location can completely ruin the flow of your video. A transition should seamlessly integrate the visuals and not create a visual distraction or discontinuity. The transition should reinforce the video’s narrative, not detract from it. Carefully consider where a transition is needed, and if it’s not visually needed, avoid it entirely.
For instance, placing a transition right before the most impactful moment in a scene can diminish the impact, rather than enhancing it.
Ignoring the Visual Context
The visual context of your video is paramount in transition selection. A transition that works perfectly in one context might not translate to another. A transition that creates visual harmony in one video can clash in another, depending on the color palettes, styles, and overall tone. It is vital to carefully consider the visual context and match the transition accordingly.
For instance, a transition that is effective in a scene with high contrast and bold colors might be less impactful in a scene with muted tones.
Common Transition Pitfalls and Solutions
| Pitfall | Solution |
|---|---|
| Overusing transitions | Evaluate the necessity of each transition. Focus on clean cuts and strategic placement. |
| Choosing the wrong transition | Analyze the content and style of your video to select the appropriate transition. |
| Incorrect transition duration | Experiment with different durations to find the ideal balance between visual effect and pacing. |
| Improper transition placement | Carefully consider the visual context and narrative flow. Place transitions strategically to enhance, not disrupt, the viewer’s experience. |
| Ignoring visual context | Match the transition to the overall visual style, color palette, and tone of your video. |
Transition Examples and Scenarios
Transitions are crucial for seamlessly guiding the viewer’s eye from one scene to another, enhancing storytelling and viewer engagement. Properly chosen transitions can elevate the impact of a video, whether it’s a documentary, a commercial, or a personal project. By understanding how different transitions affect the overall mood and message, filmmakers can create a more compelling viewing experience.Using transitions strategically can significantly impact the pacing and tone of a video.
A jarring transition might interrupt the flow, while a well-placed transition can create a smooth and engaging experience. This section delves into practical examples showcasing the diverse applications of transitions in various video types and genres.
Film and Documentary
Film and documentary productions often require transitions that maintain a sense of realism and authenticity. A simple dissolve can effectively depict the passage of time or a change in location, while a wipe can be used to highlight a shift in perspective. A more dramatic transition, such as a push-pull, could signify a pivotal moment in a narrative.
- In a documentary about the history of the automobile, a dissolve could be used to show the evolution of car design from the early 20th century to modern models.
- To depict a character’s emotional journey, a series of cross dissolves or a series of wipes could be used. Each wipe could be subtly different in color or direction to reflect the shifts in the character’s emotional state.
Music Videos
Music videos often benefit from transitions that reflect the dynamic energy of the music. A series of cuts can be used to highlight various actions or settings in the video. A zoom or a pixelate transition can build anticipation or a dramatic effect. A sliding transition could be utilized for transitions between different scenes or locations in a more subtle and graceful manner.
- In a music video, a zoom transition could be used to highlight a specific dancer as they move to the forefront, and then a pixelate transition could be used to fade to the background as the camera shifts to a different scene.
- To emphasize a specific lyric or a moment of climax, a quick cut could be used, or a transition like a split screen or a fade in/fade out could be used to transition between different scenes.
Educational Videos
Educational videos often employ transitions to improve comprehension and engagement. A split screen transition could be used to simultaneously display different information or perspectives on a topic. A reveal transition can gradually introduce new concepts or details. A fade-in/fade-out transition can help to introduce new segments and clearly separate the material.
- In a science lesson on the solar system, a split-screen transition could show the Earth and the Moon simultaneously, with text overlays describing their respective characteristics.
- A reveal transition could be used to gradually unveil a complex diagram or chart, helping viewers to grasp the details step by step.
Corporate Videos
Corporate videos often use transitions to highlight key points and emphasize important information. A push-down transition can create a sense of forward momentum, and a slide transition can present information in a clear and concise way. A wipe transition can create a sense of authority or professionalism.
- In a corporate video about a company’s history, a wipe transition could be used to highlight key milestones and achievements.
- A slide transition can be used to transition between a list of key facts or features and their corresponding descriptions.
End of Discussion
In conclusion, mastering transitions in Premiere Pro is an essential skill for any video editor. By understanding the different transition types, how to apply them correctly, and the nuances of duration and positioning, you can significantly elevate your video editing workflow. This guide has provided a comprehensive overview, from fundamental principles to advanced techniques. Now go forth and create stunning videos that captivate your audience! Remember, practice makes perfect, so experiment with different transitions and find your unique style.