Adjust the Brightness of a Photo Using the iPhone Photos App provides a comprehensive guide to mastering photo adjustments on your iPhone. Learn how to use the app’s intuitive tools to enhance your images, from basic brightness adjustments to advanced techniques for correcting underexposure and overexposure. We’ll cover everything from fundamental concepts like brightness, contrast, and exposure to practical examples and troubleshooting tips.
This guide will take you through the steps to adjust the brightness of your photos using the iPhone Photos app, explaining the different methods, tools, and techniques involved. We’ll break down the process into easily digestible steps, complete with descriptions of the app’s interface elements. From beginner tips to advanced techniques, you’ll learn how to fine-tune your images to achieve the perfect look.
We’ll also address potential issues and provide solutions for troubleshooting any problems you might encounter.
Introduction to Photo Adjustments
Photography is more than just capturing a moment; it’s about crafting an image that conveys a specific emotion or tells a story. Image adjustments are crucial tools in this process, allowing photographers to fine-tune their creations and bring out the best in their photos. These adjustments, encompassing brightness, contrast, and exposure, are essential for achieving a visually appealing and impactful final product.Image adjustments are essential for enhancing the overall quality and impact of a photograph.
By modifying elements like brightness, contrast, and color saturation, photographers can significantly improve the visual appeal and storytelling potential of their images. These adjustments are often the key to transforming a good photo into a truly exceptional one.
Understanding Brightness, Contrast, and Exposure
Brightness, contrast, and exposure are fundamental concepts in photography. Brightness refers to the overall lightness or darkness of an image. Contrast, conversely, describes the difference in brightness between the lightest and darkest parts of the image. Exposure, in essence, is the amount of light that reaches the camera sensor. Proper exposure is critical for achieving a balanced and well-lit image, while adjusting brightness and contrast can enhance the visual impact of the scene.
Comparison of Photo Editing Tools
Different photo editing tools cater to various needs and skill levels. The choice of tool often depends on factors such as budget, desired level of control, and familiarity with the interface. The following table provides a basic comparison of iPhone Photos and Adobe Photoshop, two popular options.
Adjusting the brightness of a photo on your iPhone is surprisingly simple, using the built-in Photos app. It’s all about finding the right balance, just like striving to be a free spirited person, Be a Free Spirited Person. Experiment with the sliders until you capture the perfect lighting for your picture. A little tweaking can make a big difference in the final look.
| Feature | iPhone Photos | Adobe Photoshop |
|---|---|---|
| Ease of Use | Very user-friendly, intuitive interface | Requires more technical knowledge, complex interface |
| Cost | Free (built-in) | Paid software, subscription required |
| Editing Capabilities | Basic adjustments (brightness, contrast, filters) | Extensive editing tools (advanced adjustments, layer effects, special effects) |
| Accessibility | Available on all iPhones | Requires a computer with compatible software |
| Learning Curve | Very low | High |
Opening a Photo in iPhone Photos
The iPhone Photos app provides a straightforward way to open and manage your photos. Following these steps ensures smooth access to your image library for editing.
- Locate the photo you want to edit within the iPhone Photos app. The photo library is organized by date and time of capture, making it easy to find your desired photo.
- Select the desired photo by tapping on it. This will display the image in full-screen view.
- To adjust the brightness and other parameters, use the editing tools available in the app. These tools are usually located in the top or bottom menu bar. The interface is intuitive, making it easy to navigate.
Adjusting Brightness in iPhone Photos App

The iPhone Photos app offers a range of tools for enhancing your images, and adjusting brightness is a fundamental part of this process. Understanding how to control brightness can significantly improve the overall visual appeal of your photos, making them more engaging and impactful. It allows you to fine-tune the light and shadow levels, effectively bringing out details in various situations.Brightness adjustments in the Photos app are crucial for creating visually appealing images.
By manipulating brightness, photographers can effectively control the overall tone and mood of a picture. A well-adjusted brightness level can highlight specific elements within a scene or create a more dramatic effect.
Brightness Adjustment Methods
The iPhone Photos app provides intuitive methods for adjusting brightness. These methods allow for both subtle and significant modifications, ensuring you can tailor the brightness to your specific needs and desired aesthetic.
Interface Elements for Brightness Adjustments
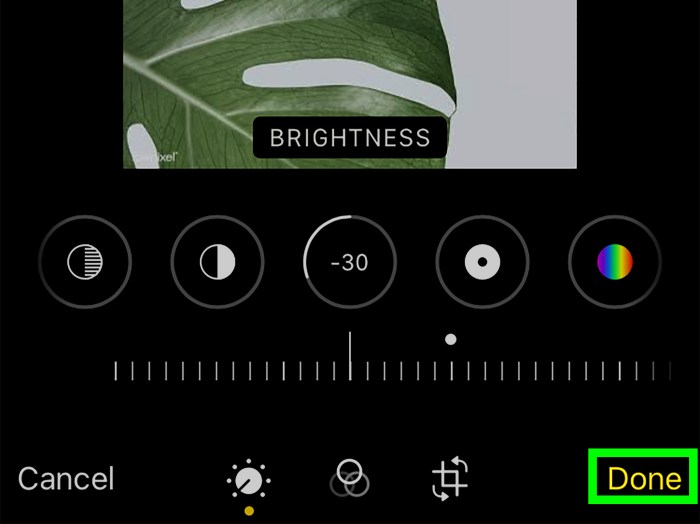
The brightness adjustment interface in the Photos app is straightforward. A prominent slider is used to control the brightness level. This slider, typically located within the editing tools, allows for precise control over the lightness or darkness of the image. Other controls may include an undo/redo button and potentially a preview area to visualize the effects of your changes in real-time.
Using the Brightness Slider
The brightness slider is a key tool for adjusting the brightness of your photos. To increase brightness, slide the slider to the right. To decrease brightness, slide the slider to the left. The slider typically has a visual representation of the current brightness level. This allows you to make subtle adjustments or significant changes, enabling precise control over the image’s overall tone.
Step-by-Step Procedure, Adjust the Brightness of a Photo Using the iPhone Photos App
To adjust brightness using the iPhone Photos app:
- Open the Photos app and select the photo you want to edit.
- Tap the “Edit” button, typically a pencil icon, located at the top right of the image preview.
- Within the editing interface, locate the brightness slider. It is usually represented by a horizontal bar with a marker.
- To increase brightness, slide the marker to the right. To decrease brightness, slide the marker to the left.
- Observe the changes in the photo as you adjust the slider. The preview area will show you the immediate impact of your adjustments.
- Once you are satisfied with the brightness adjustment, tap the “Done” button to save the changes.
Examples of Brightness Adjustments
Different brightness levels can significantly alter a photo’s appearance. A highly brightened photo may appear washed out or lose some of its detail. Conversely, a significantly darkened photo may lose detail in the shadows and appear flat. A moderate brightness adjustment typically preserves the overall quality and tone of the image, emphasizing certain aspects and reducing others.
Comparison with Contrast and Highlights
Adjusting brightness differs from adjusting contrast and highlights. Brightness controls the overall lightness or darkness of the image, while contrast controls the difference between light and dark areas. Highlights adjust the intensity of the brightest parts of the image. Understanding these differences allows for more precise control over the image’s tonal range. For example, a photo with high contrast will have significant differences between the lightest and darkest parts, while a photo with high brightness may appear brighter but have less variation between those parts.
Tweaking the brightness in your iPhone Photos app is a breeze, but did you know that similar precision can be applied to other areas of your tech life? For example, if you’re looking to save money and reduce waste, consider refilling your inkjet printer cartridge instead of buying new ones. Refill an Inkjet Printer Cartridge is a surprisingly simple process.
Once you’ve mastered that, you’ll be a pro at adjusting the brightness of photos on your phone, too!
Adjusting highlights affects only the brightest areas of the image, giving photographers greater control over the specific parts of the image they want to modify.
Advanced Brightness Adjustments
Beyond the simple slider, the iPhone Photos app offers a suite of tools to fine-tune brightness adjustments, enabling users to achieve more nuanced and sophisticated results. Understanding these advanced techniques is crucial for correcting various image issues, from subtle underexposure to severe overexposure. These methods are essential for achieving professional-looking images.
Additional Tools for Brightness Adjustment
The iPhone Photos app’s editing suite includes more than just the brightness slider. Other tools can complement and enhance brightness adjustments, providing a more comprehensive approach to image enhancement. These tools work in conjunction with the brightness controls, allowing for a more refined editing process.
Brightness Adjustment Beyond Sliders
The Photos app provides several options for adjusting brightness beyond basic slider manipulation. These options include exposure compensation, highlights, shadows, and contrast adjustments. Exposure compensation allows for a global adjustment of the image’s brightness, while highlights and shadows control the brightest and darkest parts of the image, respectively. Contrast adjustments can also impact brightness by changing the difference between light and dark tones.
Mastering these controls allows for greater precision in image editing.
Fine-Tuning Brightness Adjustments
Achieving precise brightness adjustments requires understanding the interplay of different tools. For instance, if a photo is underexposed, adjusting the exposure compensation slider might not be sufficient. In this case, fine-tuning the shadows slider can recover detail in the darker areas without blowing out the highlights. Similarly, if a photo is overexposed, using the highlights slider to reduce the intensity of the brightest areas can prevent loss of detail.
Conversely, using the shadows slider can recover detail in the darker areas of the image.
Use Cases and Techniques
- Underexposed Photos: To recover detail in underexposed photos, increase the exposure compensation. Adjust the shadows slider to enhance detail in the darker areas. Carefully monitor the highlights to avoid overexposure during the process. If the image is severely underexposed, consider using the recovery tool for even greater detail recovery. This is essential when recovering details from dark areas, without introducing unwanted artifacts.
- Overexposed Photos: For overexposed photos, use the highlights slider to reduce the intensity of the brightest areas. The exposure compensation slider can also be used to reduce the overall brightness of the image. Careful adjustment of the shadows slider is also crucial to preserve detail in the dark areas. It’s important to note that overexposed areas are harder to recover than underexposed ones.
- Mixed Lighting: When dealing with mixed lighting scenarios, the shadows and highlights sliders become crucial for balancing the different light sources. Adjust the shadows to recover detail in the darker areas while adjusting the highlights to prevent the brighter areas from becoming washed out. This is particularly helpful when shooting in environments with both direct sunlight and ambient light.
Interaction with Other Tools
Brightness adjustments interact with other image editing tools, such as contrast, sharpness, and saturation. Adjusting brightness can affect these elements, and vice versa. For example, increasing contrast may amplify the effect of brightness adjustments, while increasing saturation might affect the perception of brightness. Understanding these interactions is essential for achieving a balanced and harmonious final image.
Brightness Adjustment Scenarios
| Scenario | Description | Adjustment Steps |
|---|---|---|
| Overexposed | Image too bright, highlights blown out | Reduce exposure compensation. Adjust highlights slider to recover detail. Adjust shadows slider to maintain detail in darker areas. |
| Underexposed | Image too dark, details lost in shadows | Increase exposure compensation. Adjust shadows slider to recover detail. Monitor highlights to avoid overexposure. |
| Mixed Lighting | Different light sources creating uneven brightness | Adjust shadows and highlights sliders to balance the different light sources. Adjust exposure compensation to fine-tune overall brightness. |
Troubleshooting Brightness Adjustments

Mastering photo adjustments on your iPhone can sometimes lead to unexpected results. Understanding common issues and their solutions is key to achieving the desired image quality. This section provides a comprehensive troubleshooting guide for brightness adjustments in the iPhone Photos app.Adjusting the brightness of a photo can be tricky, especially when dealing with complex lighting scenarios. Slight alterations can sometimes have significant visual impacts, leading to unexpected outcomes.
Knowing the potential pitfalls and how to remedy them will significantly improve your photo editing experience.
Common Brightness Adjustment Issues
A thorough understanding of the common pitfalls associated with brightness adjustments is essential. These issues often stem from a misunderstanding of the image’s existing tonal range and the impact of the adjustments. Recognizing these patterns helps in anticipating potential problems and preventing unwanted outcomes.
Troubleshooting Guide
This step-by-step guide provides solutions for common issues encountered while adjusting photo brightness.
- Unexpected Results: Sometimes, adjusting brightness can lead to a photo that appears washed out or overly dark, even if the initial adjustment seems reasonable. This often occurs when the adjustment exceeds the image’s inherent tonal range. To remedy this, consider reducing the adjustment amount gradually. Experiment with smaller increments to avoid drastic changes and carefully review the effect after each adjustment.
A good approach is to evaluate the histogram of the image before and after the adjustment to better understand the distribution of tones and how the adjustments impact them. This provides valuable insights into the potential impact of your adjustments.
- Image Artifacts: Adjustments to the brightness can sometimes introduce unwanted artifacts, like banding or halos. This is more prevalent when working with images that have significant tonal transitions or high contrast. To minimize these artifacts, consider using a more gradual and subtle approach. It is sometimes helpful to selectively adjust the brightness in different areas of the image using the “brush tool” if available, allowing for more localized and nuanced changes to the tonal range.
- Over-adjustment: Overly aggressive adjustments to brightness can result in an image that loses detail in the highlights or shadows. Carefully monitor the changes as you adjust, and reduce the amount of adjustment if the image’s detail begins to diminish. Avoid using maximum brightness adjustments in a single step. Instead, break down the adjustments into multiple smaller steps, allowing for more precise control and better preservation of detail.
Learning to adjust the brightness of photos on your iPhone is a handy skill, just like knowing how to pack delicate jewelry for travel. Often, photos need a little boost to really pop, especially if taken in low light conditions. Thankfully, the iPhone Photos app makes this super easy. Thinking about your next trip? Don’t forget to check out tips on Pack Necklaces for Traveling to ensure your treasured necklaces arrive safely.
Mastering brightness adjustments in the Photos app will help you enhance those photos even further, whether you’re taking vacation snaps or just editing everyday shots.
Troubleshooting Table
This table summarizes common brightness adjustment errors and their solutions.
| Error Scenario | Cause | Solution |
|---|---|---|
| Washed-out image | Excessive brightness adjustment | Reduce the adjustment amount gradually, review the histogram. |
| Darkened image | Insufficient brightness adjustment or incorrect adjustment | Gradually increase the brightness adjustment. Check tonal distribution. |
| Image banding | Significant tonal transitions or high contrast | Use a more subtle approach, selectively adjust in specific areas. |
| Loss of detail in highlights/shadows | Overly aggressive brightness adjustment | Break down adjustments into smaller steps. Monitor the changes. |
Best Practices for Brightness Adjustments
Brightness adjustments in photo editing are more than just making an image lighter or darker. They’re a powerful tool for shaping the mood, emphasizing certain elements, and ultimately altering the viewer’s experience. Understanding the best practices for adjusting brightness can significantly elevate your photos from merely acceptable to truly impactful.Adjusting brightness isn’t a one-size-fits-all process. The ideal approach depends heavily on the specific image, the desired outcome, and the overall aesthetic you’re aiming for.
A subtly brightened landscape can evoke a feeling of serenity, while a drastically adjusted portrait might be used to highlight dramatic lighting or enhance the subject’s emotional presence.
Ideal Situations for Brightness Adjustments
Brightness adjustments are invaluable for various photo editing scenarios. They are particularly effective when aiming to achieve specific moods or emphasize certain aspects of an image. For example, increasing brightness in an image of a dimly lit street scene can enhance the details in the shadows and evoke a sense of mystery. Conversely, reducing brightness in a vibrant sunset shot can emphasize the rich colors of the sky and create a sense of tranquility.
Impact on Overall Aesthetic
The impact of brightness adjustments on the aesthetic is profound. A subtle increase in brightness can create a sense of warmth and openness, while a significant decrease can evoke a sense of mystery or drama. The key is to use brightness adjustments thoughtfully, considering how they will interact with the existing colors and textures in the image.
Artistic Styles Achieved Through Brightness Adjustments
Brightness adjustments can be instrumental in achieving a wide range of artistic styles. For instance, a significant increase in brightness can create a high-key look, emphasizing light and minimizing shadows. This style is often associated with cheerful and optimistic moods. Conversely, a substantial decrease in brightness can create a low-key look, emphasizing shadows and adding a dramatic or melancholic tone to the image.
This technique is particularly effective in portraying moody and evocative scenes. A balanced approach can also result in a more natural look, emphasizing the image’s natural elements and enhancing its beauty.
Comparison of Photo Editing Approaches
Different photo editing software and techniques can yield varying results when adjusting brightness. Some software offers sliders and presets for intuitive adjustments. Others might require more in-depth manipulation using layers and masking. The optimal approach often depends on the complexity of the image and the desired level of control. For a straightforward brightness adjustment, using sliders is efficient.
For more nuanced effects, such as selectively brightening specific areas, layers and masking can provide more control.
Tips for Avoiding Over-Adjusting Brightness
Over-adjusting brightness can lead to a loss of detail and an unnatural appearance. It’s crucial to make adjustments incrementally, and to frequently review the image to ensure the changes are beneficial and aesthetically pleasing. A good rule of thumb is to avoid overly drastic adjustments. Instead, aim for subtle enhancements that complement the existing mood and tone of the image.
Always keep the original image’s characteristics in mind to avoid overly altering its natural appeal. Utilizing the “preview” feature in editing software can be helpful for evaluating the impact of your adjustments in real-time.
Examples of Brightness Adjustments: Adjust The Brightness Of A Photo Using The IPhone Photos App
Brightness adjustments in photos can significantly alter the mood and impact of an image. Understanding how different levels of brightness affect various types of photos is crucial for achieving desired visual results. This section provides concrete examples to illustrate the impact of adjusting brightness in various scenarios.Adjusting brightness is a fundamental photo editing technique. It allows photographers and photo editors to control the overall lightness or darkness of an image.
This control is essential for achieving a balanced and visually appealing image.
Scenarios Illustrating Brightness Adjustments
Different types of photos respond differently to brightness adjustments. The effectiveness of the adjustment depends on the original lighting conditions and the desired aesthetic.
| Scenario | Before Adjustment | After Adjustment (Increased Brightness) | After Adjustment (Decreased Brightness) |
|---|---|---|---|
| Outdoor Portrait in Bright Sunlight | A vibrant outdoor portrait, but the skin tones might appear slightly washed out due to strong sunlight. | The portrait becomes more luminous, with the skin tones potentially more saturated. The overall image becomes brighter and more vivid. However, if the adjustment is too extreme, it might appear overexposed. | The image becomes slightly darker, softening the harsh sunlight and giving a more subdued, and potentially moody effect. The skin tones might appear more natural. If the adjustment is too extreme, the image might appear too dark and lose detail. |
| Indoor Portrait with Soft Lighting | A portrait taken in a room with soft, diffused light. The image has a gentle glow but may seem a little flat. | Increasing brightness enhances the glow, but if done excessively, the image might lose some of its natural, subtle beauty. | Decreasing brightness might make the image appear too dark, and the subtle lighting might be lost. |
| Landscape with Dramatic Skies | A landscape photograph featuring a dramatic sunset or sunrise. The sky is a vibrant color, but the foreground might appear underexposed. | Increasing brightness on the sky can enhance the vibrancy, but it might cause the foreground to become overexposed, losing details. | Decreasing brightness allows the foreground to be better visible, but the dramatic effect of the sky may be diminished. |
| Night Scene with City Lights | A nighttime cityscape with a multitude of lights. The image might appear grainy or contain noise. | Increasing brightness may bring out the details of the city lights, but if too high, it may increase noise. | Decreasing brightness can potentially reduce the noise, but the cityscape might appear too dark. |
Impact on Different Photo Types
The effect of brightness adjustments varies based on the subject matter and desired aesthetic.
- Portrait Photography: Brightness adjustments can enhance the subject’s complexion and overall mood. Increased brightness might highlight the subject’s features, while decreased brightness can create a softer, more intimate atmosphere.
- Landscape Photography: Brightness adjustments in landscapes are critical for balancing the light and shadow, bringing out details in the foreground and background. Carefully adjusting brightness can enhance the depth of field and highlight the unique characteristics of the scene.
- Night Photography: Brightness adjustments are crucial for bringing out details in low-light environments. Increasing brightness reveals the city lights, while decreasing brightness might reduce noise, but at the cost of details.
Final Thoughts
In conclusion, adjusting the brightness of your photos using the iPhone Photos app is a straightforward process once you understand the fundamental concepts and practical techniques. This guide has equipped you with the knowledge and tools to confidently enhance your photos, achieving desired aesthetics and effects. By mastering these techniques, you can significantly improve your photography, whether you’re a seasoned pro or just starting out.