Tag: iPhone

  • iPhone Photos App Adjust Photo Brightness

    iPhone Photos App Adjust Photo Brightness

    Adjust the Brightness of a Photo Using the iPhone Photos App provides a comprehensive guide to mastering photo adjustments on your iPhone. Learn how to use the app’s intuitive tools to enhance your images, from basic brightness adjustments to advanced techniques for correcting underexposure and overexposure. We’ll cover everything from fundamental concepts like brightness, contrast, and exposure to practical examples and troubleshooting tips.

    This guide will take you through the steps to adjust the brightness of your photos using the iPhone Photos app, explaining the different methods, tools, and techniques involved. We’ll break down the process into easily digestible steps, complete with descriptions of the app’s interface elements. From beginner tips to advanced techniques, you’ll learn how to fine-tune your images to achieve the perfect look.

    We’ll also address potential issues and provide solutions for troubleshooting any problems you might encounter.

    Introduction to Photo Adjustments

    Photography is more than just capturing a moment; it’s about crafting an image that conveys a specific emotion or tells a story. Image adjustments are crucial tools in this process, allowing photographers to fine-tune their creations and bring out the best in their photos. These adjustments, encompassing brightness, contrast, and exposure, are essential for achieving a visually appealing and impactful final product.Image adjustments are essential for enhancing the overall quality and impact of a photograph.

    By modifying elements like brightness, contrast, and color saturation, photographers can significantly improve the visual appeal and storytelling potential of their images. These adjustments are often the key to transforming a good photo into a truly exceptional one.

    Understanding Brightness, Contrast, and Exposure

    Brightness, contrast, and exposure are fundamental concepts in photography. Brightness refers to the overall lightness or darkness of an image. Contrast, conversely, describes the difference in brightness between the lightest and darkest parts of the image. Exposure, in essence, is the amount of light that reaches the camera sensor. Proper exposure is critical for achieving a balanced and well-lit image, while adjusting brightness and contrast can enhance the visual impact of the scene.

    Comparison of Photo Editing Tools

    Different photo editing tools cater to various needs and skill levels. The choice of tool often depends on factors such as budget, desired level of control, and familiarity with the interface. The following table provides a basic comparison of iPhone Photos and Adobe Photoshop, two popular options.

    Adjusting the brightness of a photo on your iPhone is surprisingly simple, using the built-in Photos app. It’s all about finding the right balance, just like striving to be a free spirited person, Be a Free Spirited Person. Experiment with the sliders until you capture the perfect lighting for your picture. A little tweaking can make a big difference in the final look.

    Feature iPhone Photos Adobe Photoshop
    Ease of Use Very user-friendly, intuitive interface Requires more technical knowledge, complex interface
    Cost Free (built-in) Paid software, subscription required
    Editing Capabilities Basic adjustments (brightness, contrast, filters) Extensive editing tools (advanced adjustments, layer effects, special effects)
    Accessibility Available on all iPhones Requires a computer with compatible software
    Learning Curve Very low High

    Opening a Photo in iPhone Photos

    The iPhone Photos app provides a straightforward way to open and manage your photos. Following these steps ensures smooth access to your image library for editing.

    1. Locate the photo you want to edit within the iPhone Photos app. The photo library is organized by date and time of capture, making it easy to find your desired photo.
    2. Select the desired photo by tapping on it. This will display the image in full-screen view.
    3. To adjust the brightness and other parameters, use the editing tools available in the app. These tools are usually located in the top or bottom menu bar. The interface is intuitive, making it easy to navigate.

    Adjusting Brightness in iPhone Photos App
    Adjust the Brightness of a Photo Using the iPhone Photos App

    The iPhone Photos app offers a range of tools for enhancing your images, and adjusting brightness is a fundamental part of this process. Understanding how to control brightness can significantly improve the overall visual appeal of your photos, making them more engaging and impactful. It allows you to fine-tune the light and shadow levels, effectively bringing out details in various situations.Brightness adjustments in the Photos app are crucial for creating visually appealing images.

    By manipulating brightness, photographers can effectively control the overall tone and mood of a picture. A well-adjusted brightness level can highlight specific elements within a scene or create a more dramatic effect.

    Brightness Adjustment Methods

    The iPhone Photos app provides intuitive methods for adjusting brightness. These methods allow for both subtle and significant modifications, ensuring you can tailor the brightness to your specific needs and desired aesthetic.

    Interface Elements for Brightness Adjustments

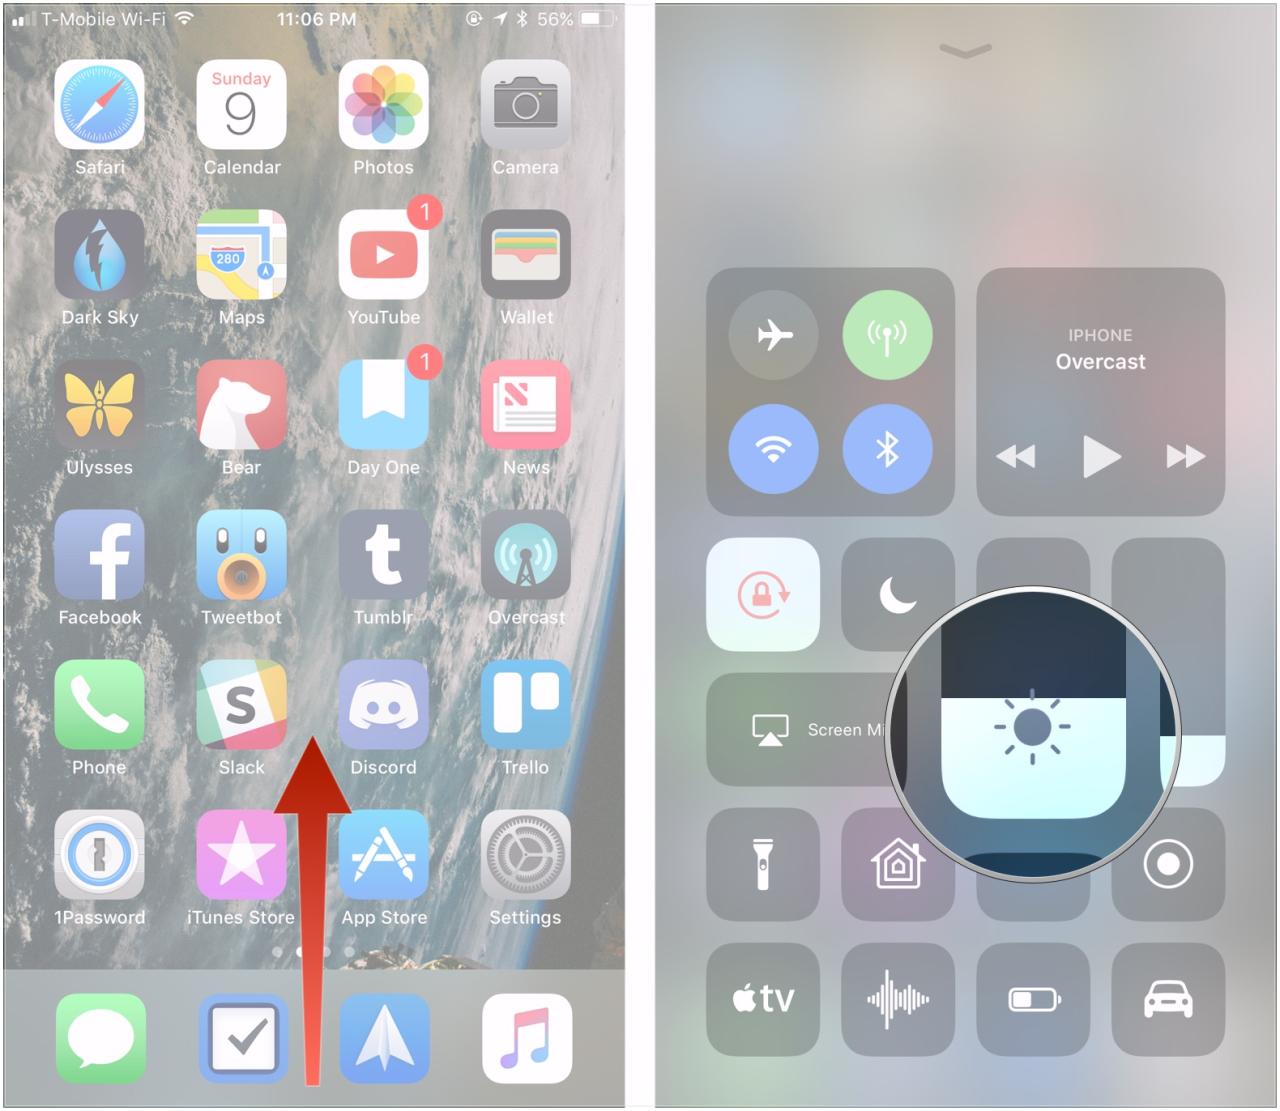
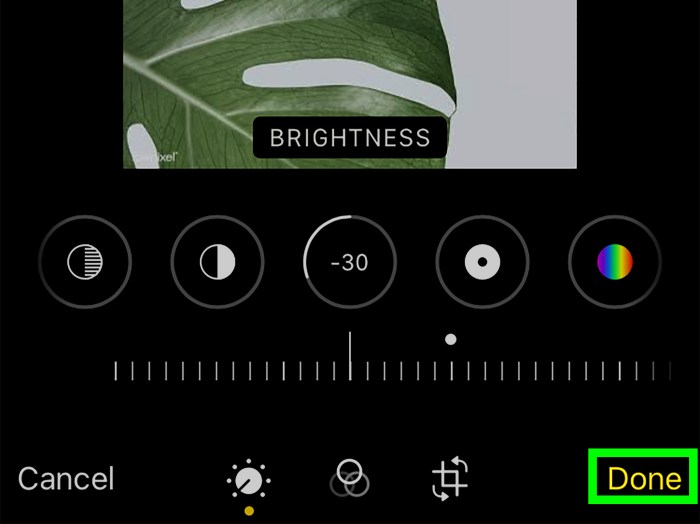
    The brightness adjustment interface in the Photos app is straightforward. A prominent slider is used to control the brightness level. This slider, typically located within the editing tools, allows for precise control over the lightness or darkness of the image. Other controls may include an undo/redo button and potentially a preview area to visualize the effects of your changes in real-time.

    Using the Brightness Slider

    The brightness slider is a key tool for adjusting the brightness of your photos. To increase brightness, slide the slider to the right. To decrease brightness, slide the slider to the left. The slider typically has a visual representation of the current brightness level. This allows you to make subtle adjustments or significant changes, enabling precise control over the image’s overall tone.

    Step-by-Step Procedure, Adjust the Brightness of a Photo Using the iPhone Photos App

    To adjust brightness using the iPhone Photos app:

    • Open the Photos app and select the photo you want to edit.
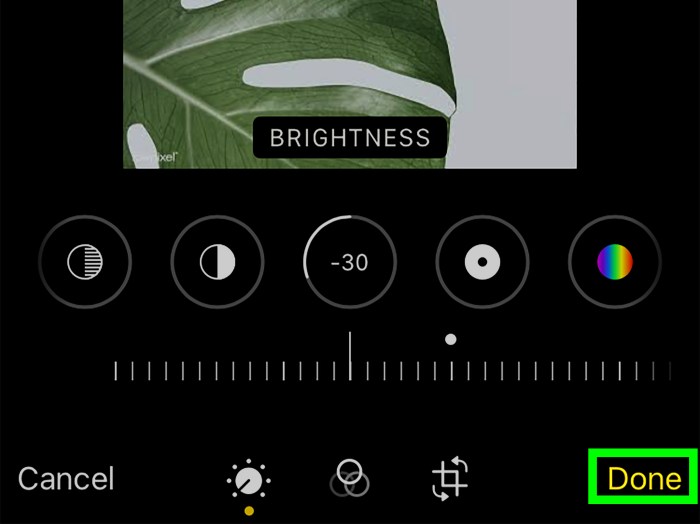
    • Tap the “Edit” button, typically a pencil icon, located at the top right of the image preview.
    • Within the editing interface, locate the brightness slider. It is usually represented by a horizontal bar with a marker.
    • To increase brightness, slide the marker to the right. To decrease brightness, slide the marker to the left.
    • Observe the changes in the photo as you adjust the slider. The preview area will show you the immediate impact of your adjustments.
    • Once you are satisfied with the brightness adjustment, tap the “Done” button to save the changes.

    Examples of Brightness Adjustments

    Different brightness levels can significantly alter a photo’s appearance. A highly brightened photo may appear washed out or lose some of its detail. Conversely, a significantly darkened photo may lose detail in the shadows and appear flat. A moderate brightness adjustment typically preserves the overall quality and tone of the image, emphasizing certain aspects and reducing others.

    Comparison with Contrast and Highlights

    Adjusting brightness differs from adjusting contrast and highlights. Brightness controls the overall lightness or darkness of the image, while contrast controls the difference between light and dark areas. Highlights adjust the intensity of the brightest parts of the image. Understanding these differences allows for more precise control over the image’s tonal range. For example, a photo with high contrast will have significant differences between the lightest and darkest parts, while a photo with high brightness may appear brighter but have less variation between those parts.

    Tweaking the brightness in your iPhone Photos app is a breeze, but did you know that similar precision can be applied to other areas of your tech life? For example, if you’re looking to save money and reduce waste, consider refilling your inkjet printer cartridge instead of buying new ones. Refill an Inkjet Printer Cartridge is a surprisingly simple process.

    Once you’ve mastered that, you’ll be a pro at adjusting the brightness of photos on your phone, too!

    Adjusting highlights affects only the brightest areas of the image, giving photographers greater control over the specific parts of the image they want to modify.

    Advanced Brightness Adjustments

    Beyond the simple slider, the iPhone Photos app offers a suite of tools to fine-tune brightness adjustments, enabling users to achieve more nuanced and sophisticated results. Understanding these advanced techniques is crucial for correcting various image issues, from subtle underexposure to severe overexposure. These methods are essential for achieving professional-looking images.

    Additional Tools for Brightness Adjustment

    The iPhone Photos app’s editing suite includes more than just the brightness slider. Other tools can complement and enhance brightness adjustments, providing a more comprehensive approach to image enhancement. These tools work in conjunction with the brightness controls, allowing for a more refined editing process.

    Brightness Adjustment Beyond Sliders

    The Photos app provides several options for adjusting brightness beyond basic slider manipulation. These options include exposure compensation, highlights, shadows, and contrast adjustments. Exposure compensation allows for a global adjustment of the image’s brightness, while highlights and shadows control the brightest and darkest parts of the image, respectively. Contrast adjustments can also impact brightness by changing the difference between light and dark tones.

    Mastering these controls allows for greater precision in image editing.

    Fine-Tuning Brightness Adjustments

    Achieving precise brightness adjustments requires understanding the interplay of different tools. For instance, if a photo is underexposed, adjusting the exposure compensation slider might not be sufficient. In this case, fine-tuning the shadows slider can recover detail in the darker areas without blowing out the highlights. Similarly, if a photo is overexposed, using the highlights slider to reduce the intensity of the brightest areas can prevent loss of detail.

    Conversely, using the shadows slider can recover detail in the darker areas of the image.

    Use Cases and Techniques

    • Underexposed Photos: To recover detail in underexposed photos, increase the exposure compensation. Adjust the shadows slider to enhance detail in the darker areas. Carefully monitor the highlights to avoid overexposure during the process. If the image is severely underexposed, consider using the recovery tool for even greater detail recovery. This is essential when recovering details from dark areas, without introducing unwanted artifacts.

    • Overexposed Photos: For overexposed photos, use the highlights slider to reduce the intensity of the brightest areas. The exposure compensation slider can also be used to reduce the overall brightness of the image. Careful adjustment of the shadows slider is also crucial to preserve detail in the dark areas. It’s important to note that overexposed areas are harder to recover than underexposed ones.

    • Mixed Lighting: When dealing with mixed lighting scenarios, the shadows and highlights sliders become crucial for balancing the different light sources. Adjust the shadows to recover detail in the darker areas while adjusting the highlights to prevent the brighter areas from becoming washed out. This is particularly helpful when shooting in environments with both direct sunlight and ambient light.

    Interaction with Other Tools

    Brightness adjustments interact with other image editing tools, such as contrast, sharpness, and saturation. Adjusting brightness can affect these elements, and vice versa. For example, increasing contrast may amplify the effect of brightness adjustments, while increasing saturation might affect the perception of brightness. Understanding these interactions is essential for achieving a balanced and harmonious final image.

    Brightness Adjustment Scenarios

    Scenario Description Adjustment Steps
    Overexposed Image too bright, highlights blown out Reduce exposure compensation. Adjust highlights slider to recover detail. Adjust shadows slider to maintain detail in darker areas.
    Underexposed Image too dark, details lost in shadows Increase exposure compensation. Adjust shadows slider to recover detail. Monitor highlights to avoid overexposure.
    Mixed Lighting Different light sources creating uneven brightness Adjust shadows and highlights sliders to balance the different light sources. Adjust exposure compensation to fine-tune overall brightness.

    Troubleshooting Brightness Adjustments
    Adjust the Brightness of a Photo Using the iPhone Photos App

    Mastering photo adjustments on your iPhone can sometimes lead to unexpected results. Understanding common issues and their solutions is key to achieving the desired image quality. This section provides a comprehensive troubleshooting guide for brightness adjustments in the iPhone Photos app.Adjusting the brightness of a photo can be tricky, especially when dealing with complex lighting scenarios. Slight alterations can sometimes have significant visual impacts, leading to unexpected outcomes.

    Knowing the potential pitfalls and how to remedy them will significantly improve your photo editing experience.

    Common Brightness Adjustment Issues

    A thorough understanding of the common pitfalls associated with brightness adjustments is essential. These issues often stem from a misunderstanding of the image’s existing tonal range and the impact of the adjustments. Recognizing these patterns helps in anticipating potential problems and preventing unwanted outcomes.

    Troubleshooting Guide

    This step-by-step guide provides solutions for common issues encountered while adjusting photo brightness.

    • Unexpected Results: Sometimes, adjusting brightness can lead to a photo that appears washed out or overly dark, even if the initial adjustment seems reasonable. This often occurs when the adjustment exceeds the image’s inherent tonal range. To remedy this, consider reducing the adjustment amount gradually. Experiment with smaller increments to avoid drastic changes and carefully review the effect after each adjustment.

      A good approach is to evaluate the histogram of the image before and after the adjustment to better understand the distribution of tones and how the adjustments impact them. This provides valuable insights into the potential impact of your adjustments.

    • Image Artifacts: Adjustments to the brightness can sometimes introduce unwanted artifacts, like banding or halos. This is more prevalent when working with images that have significant tonal transitions or high contrast. To minimize these artifacts, consider using a more gradual and subtle approach. It is sometimes helpful to selectively adjust the brightness in different areas of the image using the “brush tool” if available, allowing for more localized and nuanced changes to the tonal range.

    • Over-adjustment: Overly aggressive adjustments to brightness can result in an image that loses detail in the highlights or shadows. Carefully monitor the changes as you adjust, and reduce the amount of adjustment if the image’s detail begins to diminish. Avoid using maximum brightness adjustments in a single step. Instead, break down the adjustments into multiple smaller steps, allowing for more precise control and better preservation of detail.

      Learning to adjust the brightness of photos on your iPhone is a handy skill, just like knowing how to pack delicate jewelry for travel. Often, photos need a little boost to really pop, especially if taken in low light conditions. Thankfully, the iPhone Photos app makes this super easy. Thinking about your next trip? Don’t forget to check out tips on Pack Necklaces for Traveling to ensure your treasured necklaces arrive safely.

      Mastering brightness adjustments in the Photos app will help you enhance those photos even further, whether you’re taking vacation snaps or just editing everyday shots.

    Troubleshooting Table

    This table summarizes common brightness adjustment errors and their solutions.

    Error Scenario Cause Solution
    Washed-out image Excessive brightness adjustment Reduce the adjustment amount gradually, review the histogram.
    Darkened image Insufficient brightness adjustment or incorrect adjustment Gradually increase the brightness adjustment. Check tonal distribution.
    Image banding Significant tonal transitions or high contrast Use a more subtle approach, selectively adjust in specific areas.
    Loss of detail in highlights/shadows Overly aggressive brightness adjustment Break down adjustments into smaller steps. Monitor the changes.

    Best Practices for Brightness Adjustments

    Brightness adjustments in photo editing are more than just making an image lighter or darker. They’re a powerful tool for shaping the mood, emphasizing certain elements, and ultimately altering the viewer’s experience. Understanding the best practices for adjusting brightness can significantly elevate your photos from merely acceptable to truly impactful.Adjusting brightness isn’t a one-size-fits-all process. The ideal approach depends heavily on the specific image, the desired outcome, and the overall aesthetic you’re aiming for.

    A subtly brightened landscape can evoke a feeling of serenity, while a drastically adjusted portrait might be used to highlight dramatic lighting or enhance the subject’s emotional presence.

    Ideal Situations for Brightness Adjustments

    Brightness adjustments are invaluable for various photo editing scenarios. They are particularly effective when aiming to achieve specific moods or emphasize certain aspects of an image. For example, increasing brightness in an image of a dimly lit street scene can enhance the details in the shadows and evoke a sense of mystery. Conversely, reducing brightness in a vibrant sunset shot can emphasize the rich colors of the sky and create a sense of tranquility.

    Impact on Overall Aesthetic

    The impact of brightness adjustments on the aesthetic is profound. A subtle increase in brightness can create a sense of warmth and openness, while a significant decrease can evoke a sense of mystery or drama. The key is to use brightness adjustments thoughtfully, considering how they will interact with the existing colors and textures in the image.

    Artistic Styles Achieved Through Brightness Adjustments

    Brightness adjustments can be instrumental in achieving a wide range of artistic styles. For instance, a significant increase in brightness can create a high-key look, emphasizing light and minimizing shadows. This style is often associated with cheerful and optimistic moods. Conversely, a substantial decrease in brightness can create a low-key look, emphasizing shadows and adding a dramatic or melancholic tone to the image.

    This technique is particularly effective in portraying moody and evocative scenes. A balanced approach can also result in a more natural look, emphasizing the image’s natural elements and enhancing its beauty.

    Comparison of Photo Editing Approaches

    Different photo editing software and techniques can yield varying results when adjusting brightness. Some software offers sliders and presets for intuitive adjustments. Others might require more in-depth manipulation using layers and masking. The optimal approach often depends on the complexity of the image and the desired level of control. For a straightforward brightness adjustment, using sliders is efficient.

    For more nuanced effects, such as selectively brightening specific areas, layers and masking can provide more control.

    Tips for Avoiding Over-Adjusting Brightness

    Over-adjusting brightness can lead to a loss of detail and an unnatural appearance. It’s crucial to make adjustments incrementally, and to frequently review the image to ensure the changes are beneficial and aesthetically pleasing. A good rule of thumb is to avoid overly drastic adjustments. Instead, aim for subtle enhancements that complement the existing mood and tone of the image.

    Always keep the original image’s characteristics in mind to avoid overly altering its natural appeal. Utilizing the “preview” feature in editing software can be helpful for evaluating the impact of your adjustments in real-time.

    Examples of Brightness Adjustments: Adjust The Brightness Of A Photo Using The IPhone Photos App

    Brightness adjustments in photos can significantly alter the mood and impact of an image. Understanding how different levels of brightness affect various types of photos is crucial for achieving desired visual results. This section provides concrete examples to illustrate the impact of adjusting brightness in various scenarios.Adjusting brightness is a fundamental photo editing technique. It allows photographers and photo editors to control the overall lightness or darkness of an image.

    This control is essential for achieving a balanced and visually appealing image.

    Scenarios Illustrating Brightness Adjustments

    Different types of photos respond differently to brightness adjustments. The effectiveness of the adjustment depends on the original lighting conditions and the desired aesthetic.

    Scenario Before Adjustment After Adjustment (Increased Brightness) After Adjustment (Decreased Brightness)
    Outdoor Portrait in Bright Sunlight A vibrant outdoor portrait, but the skin tones might appear slightly washed out due to strong sunlight. The portrait becomes more luminous, with the skin tones potentially more saturated. The overall image becomes brighter and more vivid. However, if the adjustment is too extreme, it might appear overexposed. The image becomes slightly darker, softening the harsh sunlight and giving a more subdued, and potentially moody effect. The skin tones might appear more natural. If the adjustment is too extreme, the image might appear too dark and lose detail.
    Indoor Portrait with Soft Lighting A portrait taken in a room with soft, diffused light. The image has a gentle glow but may seem a little flat. Increasing brightness enhances the glow, but if done excessively, the image might lose some of its natural, subtle beauty. Decreasing brightness might make the image appear too dark, and the subtle lighting might be lost.
    Landscape with Dramatic Skies A landscape photograph featuring a dramatic sunset or sunrise. The sky is a vibrant color, but the foreground might appear underexposed. Increasing brightness on the sky can enhance the vibrancy, but it might cause the foreground to become overexposed, losing details. Decreasing brightness allows the foreground to be better visible, but the dramatic effect of the sky may be diminished.
    Night Scene with City Lights A nighttime cityscape with a multitude of lights. The image might appear grainy or contain noise. Increasing brightness may bring out the details of the city lights, but if too high, it may increase noise. Decreasing brightness can potentially reduce the noise, but the cityscape might appear too dark.

    Impact on Different Photo Types

    The effect of brightness adjustments varies based on the subject matter and desired aesthetic.

    • Portrait Photography: Brightness adjustments can enhance the subject’s complexion and overall mood. Increased brightness might highlight the subject’s features, while decreased brightness can create a softer, more intimate atmosphere.
    • Landscape Photography: Brightness adjustments in landscapes are critical for balancing the light and shadow, bringing out details in the foreground and background. Carefully adjusting brightness can enhance the depth of field and highlight the unique characteristics of the scene.
    • Night Photography: Brightness adjustments are crucial for bringing out details in low-light environments. Increasing brightness reveals the city lights, while decreasing brightness might reduce noise, but at the cost of details.

    Final Thoughts

    In conclusion, adjusting the brightness of your photos using the iPhone Photos app is a straightforward process once you understand the fundamental concepts and practical techniques. This guide has equipped you with the knowledge and tools to confidently enhance your photos, achieving desired aesthetics and effects. By mastering these techniques, you can significantly improve your photography, whether you’re a seasoned pro or just starting out.

  • Clear the RAM on an iPad or iPhone A Guide

    Clear the RAM on an iPad or iPhone A Guide

    Clear the RAM on an iPad or iPhone: This guide delves into the often-misunderstood world of RAM management on Apple devices. We’ll explore what RAM is, how it affects your iPad or iPhone’s performance, and how to effectively clear it when needed. Understanding these concepts is crucial for maintaining a smooth and responsive mobile experience.

    From identifying signs of RAM issues to troubleshooting common problems, this comprehensive guide covers all the bases. We’ll discuss various methods for clearing RAM, including force restarts and app management, and offer tips for preventing future issues. We’ll also touch on advanced techniques for optimizing RAM usage and when it’s appropriate to seek professional help.

    Understanding iPad/iPhone RAM

    Clear the RAM on an iPad or iPhone

    RAM, or Random Access Memory, is crucial for the smooth operation of your iPad or iPhone. Think of it as the device’s short-term memory. It’s where the operating system and active apps reside while you’re using them. Unlike storage, which holds your files permanently, RAM is temporary and is emptied when the device is powered off or when apps are closed.

    Understanding RAM’s role is key to optimizing your mobile experience.RAM is vital for multitasking and app performance. When you have multiple apps open, the device needs RAM to quickly switch between them. A sufficient amount of RAM ensures smooth transitions and prevents lag or freezing. If RAM is low, the device might struggle to handle multiple apps simultaneously, leading to a less responsive experience.

    RAM vs. Storage

    RAM and storage are distinct components on your iPad or iPhone. Storage holds your files, music, photos, and apps permanently. RAM, on the other hand, is temporary memory used to run the operating system and currently active apps. This means you can save a large video file to your storage, but it will not run in the background unless it is an active app.

    This temporary nature of RAM is what allows your device to switch between different tasks quickly. Storing data on your device’s storage doesn’t impact how much RAM your device has available.

    Clearing the RAM on an iPad or iPhone can sometimes feel like a digital deep breath, especially when things are feeling sluggish. It’s a simple process that can often revitalize your device, but sometimes a little music can help you focus on the task. Think about those quiet nights, the kind where you find yourself lost in the melodies of nights in the dark.

    Ultimately, clearing the RAM is a straightforward way to boost performance and make your device feel snappy again.

    Common Misconceptions about RAM

    A common misconception is that more RAM always equals better performance. While more RAM generally leads to better multitasking, other factors like the processor speed and operating system optimization also play a significant role. The quality of the apps you’re running can also affect performance. A poorly optimized app can consume a lot of RAM, regardless of the device’s total RAM capacity.

    Another misconception is that low RAM directly leads to device failure. RAM is temporary memory and is not stored in a permanent way on the device. A device will not fail if the RAM is low, but a low RAM capacity will limit multitasking.

    RAM Capacity Comparison

    The table below shows the RAM capacity across different iPad and iPhone models. Note that this information reflects current models. Future models may have different RAM capacities.

    Device RAM (GB)
    iPad Air (5th generation) 8
    iPad Pro (11-inch, 2nd generation) 8
    iPad Pro (12.9-inch, 5th generation) 8
    iPhone 14 Pro 6
    iPhone 14 Pro Max 6
    iPhone 14 6

    Identifying RAM Issues: Clear The RAM On An IPad Or IPhone

    RAM, or Random Access Memory, is crucial for your iPad or iPhone’s performance. Just like a busy highway, if RAM is overloaded or fragmented, your device can slow down, crash, or freeze. Understanding the signs of RAM problems can help you troubleshoot and maintain a smooth user experience.Identifying the specific cause of sluggishness or freezing is vital. It’s not always a RAM issue; other factors, like outdated software, background processes, or even a hardware malfunction, can contribute to similar symptoms.

    A methodical approach to diagnosing the problem is essential to ensure accurate troubleshooting.

    Common Signs of RAM Problems

    RAM issues manifest in various ways, often mimicking problems stemming from other sources. Recognizing these patterns can help you isolate the source of the problem. Sluggish performance, app crashes, and freezing are common symptoms.

    Sluggish Performance

    A noticeable slowdown in responsiveness, like delayed app launches, slow scrolling, or unresponsive controls, can suggest RAM limitations. This might not be a direct RAM issue, but rather a symptom of the device struggling to handle tasks. This is a less obvious indicator compared to more drastic symptoms like crashes.

    App Crashes and Freezes

    Frequent app crashes or freezes, particularly during intensive tasks, are strong indicators of RAM pressure. Apps requiring significant resources, such as games or video editing software, might be the first to exhibit these symptoms when RAM is overloaded. Apps that are frequently opened and closed, also may show signs of crashing if RAM is nearing its limit.

    RAM Fragmentation

    RAM fragmentation, where used memory is scattered across the RAM, can lead to performance issues. Imagine a cluttered desk; it’s harder to find and access items. Similarly, a fragmented RAM space makes it more difficult for the system to allocate memory effectively, resulting in sluggish performance.

    RAM Overload

    When the amount of RAM needed by active apps exceeds the available RAM, the device must use virtual memory (swap space). This process can significantly slow down performance. Think of a computer trying to store a large file on a slow external drive; this results in a similar performance impact. Running multiple demanding apps simultaneously can lead to RAM overload, as can prolonged use of memory-intensive features.

    Distinguishing RAM Problems from Other Issues

    It’s crucial to distinguish RAM problems from other potential software or hardware issues. Before attributing the problem to RAM, consider factors like:

    • Outdated or corrupted software: Older or corrupted software can sometimes cause problems that mimic RAM issues.
    • Background processes: Running unnecessary background processes can consume RAM and slow down performance.
    • Hardware malfunctions: Issues with the device’s internal components can lead to erratic behavior.

    Troubleshooting Steps

    This section Artikels steps to check for RAM-related problems.

    1. Restart your iPad or iPhone: A simple restart can often resolve temporary RAM issues caused by software glitches.
    2. Close unnecessary apps: Closing unused apps can free up RAM and improve performance.
    3. Check for software updates: Ensure your operating system and apps are up-to-date. Updates often include bug fixes and performance improvements.
    4. Review background processes: Identify and disable unnecessary background processes to free up RAM.
    5. Monitor RAM usage: Utilize system tools or third-party apps to monitor RAM usage to identify patterns and high-demand processes.

    Methods to Clear iPad/iPhone RAM

    Keeping your iPad or iPhone’s RAM (Random Access Memory) healthy is crucial for smooth performance. Just like your computer, too many programs running simultaneously can lead to sluggishness and occasional crashes. Understanding how to clear RAM can significantly improve your device’s responsiveness.

    Force Restart

    Force restarting your iPad or iPhone is a simple method to refresh RAM and potentially resolve temporary performance issues. It essentially gives the device a sudden reset, clearing out any processes that might be causing problems.

    Clearing the RAM on an iPad or iPhone can sometimes help speed things up, especially if you’re noticing some lag. It’s a simple process, but sometimes a little confusing. Just like navigating the bustling streets of the street of the love of days , there are often hidden pathways and shortcuts to optimize performance. Ultimately, clearing the RAM can be a quick fix for a sluggish device.

    Procedure:

    • Press and hold the power button (located on the top or side of the device) until the power-off slider appears.
    • Slide the power-off slider to turn off the device.
    • After a few seconds, press and hold the power button again until the Apple logo appears.

    This process is generally effective for clearing minor RAM glitches. It is a fast and straightforward approach to restoring responsiveness.

    Hard Reset

    A hard reset is a more drastic measure used when force restarting doesn’t resolve the issue. It completely clears the device’s memory, deleting any unsaved data, and resetting it to its factory state. Hard resets should only be considered when other troubleshooting steps have failed.

    Procedure:

    • Press and hold both the power button and the volume down button simultaneously until the device restarts.
    • The device will display the Apple logo and then restart normally.

    Using a hard reset will require you to re-enter your passcode and re-configure any settings or applications you’ve previously set up. This is a last resort if you are experiencing significant performance problems.

    Closing Background Apps

    Closing background apps is a crucial step in managing RAM usage. Many apps continue to run in the background, even when not actively used, consuming valuable RAM.

    Procedure:

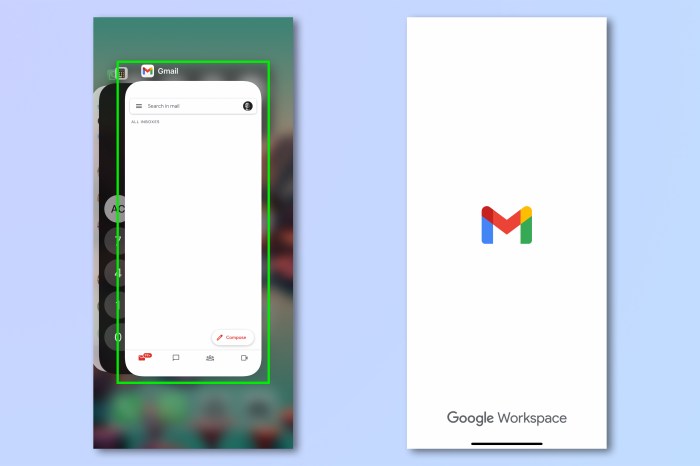
    • Double-tap the Home button to view all open apps.
    • Swipe up on the app previews to close them.

    By actively closing apps, you can release the RAM they are using and improve the overall performance of your device. This is a simple but effective technique to enhance responsiveness.

    Alternative Optimization Methods

    There are alternative approaches to optimizing RAM usage beyond basic clearing techniques. Managing app installations and performing device maintenance are important for long-term RAM health.

    App Management:

    • Uninstall apps you no longer use to free up space and resources.
    • Regularly update apps to ensure they are running efficiently.
    • Delete unnecessary files and data to minimize the demand on RAM.

    Device Maintenance:

    • Regularly back up your device to avoid data loss in case of severe issues.
    • Keep your device’s software up-to-date to benefit from bug fixes and performance improvements.
    • Use an appropriate charging method and avoid extreme temperatures to maintain device health.

    These steps can help prevent future issues and optimize RAM usage.

    Comparison Table

    Method Procedure When to Use
    Force Restart Hold power button until off, then hold again Minor performance issues
    Hard Reset Hold power and volume down buttons Severe performance problems, when other methods fail
    Close Background Apps Double-tap Home button, swipe up on app previews Managing RAM usage on a daily basis

    Troubleshooting RAM Issues

    Sometimes, despite clearing your iPad or iPhone’s RAM, performance issues persist. This often points to underlying problems within apps or the operating system itself. Effective troubleshooting involves identifying the source of the problem, which could be a faulty app, outdated software, or even a more complex hardware issue. This section will detail steps to diagnose and resolve these issues.Diagnosing and resolving RAM-related problems requires a systematic approach.

    By understanding how apps interact with RAM and how to identify potential culprits, you can efficiently pinpoint and fix performance bottlenecks.

    Investigating App RAM Consumption

    Identifying apps that are consuming excessive RAM is crucial for troubleshooting. Regular monitoring allows you to catch problematic behavior before it impacts overall performance.

    • Observe app behavior. Pay attention to apps that consistently slow down performance or cause noticeable lags. For example, if a game freezes or becomes unresponsive after a prolonged session, that app may be using an excessive amount of RAM. Note the timing and duration of these issues to help narrow down the problem.
    • Utilize the iOS performance metrics. iOS provides built-in tools to monitor app performance. Explore the device’s settings to locate these tools. Look for metrics like memory usage over time to see if certain apps consistently consume high amounts of RAM during operation.

    Identifying and Uninstalling Problematic Apps, Clear the RAM on an iPad or iPhone

    If an app consistently demonstrates high RAM usage, consider uninstalling it or checking for updates.

    • Review app usage data. Look at the app’s activity over a period of time to determine if there are any patterns in its memory consumption. If the app consistently exhibits high memory usage, it might be the source of the problem.
    • Uninstall suspicious apps. If an app is consistently consuming a significant amount of RAM, uninstalling it might resolve the issue. Consider uninstalling recently downloaded or frequently used apps first to rule out these possibilities.
    • Update problematic apps. Sometimes, outdated apps can cause RAM issues. Ensure that all apps are updated to the latest version to benefit from potential bug fixes and performance improvements.

    Importance of iOS Updates

    Regular iOS updates often include fixes for RAM-related issues.

    • Keep your iOS up to date. Updates address various performance and stability issues, including those related to RAM management. Always ensure your device is running the latest version of iOS for optimal performance and stability. Check for updates regularly and install them as soon as possible.

    Checking RAM Usage

    Checking RAM usage is a critical step in identifying performance bottlenecks.

    1. Open the Settings app on your iPad or iPhone.
    2. Tap on “General”.
    3. Select “About”.
    4. Look for “Storage” and “Memory”.
    5. This section provides a visual representation of the current memory usage and can highlight apps that are using significant resources.

    Examples of App Behaviors Suggesting RAM Issues

    Certain app behaviors can point to excessive RAM usage.

    • Frequent app crashes or freezes. If apps repeatedly crash or freeze, high RAM consumption could be a contributing factor.
    • Significant lag or slow performance. A noticeable decrease in app responsiveness might indicate excessive memory use.
    • Unresponsive UI elements. If certain UI elements within an app fail to respond, it may be indicative of high RAM usage.

    Preventing RAM Issues

    Keeping your iPad or iPhone’s RAM healthy is crucial for smooth performance and a longer lifespan. Regular maintenance and mindful app usage are key to avoiding RAM-related problems. This section Artikels strategies to proactively maintain optimal RAM health.Proactive measures are vital to prevent RAM issues, rather than just reacting to problems after they arise. By understanding and implementing these strategies, you can ensure your device operates efficiently and reliably.

    Regular Device Maintenance

    Proper device maintenance is paramount for optimal RAM performance. Regular software updates address potential bugs and inefficiencies that can impact RAM usage. Updates often include optimizations that improve RAM management, freeing up resources and preventing overload. App updates frequently include bug fixes and performance enhancements that indirectly benefit RAM usage.

    Clearing the RAM on your iPad or iPhone can sometimes be a lifesaver for sluggish performance. It’s like giving your device a mental reset. Similar to how quitting smoking and alcohol can revitalize your health, Stop Smoking and Drinking at the Same Time requires a lot of focus and willpower. Ultimately, both practices are about freeing up space – in this case, digital space – for optimal functioning, whether it’s your device or your body.

    So, the next time your iPad feels a little slow, consider clearing the RAM for a smoother experience.

    • Software Updates: Installing the latest iOS or iPadOS updates is essential. These updates often contain crucial bug fixes, performance improvements, and RAM management enhancements that help prevent issues.
    • App Updates: Keeping apps up-to-date is equally important. Developers frequently release updates that address performance problems, potentially resolving RAM-related issues within apps themselves.

    App Management

    Managing your installed apps is critical for efficient RAM utilization. Unnecessary apps consume resources, including RAM. A well-managed app library reduces the likelihood of RAM overload.

    • Uninstall Unnecessary Apps: Regularly review and uninstall apps you no longer use. Unused apps, even if dormant, can still consume a small amount of RAM. Removing them frees up this space, enhancing overall performance.
    • App Usage Pattern Analysis: Observe your app usage patterns. Identify apps you frequently use and those you rarely touch. Prioritize frequently used apps for easy access. This conscious decision helps minimize the need to load and switch between infrequently used apps, thus reducing RAM strain.

    Efficient App Usage

    Minimizing background processes and carefully managing app usage can significantly impact RAM performance. Understanding app behavior and controlling their activity are important.

    • Minimize Background Processes: Avoid running too many apps in the background. Close apps you’re not actively using to prevent them from consuming RAM resources. This proactive measure prevents gradual RAM depletion.
    • Limit App Usage at Once: Avoid opening and using too many apps simultaneously. This can lead to RAM overload, causing sluggish performance or app crashes. This is particularly important when using resource-intensive apps.

    Managing and Prioritizing App Usage

    Prioritizing app usage is key to preventing RAM overload. Understanding app needs and allocating resources accordingly helps prevent problems.

    • Prioritize App Usage: Identify and prioritize the apps you use most frequently. Keep these apps readily accessible to minimize the need to load them from the background. This improves responsiveness and avoids unnecessary background loading.
    • App Usage Scheduling: Consider scheduling the usage of demanding apps. If you know you’ll need a specific app for a certain period, initiate it before you need it to reduce the chance of RAM overload. This is particularly beneficial for demanding games or video editing software.

    Optimizing RAM Utilization

    Optimizing RAM utilization is crucial for extending the lifespan of your device. Conscious decisions about app usage and device maintenance lead to better overall performance.

    • Regular Device Restarts: Regular restarts can clear temporary files and processes that consume RAM. This is an effective way to maintain device performance and prevent accumulation of unnecessary data.
    • Monitor RAM Usage: Using system monitoring tools can help you understand your app’s RAM usage patterns. Identify apps with high RAM consumption and take steps to manage their usage. This proactive approach allows you to fine-tune your app management strategies.

    Advanced RAM Management Techniques

    Clear the RAM on an iPad or iPhone

    Optimizing RAM usage on your iPad or iPhone goes beyond simply clearing the cache. Advanced techniques delve into the nuanced ways iOS manages memory, and understanding these strategies can significantly impact overall performance, especially for demanding tasks like gaming and video editing. This section explores sophisticated approaches to memory management, highlighting the impact on device performance and offering troubleshooting tips for specific models.Advanced memory management techniques involve understanding iOS’s internal mechanisms for handling RAM.

    These techniques can help prevent common performance issues and improve responsiveness for demanding applications. By understanding how RAM allocation works, users can proactively optimize their device’s performance.

    RAM Optimization Tools

    There aren’t dedicated third-party RAM management tools specifically designed for iOS. Apple’s built-in memory management system is highly efficient and often handles resource allocation automatically. However, some users might find that certain apps or tasks persistently consume more RAM than expected. In these situations, reviewing app usage and closing unnecessary applications can be helpful.

    Advanced iOS Memory Management Features

    iOS incorporates sophisticated memory management features to ensure optimal performance. These features automatically manage background app activity and minimize resource consumption, preventing applications from hogging RAM. This proactive management is crucial for overall device stability. Background app refresh settings and app usage monitoring are essential tools for managing RAM allocation.

    Impact of RAM on Performance (Gaming and Video Editing)

    Sufficient RAM is vital for smooth performance in resource-intensive tasks like gaming and video editing. Adequate RAM allows applications to load and process data more quickly, resulting in smoother gameplay and reduced lag. In video editing, large files and complex operations require substantial RAM for efficient processing. Insufficient RAM can lead to stuttering, freezes, and crashes.

    Troubleshooting Specific iPad/iPhone Models

    Different iPad/iPhone models have varying RAM capacities. Troubleshooting RAM-related issues might require specific considerations for each model. For example, an older iPad with limited RAM may experience more frequent performance lags during intensive tasks compared to a newer model with a larger RAM capacity. Diagnosing and addressing specific RAM-related issues for particular models might involve different strategies.

    Comparison of RAM Optimization Methods

    • Closing Unused Apps: This simple method effectively frees up RAM by terminating apps not currently in use. Pros: Easy to implement, requires minimal effort. Cons: Might require frequent execution, does not address the root cause of excessive RAM consumption.
    • Managing Background App Refresh: This feature allows users to control how often apps in the background refresh data. Pros: Helps conserve RAM by limiting background activity. Cons: Might result in delayed updates or notifications, requires user intervention.
    • App Usage Monitoring: Regularly monitoring app usage helps identify applications consuming excessive RAM. Pros: Provides insights into potential issues and allows targeted optimization. Cons: Requires active monitoring, may not always reveal the root cause.

    When to Seek Professional Help

    Knowing when to seek professional help for RAM issues on your iPad or iPhone is crucial. While many problems can be resolved through basic troubleshooting, some situations demand the expertise of a qualified technician. This section details the scenarios where contacting Apple Support or a qualified repair shop is the best course of action.Understanding the limits of your troubleshooting capabilities is key to preventing potential data loss or further hardware damage.

    This section will guide you in recognizing when a problem requires professional intervention.

    Recognizing Hardware Issues Requiring Intervention

    Troubleshooting RAM issues often involves identifying whether the problem stems from software conflicts or hardware malfunctions. Physical damage to the device, such as liquid spills or severe drops, can cause internal RAM damage that requires specialized repair. Issues like these are beyond the scope of typical user troubleshooting and should be addressed by a qualified technician.

    Software Issues Exceeding Troubleshooting Capabilities

    Complex software conflicts can manifest as persistent RAM issues that resist standard troubleshooting techniques. If repeated attempts to clear RAM, update iOS, or reinstall apps fail to resolve the problem, professional assistance is warranted. Specific examples include corrupted system files or malware infections that are difficult to diagnose and rectify without specialized tools and knowledge.

    Diagnosing and Documenting Problems for Support

    Thorough documentation is essential for effective communication with support personnel. When seeking help, gather detailed information about the problem, including specific error messages, steps to reproduce the issue, and the device’s configuration (iOS version, apps installed, etc.). A clear description of the symptoms and the steps taken to resolve them is crucial for accurate diagnosis.

    Backing Up Data Before Advanced Troubleshooting

    Backing up data is paramount before undertaking any potentially disruptive troubleshooting steps. RAM issues can sometimes lead to data loss if not handled with care. Using iCloud or a reliable external backup solution is highly recommended to safeguard your data before attempting any advanced troubleshooting or repair. A backup allows you to restore your device to its previous state if issues arise during the process.

    Potential Damage from Unrecommended Procedures

    Attempting procedures outside the recommended guidelines can potentially cause damage to your iPad or iPhone. Unauthorized modifications or forceful interventions can lead to unexpected and irreversible consequences. Sticking to Apple’s official guidelines and recommended troubleshooting steps is essential to prevent unintended harm. Attempting to open or repair the device yourself can void the warranty and compromise the device’s integrity.

    Final Thoughts

    In conclusion, managing RAM on your iPad or iPhone is a key component of ensuring optimal performance. By understanding how RAM works, recognizing potential issues, and implementing the appropriate solutions, you can keep your device running smoothly. This guide provided a comprehensive overview of RAM management, from basic troubleshooting to advanced techniques. We hope this helps you maintain a speedy and efficient mobile experience!

  • Use the iPhone App Store Your Mobile App Hub

    Use the iPhone App Store Your Mobile App Hub

    Use the iPhone App Store to unlock a world of possibilities on your mobile device. From captivating games to essential productivity tools, the App Store is your gateway to a vast and ever-evolving digital marketplace. This guide explores the App Store’s history, functionality, and the process of finding, developing, and using apps effectively.

    Dive into the intricacies of navigating the App Store’s diverse categories, mastering search and filtering options, and understanding the factors that influence app selection. We’ll also cover the app development lifecycle, monetization strategies, and the crucial aspects of user experience and security.

    Introduction to the iPhone App Store: Use The IPhone App Store

    The Apple App Store is more than just a digital marketplace; it’s a cornerstone of the mobile ecosystem. It’s the gateway to a vast library of applications, transforming how people interact with their phones and the world around them. This platform has profoundly impacted both users and developers, shaping the very landscape of mobile technology.The App Store isn’t just a repository of apps; it’s a dynamic environment that fosters innovation and fuels a thriving economy.

    It provides a reliable and curated space for users to discover and download software, and for developers to reach a global audience. This model has become a template for other app stores and digital marketplaces.

    The App Store’s Role in the Mobile Ecosystem

    The App Store’s significance extends beyond simply providing access to apps. It’s a vital component of the mobile ecosystem, enabling a symbiotic relationship between users and developers. Users benefit from a streamlined and secure platform for discovering and downloading software, while developers gain access to a massive and engaged user base. This interconnectedness drives innovation and fuels the growth of the mobile industry.

    Significance for Developers and Users

    The App Store’s value for developers lies in its ability to connect them directly with a vast audience. This provides an unparalleled opportunity to reach users worldwide and generate revenue from their applications. The App Store’s stringent review process ensures a high level of quality and user experience, which fosters trust and loyalty amongst users. For users, the App Store represents a curated selection of applications, allowing them to find exactly what they need.

    The diverse range of apps addresses various needs and interests, from productivity tools to entertainment and communication. This ease of access and extensive selection drives the adoption and use of mobile technology.

    History and Evolution of the App Store

    The App Store’s journey began in 2008, marking a pivotal moment in the evolution of mobile computing. Initially, it offered a limited selection of apps, but its rapid growth and expansion were driven by strong user demand and developer engagement. Over the years, the App Store has evolved to accommodate a vastly increased number of applications, representing diverse categories and functionalities.

    The introduction of features like in-app purchases and subscription models further expanded the revenue streams for developers and user engagement. This iterative evolution, driven by user feedback and technological advancements, continues to shape the future of mobile software.

    App Discovery Process within the App Store

    The App Store’s app discovery process is a sophisticated system that blends curated selections with user-driven search. Users can browse categories, search for specific applications, and utilize app recommendations based on their usage patterns. These recommendations are tailored to the user’s interests and app usage history, making it easier to find relevant and useful applications. Features such as app reviews and ratings further assist users in making informed decisions.

    Navigating the App Store

    The App Store, a digital marketplace brimming with applications for iPhones and iPads, demands a smooth and efficient navigation strategy. Understanding its structure and utilizing its search and filtering tools empowers users to find the perfect apps for their needs. This exploration dives into the intricacies of navigating this vast digital store, highlighting essential features and practical tips.The App Store’s layout isn’t just aesthetically pleasing; it’s strategically designed to streamline the app discovery process.

    Sections and categories are thoughtfully organized, guiding users through a curated selection of apps.

    Sections and Categories

    The App Store is divided into various sections and categories, each housing a diverse range of applications. These sections are a fundamental part of the navigation experience, providing a structured overview of the available apps. This organized structure enables users to quickly find apps related to their interests or needs. Examples include Games, Productivity, Education, and more.

    Subcategories within these sections further refine the search, offering a more specific selection of apps.

    Search Functionality

    The App Store’s search function is a powerful tool for locating specific apps. It allows users to input s, phrases, or app names to quickly locate desired applications. The search engine is intelligent enough to identify relevant apps even with misspelled words or incomplete terms. For instance, searching “photo editor” will yield results for apps related to photo editing, even if the user’s query isn’t perfectly precise.

    The search results are often displayed with a combination of app previews, screenshots, and user ratings, enabling a quick assessment of potential downloads.

    Filtering Options

    Filtering options within the App Store are crucial for narrowing down search results and finding apps that precisely match specific criteria. These options allow users to refine their search based on factors like price, age rating, app size, or supported devices. This granular control significantly streamlines the app discovery process, eliminating irrelevant options. For example, users can filter apps by price range, ensuring they only view apps within their budget.

    Another useful filter is the age rating, ensuring that apps are appropriate for the intended user.

    Browsing and Exploring Categories

    The App Store encourages browsing and exploration through various categories. Each category is designed to showcase a collection of apps within a specific niche. Users can easily switch between categories, exploring new genres and discovering apps they might not have initially considered. The use of visually appealing app thumbnails and concise descriptions helps in quickly assessing the potential of each app.

    The browsing experience is further enhanced by the integration of user reviews, offering insights into the real-world experiences of other app users.

    App Discovery and Selection

    Use the iPhone App Store

    Finding the perfect app in the vast iPhone App Store can feel like searching for a needle in a haystack. Fortunately, several factors guide users towards suitable apps, making the process more manageable. This section delves into these key elements, from the crucial role of reviews to the compelling nature of app previews.Understanding the factors influencing app selection is critical for both developers and users.

    Users are constantly evaluating apps based on their needs and desires, making informed choices crucial.

    Common Factors Influencing App Selection

    A multitude of factors shape app selection. User experience plays a pivotal role, with positive reviews and ratings often leading to higher downloads. The visual appeal of app screenshots and descriptions is also significant.

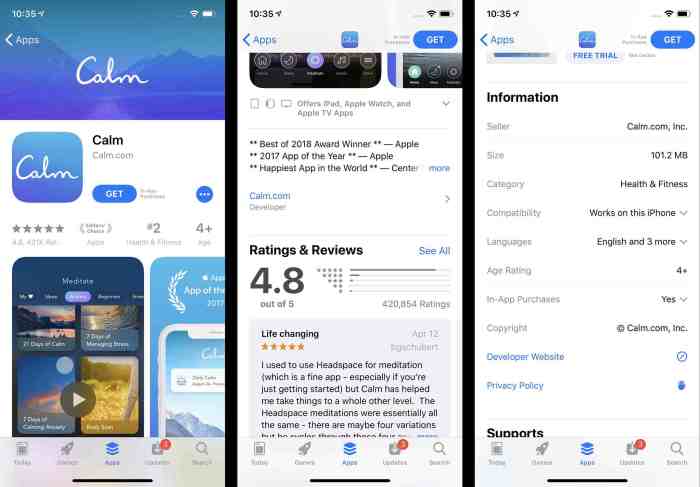
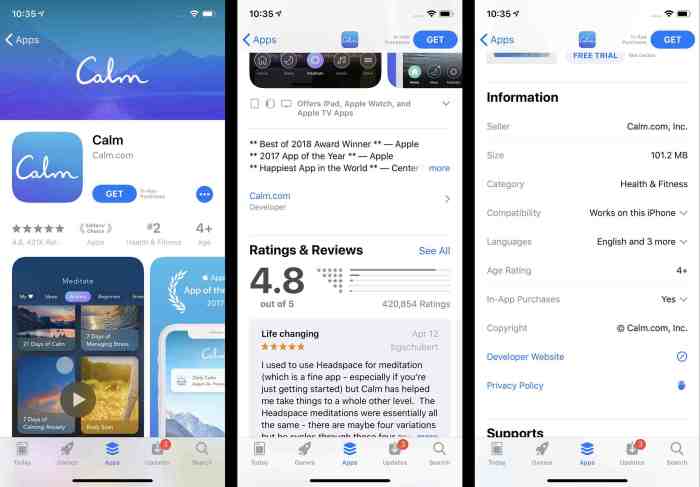
    • User Reviews and Ratings: User reviews and ratings provide invaluable feedback. Users share their experiences, highlighting both strengths and weaknesses. This direct feedback allows potential users to gauge the app’s efficacy and suitability. For instance, a high-rated app with numerous positive reviews is often perceived as more reliable and user-friendly, making it a more attractive choice compared to one with a few negative comments.

      The volume and sentiment of reviews often act as a strong indicator of user satisfaction.

    • App Screenshots and Descriptions: These elements are the first visual and textual impressions a user encounters. Compelling screenshots showcase the app’s features and functionality, while clear descriptions provide a concise overview. High-quality screenshots and detailed descriptions help users quickly understand the app’s purpose and potential value.
    • App Previews and Trailers: These dynamic elements offer a glimpse into the app’s functionality and potential value. Short video previews and trailers provide a more engaging experience compared to static screenshots, allowing users to see the app in action. This can often be a decisive factor in the selection process, particularly for apps that are feature-rich or have a complex user interface.

      A well-produced preview or trailer demonstrates the app’s usability, showcasing its core features and how they are integrated.

    The Importance of User Reviews and Ratings

    User reviews and ratings act as a powerful filter, shaping app selection decisions. These ratings and reviews offer a concise summary of user experiences, offering a glimpse into the app’s practical utility and ease of use.

    • Transparency and Trust: Authentic reviews provide crucial transparency, allowing users to make informed decisions. Trust is built when users see a range of experiences, not just praise.
    • Identifying Potential Issues: Constructive criticism, even negative reviews, can highlight potential issues with the app. These issues can range from technical glitches to confusing interfaces. Understanding potential drawbacks empowers users to choose an app that aligns with their needs.
    • Identifying High-Quality Apps: A consistent pattern of positive reviews suggests a well-designed and useful app. Positive reviews build confidence and credibility, making the app more appealing.

    App Screenshots and Descriptions

    The visual and textual elements of an app are vital for app discovery. They are the first impressions and serve as a critical component in the app selection process.

    • Visual Appeal: High-quality screenshots showcasing the app’s key features are essential. Visuals help users grasp the app’s functionality and design aesthetic.
    • Conciseness and Clarity: Descriptions must be concise and accurately reflect the app’s purpose. Clear descriptions provide users with a concise overview of the app’s features and capabilities.

    App Previews and Trailers

    Previews and trailers provide a dynamic way to engage potential users. They are often crucial in helping users make informed decisions about downloading an app.

    Using the iPhone App Store is a breeze, but sometimes you need a little inspiration. For example, check out Mike’s latest album, “Renaissance Man,” which you can listen to right now on the Downright Music site mike releases new album renaissance man listen. It’s a great way to discover new artists and keep your music library fresh.

    And once you’ve explored a bit, you’ll find the App Store is just as rewarding for finding new apps and games too!

    • Engaging Experience: Videos are a more engaging way to present an app’s features than static screenshots. They give users a sense of how the app functions and looks in action.
    • Demonstrating Functionality: Well-made previews and trailers clearly showcase the app’s core functionality. Potential users can observe the app’s user interface and experience firsthand, leading to better decision-making.

    App Development and Submission

    The App Store isn’t just a marketplace for apps; it’s a meticulously curated ecosystem. Developers need to understand the process of submitting their creations for approval, a process that requires adherence to specific guidelines and a comprehensive understanding of the App Store Review Guidelines. This meticulous approach ensures a high-quality user experience for everyone.Submitting an app to the App Store is a significant undertaking.

    It demands more than just building a functional application; it requires a deep understanding of Apple’s guidelines, a comprehensive submission process, and meticulous preparation for the rigorous review process. This commitment is vital for developers to successfully launch their apps and reach a wider audience.

    App Submission Process Overview

    The app submission process is a multi-step procedure designed to maintain the App Store’s quality and user experience. It’s a critical stage for app developers, ensuring their creations align with Apple’s standards and meet user expectations. Failure to follow these steps can result in delays or rejection.

    Using the iPhone App Store can be incredibly helpful for starting a plant nursery business, like Start a Plant Nursery Business. From inventory tracking to customer relationship management, there are apps designed to streamline every aspect of your operation. Finding the right tools on the App Store will help you manage your business efficiently, keeping your focus on growing your beautiful plants.

    • Preparation and Planning: Thorough preparation is paramount. This includes meticulously reviewing the App Store Review Guidelines, creating a comprehensive app metadata package, and ensuring all aspects of the app meet Apple’s requirements. Careful planning avoids costly and time-consuming revisions later.
    • Creating the App Submission Package: The app submission package is a critical component. It involves preparing all the necessary documentation, including screenshots, videos, descriptions, and marketing materials. The submission package is a crucial part of the review process, giving reviewers a comprehensive view of the application. A well-structured submission package is critical for successful review.
    • Submitting the Application: Once the submission package is complete, the developer submits the app through the Apple Developer Portal. This involves uploading the app binary, providing the required metadata, and adhering to all submission requirements.
    • Review Process: Apple’s review process is rigorous. Reviewers assess the app against numerous criteria, including functionality, design, performance, security, and compliance with App Store guidelines. The review process ensures that apps are safe, functional, and adhere to Apple’s standards.
    • Addressing Feedback and Revisions: Developers may receive feedback from Apple regarding any issues with their app. Addressing this feedback promptly and accurately is crucial for getting the app approved. Developers must be ready to iterate and adjust their apps based on the feedback received.

    App Store Review Guidelines

    Adherence to the App Store Review Guidelines is paramount. These guidelines Artikel the criteria Apple uses to evaluate app submissions. Understanding and adhering to these guidelines is critical for successful app submission.

    Using the iPhone App Store is a breeze, but sometimes you need a little guidance. Finding apps for zodiac compatibility, like whether Virgos are compatible with each other, can be surprisingly tricky. Luckily, Are Virgos Compatible with Each Other has a helpful resource to navigate this. Once you’ve got that sorted, you can easily find more apps to suit your needs.

    Just remember to check the reviews and ratings to make sure you’re getting the best experience.

    • Content Guidelines: Content must be appropriate and adhere to Apple’s standards. This includes avoiding inappropriate or harmful content. Ensuring compliance with these guidelines is crucial for the app’s approval.
    • Technical Requirements: Apps must meet specific technical requirements, including performance, security, and compatibility with various iOS devices. These requirements are critical for ensuring a positive user experience across a wide range of devices.
    • Design and Usability: The app’s design and usability must be well-considered. A user-friendly interface and clear functionality are essential. A user-friendly interface is a key factor in the success of any app.
    • Privacy and Security: The app must be secure and respect user privacy. Data handling and user security are critical considerations. Adherence to privacy and security guidelines is essential for user trust.

    Common Submission Issues, Use the iPhone App Store

    Understanding common submission issues can help developers avoid pitfalls.

    • Inaccurate Metadata: Incorrect or incomplete metadata can lead to rejection. Accurate and comprehensive metadata is essential for the review process.
    • Non-Compliance with Guidelines: Failure to adhere to App Store Review Guidelines can lead to rejection. Thorough understanding and compliance with the guidelines is paramount.
    • Poor App Performance: Apps must function smoothly and efficiently. Ensuring optimal performance is vital for a positive user experience.

    In-App Purchases and Monetization

    Unlocking revenue streams and engaging users are critical for app success in the App Store ecosystem. In-app purchases (IAP) are a powerful tool for developers to generate income beyond the initial app download. Understanding the various types of IAPs, revenue models, and the importance of effective monetization strategies is essential for building profitable and user-friendly applications.Effective monetization strategies are crucial to the long-term viability of an app.

    By thoughtfully integrating in-app purchases, developers can not only generate revenue but also provide value to users. This ensures the app continues to offer a rewarding experience, encouraging engagement and positive word-of-mouth.

    Types of In-App Purchases

    In-app purchases offer diverse options for monetizing an app. Different purchase types cater to various user needs and app functionalities.

    • Consumables: These are items that are used up or disappear after use, often providing temporary advantages. Examples include extra lives in a game, in-game currency, or temporary boosts.
    • Non-consumables: These are items that remain in the user’s possession, providing permanent benefits. This could include cosmetic items, powerful tools, or premium content like extra levels or characters.
    • Subscriptions: This model offers recurring payments for access to specific features or content. These are increasingly popular, enabling access to premium features, or regular updates.
    • One-time Purchases: These are items that are purchased once and remain accessible to the user. Examples include premium features, additional content, or exclusive skins.

    Revenue Models for App Developers

    Understanding the available revenue models is key to determining the most appropriate approach for an app. Different models align with various app functionalities and target user demographics.

    • Freemium: This model offers a free core app experience with in-app purchases for premium features or content. This is a common model, attracting a broad audience while generating revenue from motivated users.
    • Paid Apps: This model involves a one-time purchase for full access to all features. This is often a suitable approach for apps with a clear value proposition and a defined user base.
    • Subscription Models: Apps offering recurring payments for access to specific content or features. This model provides a predictable revenue stream, while offering users ongoing access to app benefits.

    Importance of Monetization Strategies in App Development

    Monetization strategies are integral to the app’s long-term success. Effective strategies not only generate revenue but also enhance the user experience.

    • User Retention: Thoughtful monetization can directly impact user retention by offering value and avoiding frustrating paywalls.
    • App Sustainability: A successful monetization strategy ensures the app’s long-term sustainability, enabling ongoing development and support.
    • Value Proposition: Clearly defined monetization plans allow developers to communicate the value of their app to potential users.

    Role of In-App Purchases in User Experience

    Well-integrated in-app purchases contribute to a positive user experience. This is achieved by careful design and a balanced approach.

    • Transparency: Clear communication about in-app purchases is crucial for building trust and avoiding frustration.
    • Accessibility: In-app purchases should be easily accessible and integrated into the app’s flow.
    • Value Alignment: The value provided by the in-app purchases should align with the user’s needs and the overall app experience.

    User Experience and Design

    The success of an iPhone app hinges significantly on its user experience (UX). A well-designed app not only makes using the app enjoyable but also facilitates its purpose, whether it’s entertainment, productivity, or communication. A compelling UX fosters user satisfaction, encouraging repeat use and positive word-of-mouth promotion. A poor UX, conversely, can deter users and lead to a diminished app’s market presence.A meticulously crafted user interface (UI) plays a crucial role in shaping this experience.

    Clear visual cues, intuitive navigation, and aesthetically pleasing design elements collectively contribute to a user-friendly interface. This approach, rather than a haphazard design, leads to a satisfying user journey.

    Importance of a User-Friendly Interface

    A user-friendly interface is paramount for app success. It directly impacts user engagement, satisfaction, and ultimately, the app’s overall success. Ease of use translates to quicker adoption and retention. Users are more likely to continue using an app that feels natural and intuitive to navigate. Conversely, a complex or confusing interface can lead to frustration and abandonment.

    Role of Intuitive Navigation

    Intuitive navigation is critical for user satisfaction. Users should be able to easily find what they need without extensive searching. Consistent design patterns and logical hierarchies within the app’s structure are key. A well-structured navigation system reduces cognitive load, allowing users to focus on the app’s core function.

    Impact of App Design on User Engagement and Satisfaction

    App design directly influences user engagement and satisfaction. Visual appeal, ease of use, and functionality all contribute to the user experience. For example, a visually appealing design can attract and retain users, while a user-friendly layout enhances usability. Consistent branding and a clear visual hierarchy further improve user engagement. Well-executed design, from color palettes to typography, contributes to an immersive and positive experience.

    Users will be more likely to return to an app that feels visually appealing and is easy to use.

    Examples of Well-Designed Apps

    Many apps exemplify excellent user experience and design. One example is the “Reminders” app. Its simple interface, straightforward functionality, and intuitive navigation make it incredibly user-friendly. Another noteworthy example is the “Camera” app. Its clean design, easy-to-use controls, and high-quality image capture capabilities contribute to a seamless experience.

    These examples highlight how well-thought-out design choices can greatly enhance the overall user experience.

    Security and Privacy

    The iPhone App Store is built on a foundation of trust, ensuring a secure and private environment for users. This involves rigorous security measures at every stage, from app development to user interaction. Protecting user data is paramount, and the App Store prioritizes safeguarding sensitive information.App developers and users alike benefit from a system that prioritizes both security and privacy.

    This approach helps foster a positive user experience while maintaining a high level of trust.

    App Store Security Measures

    The App Store employs a multi-layered approach to app security. These measures include rigorous vetting processes, which help prevent malicious or harmful apps from reaching users. The continuous monitoring and evaluation of apps are critical to maintaining the integrity of the platform. Furthermore, the App Store’s infrastructure is designed with robust security protocols to protect user data.

    App Reviews and Vulnerability Identification

    User reviews play a crucial role in identifying potential security vulnerabilities. By actively monitoring and analyzing user feedback, the App Store team can detect and address issues early on. User reports of unusual behavior or functionality in apps can highlight areas needing attention. This active feedback loop is a significant component of the App Store’s proactive security measures.

    Privacy Policies and User Data Handling

    Each app must adhere to strict privacy policies. These policies detail how the app collects, uses, and shares user data. Transparent communication about data practices builds trust and allows users to make informed decisions about the apps they download. The App Store demands that these policies are meticulously reviewed and adhere to established industry standards.

    User Data Protection

    The App Store employs advanced encryption and security measures to protect user data. These methods help safeguard user information during transmission and storage. Data breaches are mitigated through robust protocols and regular security audits. The protection of user information is paramount to the success of the App Store.

    App Store Trends and Future

    The App Store, a digital marketplace for mobile applications, continues to evolve, mirroring the dynamic nature of technology and user expectations. This evolution demands a deep understanding of emerging trends in app development, user behavior, and the ever-changing technological landscape. This section delves into these factors, offering insights into the future direction of the App Store ecosystem.The App Store is not just a platform; it’s a reflection of our digital lives.

    Understanding its trajectory requires anticipating the needs and preferences of users, recognizing the influence of emerging technologies, and predicting how these factors will shape the future of app development and discovery.

    Emerging Trends in App Development

    The app development landscape is constantly shifting, driven by user expectations and technological advancements. Developers must adapt to stay relevant and maintain user engagement. Key trends include the rise of personalized experiences, AI-powered functionalities, and an increased emphasis on user privacy and security.

    New Features and Functionalities in the App Store

    The App Store itself is undergoing a transformation, adding features to improve user experience and app discovery. These include enhanced search algorithms, personalized recommendations, and more robust filtering options to help users find relevant applications. The focus is on intuitive navigation and targeted suggestions.

    Impact of Emerging Technologies on App Store Usage

    Emerging technologies are profoundly influencing app store usage. Augmented reality (AR) and virtual reality (VR) are creating immersive app experiences, pushing the boundaries of what’s possible. Machine learning (ML) is also reshaping app development, enabling more personalized and intelligent applications. The integration of these technologies is altering the way users interact with apps and the App Store.

    Prediction of the Future Direction of the App Store Ecosystem

    The App Store’s future is likely to be characterized by a continued emphasis on user experience and security. Developers will need to prioritize user privacy and data security, while simultaneously embracing innovative technologies to create immersive and engaging experiences. The App Store will likely become more intelligent, leveraging machine learning to personalize app recommendations and facilitate seamless app discovery.

    The rise of AR/VR apps will continue to shape the platform, creating entirely new categories and interaction paradigms. Examples of this can be seen in the growing popularity of educational AR apps, gaming experiences, and the increasing use of virtual shopping malls.

    Organizing Information

    The App Store’s vast library of apps necessitates a well-organized structure to help users find what they need. Categorization and genre classification are crucial for efficient app discovery. Understanding how apps are organized, and the underlying principles of app store optimization (ASO), are key to successful app development and marketing. A clear understanding of these elements also benefits users, enabling them to find the apps that meet their specific needs and preferences.

    App Categories and Subcategories

    The App Store’s hierarchical structure allows for deep exploration of diverse app categories. This table Artikels some key categories and subcategories, providing examples, brief descriptions, and estimated user ratings. Accurate ratings, while not always definitive, offer a valuable snapshot of user engagement and satisfaction.

    Category Subcategory Example App Name Description Estimated User Rating
    Productivity Task Management Todoist A powerful task management app with features for organization, prioritization, and collaboration. 4.8
    Productivity Calendar Google Calendar A robust calendar app integrating with other Google services. 4.7
    Entertainment Games Angry Birds Classic casual game with engaging gameplay and addictive elements. 4.5
    Entertainment Music Spotify Streaming music platform with extensive library and personalized recommendations. 4.6
    Utilities Calculators Calculator Basic and advanced mathematical calculator. 4.4

    Popular App Genres

    Understanding the features, target audience, and pricing models of popular app genres helps developers tailor their apps effectively. This table demonstrates the diversity of genres within the App Store.

    Genre Features Target Audience Pricing Models
    Casual Games Simple, engaging gameplay; short playtime; often free-to-play with optional in-app purchases. Broad audience, appealing to casual gamers. Free-to-play with in-app purchases, or single-purchase.
    Productivity Apps Task management, organization, reminders, calendars, and project management. Professionals, students, and individuals seeking efficient workflow tools. Free, or subscription-based.
    Educational Apps Interactive lessons, quizzes, tutorials, and educational content. Students, educators, and individuals seeking learning opportunities. Free, or subscription-based.

    In-App Purchase Types

    Different in-app purchase types cater to various monetization strategies. The frequency of use and impact on user experience varies significantly.

    Purchase Type Frequency of Use Impact on User Experience
    Consumable Items High; frequently purchased. Can enhance gameplay but can also be frustrating if not implemented well.
    Non-Consumable Items Moderate; purchased less frequently. Adds value and functionality, usually impacting long-term user engagement.
    Subscriptions Variable; depends on app and user. Offers ongoing access to features and content. Can lead to retention if valuable.

    App Submission Steps

    A clear understanding of the app submission process is essential for developers. This structured approach ensures a smooth and efficient submission.

    • Prepare the App Package: Gather all necessary files, including the app’s executable, resources, and documentation. Comply with all App Store guidelines for file size, structure, and format. A well-organized package is essential for a successful submission.
    • Create App Metadata: Develop comprehensive and accurate descriptions, screenshots, and video previews that accurately represent the app’s functionality and appeal to potential users. s are vital for search engine optimization (). A clear and compelling description significantly improves the app’s discoverability.
    • Submit the App: Use the Apple Developer Portal to submit the app package and metadata. Address any feedback promptly. Careful attention to detail and a methodical approach during this phase can significantly impact the app’s success.
    • Review and Approval: Apple reviews each submission for compliance with guidelines. Be prepared for potential revisions and feedback. Thorough responses to feedback expedite the review process.

    Illustrative Examples

    Use the iPhone App Store

    The iPhone App Store showcases a vast array of applications, each catering to diverse user needs and preferences. From engaging mobile games to powerful productivity tools, social media platforms to essential utilities, the App Store exemplifies the versatility and potential of mobile applications. These examples highlight the innovative features, user experiences, and design considerations that contribute to the success of various app categories.

    Mobile Game App: “Skyfall Saga”

    Skyfall Saga is a mobile strategy game where players build and manage their own enchanted kingdom. Unique features include a dynamic weather system that impacts resource gathering and combat, a robust crafting system with over 100 unique items, and a cooperative multiplayer mode that allows players to team up and conquer challenging dungeons. The game’s vibrant graphics and intuitive controls make it easily accessible to casual players while offering a deep strategic layer for dedicated players.

    The in-app purchases focus on cosmetic enhancements and additional resources, not game-altering advantages, keeping the core gameplay experience fair for all players.

    Productivity App: “TaskFlow Pro”

    TaskFlow Pro is a productivity app designed for managing complex projects and tasks. Its usability stems from its intuitive interface, allowing users to create custom workflows and assign tasks with clear deadlines and dependencies. Users can create visually appealing Kanban boards to track progress, set reminders, and collaborate with team members in real-time. Importantly, the app integrates seamlessly with other productivity tools, like calendar applications and email services.

    Its ability to handle complex projects with clarity and maintain organization makes it a valuable tool for professionals and students alike.

    Social Media App: “ConnectSphere”

    ConnectSphere is a social media app that emphasizes meaningful connections. Its popularity is rooted in its focus on fostering genuine interactions. The app uses algorithms to match users with people who share similar interests and values, rather than simply presenting a feed of random updates. ConnectSphere features a robust messaging system that supports group chats, video calls, and direct messaging.

    Visual elements, like interactive stories and engaging content suggestions, contribute to its user engagement. Its design prioritizes privacy and security, encouraging authentic interactions.

    Utility App: “PocketScanner Pro”

    PocketScanner Pro is a utility app for scanning documents and receipts. Its purpose is to streamline document management, reducing the need for physical paper copies. Users can easily scan and save documents in various formats, including PDF and JPEG. The app also provides OCR (Optical Character Recognition) functionality, allowing users to extract text from scanned documents. This enables easy searching and sharing of important information.

    It is particularly useful for professionals, students, and individuals who handle numerous documents regularly.

    Conclusion

    In conclusion, the iPhone App Store is more than just a platform; it’s a dynamic ecosystem that connects users with developers and innovation. From its rich history to its future potential, the App Store continues to shape the mobile experience. Understanding its features and processes empowers you to navigate this digital landscape with confidence and discover the perfect apps for your needs.

  • Make a Private Album on iPhone Your Guide

    Make a Private Album on iPhone Your Guide

    Make a Private Album on an iPhone is crucial for safeguarding precious memories and sensitive images. This guide walks you through creating, accessing, and sharing private albums, emphasizing security and privacy measures. We’ll cover everything from the initial setup to troubleshooting common issues, empowering you to manage your photos with confidence and control.

    Private albums on iPhones offer a high level of security, unlike public albums where anyone with a link can view your photos. Understanding the differences between public and private albums is key to maintaining your privacy. This comprehensive guide delves into the practical aspects of creating, managing, and sharing photos within these secure digital spaces.

    Introduction to Private Albums on iPhone

    Make a Private Album on an iPhone

    Private albums on iPhones offer a powerful way to safeguard sensitive or personal photos and videos. They provide a dedicated space for storing content that you want to keep secure and inaccessible to unauthorized individuals. This feature is particularly useful for storing intimate moments, family heirlooms, or professional material that you wish to maintain a high level of privacy over.Using private albums helps maintain control over your digital memories.

    They create a separate repository for images and videos, effectively separating them from your public photo library. This ensures that only those you specifically authorize can view the content, enhancing security and privacy.

    Security Measures in Private Albums

    Private albums employ robust security measures to protect the confidentiality of their contents. Access to these albums is restricted to authorized users, and they are not publicly accessible. This is achieved through various security protocols that ensure only individuals with explicit permission can view the stored photos and videos.

    Differences Between Public and Private Albums

    This table Artikels the key distinctions between public and private photo albums on iPhones:

    Feature Public Album Private Album
    Access Anyone with the link Only authorized users
    Sharing Can be shared easily Requires explicit permission
    Privacy Limited privacy High level of privacy

    Public albums, by their nature, are designed for sharing. Anyone with the shared link can access the images and videos. This is beneficial for sharing family photos with extended relatives or showcasing work projects. Conversely, private albums provide a higher degree of control over access and sharing. The user maintains strict control over who sees the contents, fostering a greater level of privacy.

    Creating a Private Album

    Creating a private album on your iPhone is a simple process that allows you to securely store photos and videos that you want to keep away from prying eyes. This is especially useful for sensitive content or memories you want to protect from unwanted access. This guide will walk you through the steps involved, from initial setup to adding and organizing your media.Private albums offer a layer of privacy, keeping your personal content secure and accessible only to you.

    Figuring out how to make a private album on your iPhone can be surprisingly straightforward. While I’m currently obsessed with the news that the Fugees have postponed their reunion tour, fugees postpone reunion tour , it’s a good time to organize those personal photos and music files into a private album. This way, you can keep cherished memories safe and sound, without worrying about unwanted eyes on your collection.

    This is a critical aspect of digital security, especially when dealing with personal information or sensitive moments.

    Creating a New Private Album

    This section Artikels the steps to create a new private album on your iPhone.

    1. Open the Photos app on your iPhone.
    2. Tap the “+” button located at the bottom-right corner of the screen. This action initiates the creation of a new album.
    3. Select “Create Album” from the options presented.
    4. Choose the option “Private Album”.
    5. A new album will be created. Enter a name for the album that clearly identifies its contents. Avoid generic names like “New Album” to ensure easy identification later.

    Naming and Categorizing Photos

    This section explains how to effectively name and categorize photos within your private album for easy retrieval.

    1. Tap on the newly created private album.
    2. To add photos, tap the “Add Photos” button, typically located at the top of the screen.
    3. Select the photos you wish to add from your photo library.
    4. Optionally, you can rename the photos or add s to better categorize them. The system allows you to use multiple tags to ensure clarity.
    5. To rename a photo, tap the photo, then tap “Edit” and type the desired name in the photo’s title field. To categorize, tap on “Tags” to add relevant s.

    Adding Photos and Videos

    Several methods allow you to add photos and videos to your private album. Choose the method that best suits your needs.

    • Direct Import: Select the photos or videos you want to add from your camera roll or other sources and add them directly to the private album. This method is simple and straightforward.
    • Bulk Import: If you have a collection of photos or videos you want to add, select the files to be imported and choose the album. This allows you to add multiple items at once.
    • Sharing: If the photos are from another source (e.g., email attachments or messages), you can save them to your camera roll and then import them to the private album. This is useful for adding photos that are not directly captured on your iPhone.

    Step-by-Step Guide to Creating a Private Album

    This detailed guide provides a comprehensive approach to creating a private album.

    1. Open the Photos app on your iPhone.
    2. Navigate to the “Albums” tab.
    3. Tap the “+” button at the bottom-right of the screen.
    4. Select “Create Album”.
    5. Choose “Private Album” from the options.
    6. Name the album descriptively. For example, “Vacation Memories (2024)” or “Family Gathering”.
    7. Add photos and videos by selecting the items from your photo library or other sources.
    8. Organize the photos by adding relevant tags or renaming them for easier retrieval.

    Accessing and Managing Private Albums

    Accessing and managing private albums on your iPhone is straightforward. Once created, these albums offer a secure way to store photos and videos that you want to keep private. This section will detail how to navigate, manage, and share content within these special albums.

    Figuring out how to make a private album on your iPhone can be tricky, but it’s surprisingly straightforward. While you’re mastering the art of digital privacy, have you considered optimizing your Windows experience? Learning how to enable Task Manager in Windows, for example, can dramatically improve your system performance. Enable Task Manager in Windows can unlock hidden performance potential and is a great skill to have, even if your focus is primarily on your iPhone’s photo organization.

    Ultimately, creating a private album on your iPhone is all about safeguarding your memories and controlling who sees them.

    Accessing a Private Album, Make a Private Album on an iPhone

    Private albums are designed for discreet storage, ensuring only you have access. To locate a private album, navigate through the Photos app on your iPhone. The exact path will vary slightly depending on the iPhone model and iOS version. Generally, you’ll find private albums listed separately from your other photo collections. The album’s name will clearly indicate its private status, providing a visual distinction from public albums.

    Managing Photos and Videos

    Within a private album, you can perform common photo management tasks. Editing, deleting, and rearranging photos are all possible. These actions follow standard iOS photo management procedures.

    Deleting Photos and Videos

    Deleting photos and videos from a private album is straightforward. Select the images or videos you want to remove, then tap the delete button. A confirmation prompt will typically appear to ensure you intend to delete the selected items.

    Editing Photos and Videos

    Editing photos and videos within a private album is similar to editing in other photo libraries. Use the editing tools available within the Photos app to adjust brightness, contrast, filters, and other parameters.

    Rearranging Photos and Videos

    Rearranging photos and videos is possible. You can drag and drop images or videos to reposition them within the album’s sequence.

    Sharing Photos and Videos

    Sharing photos and videos from a private album is carefully controlled. You can share selected items with specific contacts or groups. Sharing options might include sending via Messages, email, or using other compatible apps.

    Methods for Accessing and Managing Private Albums

    Managing your private albums involves various methods. This table Artikels different approaches.

    Method Description Example
    App Interface Navigate the Photos app to access the album. Tap on the private album icon.
    File System Access through a file system app (if supported). Use a file explorer app (limited support for this method).
    Third-party apps Utilize third-party photo management apps. Use an image editing app for editing photos in the private album.

    Sharing Photos from a Private Album

    Make a Private Album on an iPhone

    Sharing photos within a private album allows for a controlled and selective distribution of images. This feature is invaluable for preserving sensitive or personal moments while ensuring that only trusted individuals have access. This section will explore various methods for sharing photos from a private album, emphasizing security and privacy.Sharing photos from a private album offers several advantages.

    It lets you selectively share specific images with individuals or groups, preventing unwanted exposure. This control also allows you to maintain the privacy and security of your content.

    Different Ways to Share Photos

    Sharing photos from a private album can be done in several ways, each with varying levels of control and recipient access. Direct sharing allows for targeted distribution, while group sharing is useful for broader dissemination within a pre-defined circle.

    • Direct Sharing: This method allows you to share photos with specific individuals. It is ideal for situations where you want to share images with only a select few people. This approach provides the highest level of control over who sees the shared content.
    • Group Sharing: Sharing with a group of people is facilitated through the use of existing contacts or groups. This is particularly useful when you need to distribute photos to a larger audience, such as family members or colleagues, while maintaining a degree of privacy.

    Sharing with Specific Individuals

    To share photos with specific individuals, you typically select the desired images and choose the recipient from your contacts. The exact procedure may vary slightly depending on the iPhone model and iOS version. However, the general steps remain consistent.

    1. Locate the private album containing the photos you wish to share.
    2. Select the images you want to share.
    3. Choose the “Share” option from the album’s menu or within the image selection.
    4. Select the desired recipient from your contacts list. This is usually done via a contact selection interface.
    5. Confirm the sharing request to finalize the process.

    Sharing with a Group of People

    Sharing with a group of people is often done through existing contacts or groups. This approach simplifies sharing with numerous individuals.

    1. Identify the group or contact group you want to share the photos with.
    2. Select the images you want to share from the private album.
    3. Choose the “Share” option and select the group or contact group from the sharing interface.
    4. Confirm the sharing request to complete the process.

    Controlling Sharing Permissions

    Controlling sharing permissions for photos within a private album is crucial to maintaining privacy. This level of control allows you to manage access and limit exposure of sensitive images.

    • Expiration Date: Set an expiration date for the shared photos, after which the images will no longer be accessible to the recipient. This is a helpful feature for time-sensitive sharing, such as event photos.
    • Download Restrictions: Prevent recipients from downloading the shared images by selecting the appropriate option in the sharing settings. This ensures that the photos remain within the controlled environment.
    • Viewing Permissions: Limit viewing permissions to specific durations. This feature can be beneficial in situations where you need to share images temporarily.

    Security Considerations

    Sharing photos from a private album requires careful consideration of the recipient and their trustworthiness. Be cautious about sharing sensitive information.

    Sharing sensitive or private information through a private album demands meticulous consideration of the recipient. Ensure you are comfortable with the recipient’s ability to maintain the confidentiality of the shared content. Avoid sharing images that could compromise your personal safety or privacy.

    Security and Privacy Considerations

    Protecting your private photos is paramount. Apple’s iOS provides robust security features, but understanding how to leverage them is key to maintaining your privacy. This section delves into the security and privacy aspects of private albums, outlining how to safeguard your sensitive images.Private albums, while designed for enhanced privacy, require a proactive approach to security. A combination of iOS features and user-applied strategies ensures your photos remain confidential.

    Knowing how to prevent unauthorized access and understand the associated privacy policies is essential.

    Security Features of Private Albums

    Private albums on iPhones leverage encryption to protect their contents. This means that even if someone gains physical access to your device, the photos within the private album remain protected. The encryption process transforms the data into an unreadable format, making it extremely difficult to decipher without the correct decryption key (your device’s passcode).

    Figuring out how to make a private album on your iPhone can be a snap. It’s all about those settings, and honestly, it’s super straightforward. But, if you’re also looking for ways to manage your computer remotely, you might find Remotely Shutdown a Computer a useful resource. Ultimately, creating a private photo album is a simple process that lets you control who sees your memories, and it’s a great way to keep your photos organized and secure.

    Privacy Policies Related to Private Albums

    Apple’s privacy policy covers how your data, including photos in private albums, is handled. Crucially, Apple states that it does not access the content of private albums unless a court order or other legal process compels it. This policy underscores the confidentiality of your private data.

    Preventing Unauthorized Access to Private Albums

    Strong passcodes are essential. Enable Face ID or Touch ID for added security layers, and consider using two-factor authentication where available for enhanced security. These measures prevent unauthorized access to your device, and subsequently, your private albums. Actively monitoring your device for any unusual activity is also a crucial part of protecting your private albums.

    Examples of Privacy Settings for Controlling Access

    Controlling access to your private albums is crucial. You can restrict access to certain photos by assigning different access levels to individual contacts. Sharing albums with limited access controls empowers you to control who sees what and when. You can choose whether to allow contacts to download, edit, or simply view the photos within the album.

    Recommendations for Securing Your iPhone and Its Data

    Regularly updating your iPhone’s software ensures that you benefit from the latest security patches. These updates often include crucial fixes that address vulnerabilities, safeguarding your device from potential threats. Keeping your device’s operating system updated is vital. Employing a strong passcode, enabling two-factor authentication (where applicable), and regularly backing up your device’s data, including private albums, are further essential steps in securing your iPhone and its data.

    This allows for recovery in case of device loss or damage.

    Troubleshooting Private Albums

    Private albums offer a secure way to store cherished photos and videos. However, occasional issues can arise. This section provides solutions to common problems you might encounter while managing your private albums on your iPhone.Understanding the potential pitfalls and knowing how to resolve them empowers you to maintain the privacy and integrity of your photos.

    Common Issues with Private Albums

    Issues with private albums can stem from various factors, including incorrect settings, temporary glitches, or even accidental deletions. A proactive approach to troubleshooting can prevent frustration and ensure you have access to your private photos.

    • Album Not Accessible: This issue arises when the iPhone cannot locate or access the private album. Possible causes include insufficient storage space, corrupted data within the album, or an app glitch. Checking storage space and restarting the device are often effective solutions. If the problem persists, a backup and restore operation might be necessary.
    • Sharing Permissions Not Set Correctly: If you encounter problems sharing photos from a private album, verify that the sharing permissions are properly configured. Ensure that the recipient has been granted the appropriate access rights. Review the sharing settings within the album to confirm that the correct contacts or groups have been added. If the problem persists, a complete review of sharing settings or contacting support might be required.

    • Photo Deletion Issue: Accidental or unexpected photo deletions from private albums are frustrating. Ensure that the deletion wasn’t a result of a faulty app update, or other system-related issues. Double-check the intended actions to confirm whether the deletion was accidental. In case of accidental deletion, exploring recovery options is essential. This may involve checking the device’s backup or contacting support.

    Resolving Album Accessibility Issues

    Addressing accessibility problems in private albums often involves a systematic approach. Troubleshooting steps can range from simple actions like restarting the device to more involved methods like restoring from a backup.

    • Insufficient Storage: Free up space on your iPhone by deleting unnecessary files, apps, or media. A full device can cause problems with accessing private albums.
    • Corrupted Data: If the album is corrupted, a backup and restore from a previous point might be necessary. This process can be complex, so refer to the Apple support website for detailed instructions.
    • App Glitch: Restarting the Photos app or even the entire device might resolve temporary app glitches. If the problem persists, uninstalling and reinstalling the Photos app may help.

    Recovering Deleted Photos

    Losing photos from a private album can be distressing. Employing the right recovery techniques can help you regain access to these cherished memories.

    • Backup and Restore: If you have enabled iCloud Photo Library or a local backup, restoring from a previous backup might recover deleted photos.
    • Recovery Software: Third-party recovery software might be able to retrieve deleted photos, but use caution when using such software. Ensure you understand the risks and potential consequences involved before proceeding.

    Contacting Support

    If troubleshooting steps fail to resolve the issue, contacting Apple support might be necessary. Gather information about the problem, including the error messages and steps you have already taken.

    • Documentation: Before contacting support, gather information about the issue, such as error messages, and the steps you have already taken.
    • Support Channels: Apple provides various support channels, including online help, phone support, and in-person assistance. Choose the channel that best suits your needs.

    Common Errors

    • Error 1: Album Not Accessible: This error suggests the album’s data might be corrupted or inaccessible due to insufficient storage. Try restarting your iPhone or checking storage space.
    • Error 2: Sharing Permissions Not Set Correctly: Verify that the sharing settings within the album are correctly configured and the intended recipient has the correct access permissions.
    • Error 3: Photo Deletion Issue: Confirm that the deletion wasn’t accidental or due to a system issue. Explore backup options or recovery software if necessary.

    Closing Notes: Make A Private Album On An IPhone

    In conclusion, creating and managing private albums on your iPhone is a straightforward process that provides essential control over your photos and videos. By understanding the steps Artikeld in this guide, you can confidently protect your privacy and share photos selectively. Remember to prioritize security measures and be mindful of sharing permissions to maintain the confidentiality of your private album contents.

  • See Blocked Contacts on iPhone A Comprehensive Guide

    See Blocked Contacts on iPhone A Comprehensive Guide

    See Blocked Contacts on iPhone, a crucial skill for maintaining a healthy digital life. This guide delves into the often-overlooked world of blocked contacts, exploring the reasons behind blocking, different methods for locating blocked numbers across various iPhone models, and the features for managing your blocked list. We’ll cover everything from simple steps to advanced usage scenarios, making it easy to understand and apply these techniques.

    Knowing how to locate and manage blocked contacts is more than just a technical skill. It’s about regaining control over your communication channels, protecting your privacy, and efficiently managing your digital relationships.

    Understanding Blocked Contacts

    Blocking contacts on your iPhone is a powerful tool for managing your interactions with others. It allows you to control who you receive calls and messages from, fostering a more comfortable and secure communication environment. This is particularly useful for dealing with unwanted or problematic contacts.Blocking a contact prevents them from reaching you through various communication channels on your iPhone.

    This includes calls, messages, FaceTime calls, and sometimes even app-specific interactions, depending on the application. This feature is a key component of maintaining a healthy digital life.

    Reasons for Blocking Contacts

    Users block contacts for a variety of reasons, ranging from simple annoyance to more serious concerns. Sometimes, it’s a temporary measure to prevent unwanted communication. Other times, it signifies a more permanent separation from a contact.

    • Unwanted or harassing communication is a common reason for blocking. This could involve repeated calls, messages, or social media interactions that are unwanted or offensive.
    • Relationship issues or disagreements can also lead to blocking. A falling out with a friend or family member might result in blocking to avoid further conflict or unpleasantness.
    • Safety concerns are a significant reason for blocking. Potentially dangerous or threatening contacts are often blocked to ensure personal safety.
    • Spam or unwanted marketing messages are frequently blocked to reduce the number of irrelevant notifications and distractions.

    Examples of Blocked Contacts, See Blocked Contacts on iPhone

    Blocking isn’t limited to specific types of people. It can apply to various individuals and situations.

    • A former romantic partner who is causing distress might be blocked.
    • A persistent telemarketer or spammer can be blocked to prevent future calls.
    • A family member who frequently sends unwanted or upsetting messages could be blocked.
    • A friend who frequently sends messages with inappropriate content might be blocked to maintain boundaries.

    Identifying Blocked Contacts on Different iPhone Models

    The process for finding blocked contacts may vary slightly depending on the iPhone model and operating system.

    • Older iPhone models (pre-iOS 16): Identifying blocked contacts often involved manually checking the contact list and searching for a blocked number. This required a degree of active investigation.
    • Newer iPhone models (iOS 16 and later): The method for locating blocked contacts is streamlined and more intuitive. It usually involves a dedicated section within the Phone app or Settings app.

    Comparison of Methods Across iPhone Operating Systems

    The table below highlights the methods for locating blocked contacts across different iPhone operating systems.

    Figuring out how to see blocked contacts on your iPhone can be surprisingly tricky, but it’s a straightforward process. Sometimes, though, you might find yourself needing to deal with more complex situations, like figuring out how to put your Tesla in neutral – a surprisingly common question. Thankfully, you can find a helpful guide on Put Tesla in Neutral if you’re facing that challenge.

    Once you’ve mastered that, you’ll be back to smoothly navigating your iPhone’s contact list and blocking unwanted calls!

    iPhone Operating System Method for Locating Blocked Contacts
    iOS 15 and earlier Usually involves manually searching through contacts and checking for a blocked status, often requiring a manual search for the blocked number.
    iOS 16 and later A dedicated section within the Phone app or Settings app usually provides a clear list of blocked contacts.

    Locating Blocked Contacts

    Finding blocked contacts on your iPhone is a straightforward process, allowing you to easily manage your communication preferences. Knowing how to locate them can be helpful in various scenarios, such as recalling why you blocked a contact or adjusting your communication settings. This process is designed to be intuitive and accessible to all iPhone users.

    Accessing the Blocked Contacts List

    The blocked contacts list is accessible through the Phone app settings. This approach is efficient and ensures you can quickly locate and manage your blocked contacts.

    Locating Blocked Contacts in the Phone App

    To find your blocked contacts within the Phone app, follow these steps:

    1. Open the Phone app on your iPhone.
    2. Tap on “Settings” in the app.
    3. Scroll down and tap on “Phone”.
    4. Scroll further down and tap on “Blocked Contacts”.
    5. This action will display a list of all blocked contacts on your iPhone.

    Steps for Locating Blocked Contacts on iPhone

    This table Artikels the steps to locate blocked contacts on your iPhone, providing a clear visual guide.

    Step Action Description
    1 Open the Phone app. Launch the Phone application on your iPhone.
    2 Tap on Settings. Navigate to the Settings section within the Phone app.
    3 Select Phone. Choose the “Phone” option within the Settings menu.
    4 Tap on Blocked Contacts. Locate and select the “Blocked Contacts” option.
    5 Review the list. The screen will display a list of all blocked contacts.

    Locating Blocked Contacts in Different iPhone Settings

    The process for locating blocked contacts is consistent across various iPhone settings. The following procedures detail how to access the list in different areas.

    • Via the Phone app: Open the Phone app, navigate to Settings, select Phone, and then choose Blocked Contacts.
    • Via the Contacts app: Although the Contacts app does not directly display blocked contacts, the Phone app provides the comprehensive list.
    • Via the Settings app: While the Settings app is a central hub for device settings, the Phone app is specifically designed for managing blocked contacts.

    Features Related to Blocked Contacts

    Blocking contacts is a crucial feature for maintaining privacy and managing unwanted communication. Understanding the various options available for managing blocked contacts allows users to tailor their communication experience effectively. This section delves into the specific features and settings for controlling interactions with blocked individuals.

    Specialized Blocking Options

    Managing blocked contacts extends beyond simply preventing communication. Advanced features enable users to fine-tune their interaction with blocked individuals. These options often provide granular control over specific communication channels, allowing for a more personalized approach to managing unwanted interactions.

    Blocking Specific Contact Types

    Blocking contacts allows for precise control over communication channels. Users can choose to block calls, messages, or FaceTime interactions independently. This allows for targeted blocking, preventing unwanted interactions while still maintaining contact for other communication methods. For example, a user might block calls from a telemarketer but still allow messages for important business communication.

    Blocking Contacts from Specific Communication Channels

    Detailed control over blocked contacts extends to individual communication channels. Users can choose to block specific contacts from certain methods, such as blocking a contact from sending messages while allowing calls. This provides a tailored approach to communication management, enabling users to filter unwanted interactions more precisely. This granular control empowers users to block contacts on specific communication platforms, such as blocking a contact from sending messages on iMessage while still allowing calls.

    Unblocking Contacts

    The process of unblocking contacts is straightforward and allows users to restore communication with previously blocked individuals. Unblocking is typically done through a dedicated settings menu, allowing for easy access and management of blocked contacts. The specific method for unblocking may vary slightly depending on the iPhone model and operating system version.

    Figuring out how to see blocked contacts on your iPhone can be a bit tricky, but it’s totally doable. Speaking of interesting things, did you know that Janelle Monáe is set to star in a biopic about Harriet Tubman? It’s a fascinating project, and you can read more about it here: janelle monae tapped for harriet tubman biopic.

    Thankfully, finding those blocked numbers isn’t nearly as complicated as a historical biopic; just follow these simple steps, and you’ll be able to see those contacts again in no time.

    Comparison with Other Mobile Platforms

    Different mobile operating systems offer varying degrees of control when managing blocked contacts. Android, for instance, often provides similar features but may have different terminology or layouts. While the core function of blocking remains consistent, the implementation and user interface may differ. For example, some platforms may provide additional blocking options, such as blocking contacts based on location, while others may not.

    The specific blocking features of other mobile platforms will vary depending on the manufacturer and the particular operating system version.

    Troubleshooting Common Issues

    See Blocked Contacts on iPhone

    Navigating your iPhone’s blocked contacts list can sometimes present unexpected challenges. This section delves into common problems users encounter, exploring potential causes and providing practical solutions. Understanding these issues can help you confidently manage your blocked contact list and resolve any difficulties you may face.

    Common Problems with Blocked Contacts

    Troubleshooting issues with blocked contacts often involves understanding the interplay of various iPhone functionalities. Problems might stem from software glitches, improper configuration, or even user error. It’s crucial to systematically identify the root cause before implementing any solution.

    Potential Causes for Difficulty Accessing Blocked Contacts

    Several factors can contribute to difficulties in accessing the blocked contacts list. These include incorrect settings, temporary software glitches, or even syncing issues with other devices. A thorough examination of these potential causes is essential for pinpointing the specific problem.

    Solutions to Common Problems

    Addressing issues with blocked contacts often involves a combination of checks and troubleshooting steps. Sometimes a simple refresh or reset can resolve the problem, while more complex issues might require more comprehensive solutions.

    Troubleshooting Table

    This table summarizes common problems, their potential causes, and corresponding solutions.

    Problem Potential Cause Solution
    Blocked contacts list is empty or missing Incorrect settings, corrupted data, or software glitch. Verify settings, restart the iPhone, and, if the issue persists, restore the device from a backup.
    Unable to add or remove contacts from the blocked list Software glitches, temporary system errors, or conflicts with other applications. Restart the iPhone, check for updates, and if the problem persists, restore the device from a backup.
    Blocked contacts still appear in other contacts lists Synchronization issues with other devices, corrupted data, or incorrect settings. Ensure all devices are synced properly, check and verify settings, and, if the problem persists, restore the device from a backup.
    Blocked contacts reappear after removing them Incorrect removal procedure, temporary system errors, or data corruption. Ensure the contact was properly removed from the blocked list, restart the iPhone, and if the problem persists, restore the device from a backup.

    Resetting iPhone Settings (Advanced Troubleshooting)

    If the above solutions don’t resolve the issue, a factory reset might be necessary. This process essentially erases all data on the device, including the blocked contact list, and restores it to its original factory settings. This should be considered a last resort as it involves data loss.

    Important Considerations: Before proceeding, ensure you have backed up your iPhone data. This procedure is irreversible and cannot be undone.

    Figuring out how to see blocked contacts on your iPhone can be a bit of a puzzle, but it’s definitely doable. Speaking of puzzles, did you know you can listen to Prince’s unreleased father’s song? It’s a fascinating little historical gem, giving you a different perspective on the artist. listen to princes unreleased fathers song. Once you’ve unearthed that musical treasure, you can get back to your contact list and see who you’ve blocked on your iPhone, if you ever need to.

    Procedure:

    1. Back up your iPhone data to iCloud or a computer.
    2. Open Settings.
    3. Tap General.
    4. Tap Transfer or Reset iPhone.
    5. Select Erase All Content and Settings.
    6. Enter your passcode when prompted.
    7. Follow the on-screen instructions to complete the reset process.

    Managing Blocked Contacts: See Blocked Contacts On IPhone

    Keeping your iPhone’s contact list clean and organized is essential for a smooth user experience. A crucial part of this is effectively managing blocked contacts. This section delves into the various options for managing your blocked contacts, from simple unblocking to efficiently handling multiple entries and restoring deleted ones.Managing blocked contacts allows you to regain control over your communication preferences, avoiding unwanted calls and messages.

    It’s a straightforward process, but understanding the different methods and best practices can significantly streamline your workflow.

    Methods for Managing Blocked Contacts

    Efficiently managing blocked contacts involves various options, including unblocking and adding to the block list. Understanding these options is key to maintaining a personalized and manageable contact list.

    • Unblocking Contacts: This process reverses the blocking action, allowing communication with the previously blocked contact. Simply locate the contact within the blocked list and select the “unblock” option. This will remove them from your blocked list and allow future calls and messages.
    • Adding Contacts to the Block List: This action prevents communication from a specific contact. Navigate to the contact details and select the “block” option. This prevents calls, messages, and FaceTime calls from the specified contact.

    Managing Multiple Blocked Contacts

    Handling numerous blocked contacts efficiently requires a systematic approach. The methods for managing a large list are the same as for a smaller list.

    • Categorization (optional): While not a built-in feature, consider using your iPhone’s native contact management tools or third-party apps to categorize contacts. This can improve organization, even within the blocked list. For example, if you block spammers, you can categorize them into a specific “Spam” or “Unwanted” folder.
    • Filtering: The iPhone’s search function enables rapid filtering of the blocked contacts list. Use s or names to locate specific contacts within the blocked list. This significantly improves efficiency, especially when dealing with large lists.

    Finding and Removing Specific Blocked Contacts

    Locating and removing a particular blocked contact is straightforward. The search functionality within the blocked contacts list is a vital tool.

    • Searching by Name or Number: Use the search bar within the blocked contacts list. Typing the contact’s name or phone number initiates a search, enabling quick access to the specific entry.
    • Using the List View: If you prefer, browse the list of blocked contacts directly. You can use the alphabetical sorting to find the desired contact quickly. Select the entry and tap the “unblock” or “remove” option to manage it.

    Restoring a Deleted Blocked Contact

    Restoring a deleted blocked contact is unfortunately not directly possible. If a blocked contact is accidentally deleted, it’s permanently removed from the blocked list.

    • Prevention: The best approach is to avoid accidental deletions by being mindful of your actions when managing the blocked contacts list.

    Best Practices for Managing Blocked Contacts

    Implementing effective practices ensures a well-maintained blocked contacts list.

    • Regular Review: Periodically review your blocked contacts list to ensure it aligns with your current communication preferences. Unblock contacts you may no longer want to block.
    • Transparency: Understand the reasons behind blocking a contact. This helps maintain a focused and accurate blocked contacts list.

    Visual Representation of Blocked Contacts

    Understanding how to manage blocked contacts is crucial for maintaining a healthy and secure digital environment. This section dives into visual representations that clarify the process of blocking and managing contacts on your iPhone, helping you to efficiently locate and manage these blocked individuals.A visual representation of the blocking and management process, whether through diagrams or flowcharts, greatly enhances comprehension.

    These visual aids make it easier to grasp the steps involved, reducing any potential confusion.

    Blocked Contact Management Process Diagram

    This flowchart illustrates the process of blocking and managing contacts on an iPhone.

    +-----------------+
    |   Start Here    |
    +-----------------+
    |                 |
    |   Select Contact|----->
    |                 |
    +-----------------+
    |                 |
    |   Block Contact |----->
    |                 |
    +-----------------+
    |                 |
    |  Confirmation   |----->
    |  Message         |
    +-----------------+
    |                 |
    |   View Blocked  |----->
    |   Contacts     |
    +-----------------+
    |                 |
    |  Manage Block   |----->
    |  (Unblock)      |
    +-----------------+
    |                 |
    |    End Here     |
    +-----------------+
     

    Finding Blocked Contacts Flowchart

    This flowchart details the steps to locate blocked contacts on your iPhone.

    +-----------------+
    |   Start Here    |
    +-----------------+
    |                 |
    |   Open Contacts |----->
    |                 |
    +-----------------+
    |                 |
    |   Tap on Menu  |----->
    |   (More Options)|
    +-----------------+
    |                 |
    |   Select Blocked|----->
    |   Contacts     |
    +-----------------+
    |                 |
    |   View List     |----->
    |   of Contacts   |
    +-----------------+
    |                 |
    |    End Here     |
    +-----------------+
     

    Steps to Find Blocked Contacts

    These steps Artikel the process for locating blocked contacts on your iPhone:

    • Open the Contacts app.
    • Tap on the “More” or “Options” menu (usually represented by three vertical dots). This may vary slightly depending on the iPhone version.
    • Select “Blocked Contacts.”
    • The list of blocked contacts will be displayed.

    Infographic: Blocking a Contact

    This infographic visually depicts the concept of blocking a contact on your iPhone. Imagine a phone screen with a contact displayed. A button, labeled “Block,” is prominently displayed next to the contact’s name. Tapping this button initiates the blocking process, leading to a confirmation message confirming the action.

    Possible iPhone User Interface for Blocked Contacts

    This hypothetical user interface displays a list of blocked contacts.

    Contact Name Last Interaction Action
    John Doe 2023-10-27 Unblock
    Jane Smith 2023-10-26 Unblock
    Peter Jones 2023-10-25 Unblock

    The user can easily identify blocked contacts by name and view their last interaction. An “Unblock” option is available for each contact, allowing for easy management.

    Advanced Usage Scenarios

    See Blocked Contacts on iPhone

    Mastering the art of blocking contacts on your iPhone goes beyond simple annoyance management. Advanced knowledge allows you to leverage this feature for more nuanced and effective communication strategies. Understanding how to strategically block contacts unlocks a range of benefits, from enhanced privacy to improved productivity.

    Advanced blocking techniques are valuable in various situations. Whether you’re dealing with spam, unwanted solicitations, or simply need to create a digital boundary, knowing how to effectively block contacts can make a significant difference in your daily interactions.

    Blocking Multiple Contacts Simultaneously

    Blocking multiple contacts simultaneously is a valuable tool for handling bulk unwanted communications. This method streamlines the process and saves time compared to blocking each contact individually. It is especially helpful when dealing with mass spam or unwanted solicitations.

    • Using the “Contacts” app’s advanced filtering capabilities, identify the contacts you wish to block. This can involve selecting contacts based on shared attributes, such as a specific group or location.
    • Leveraging the “Search” function in the “Contacts” app is another approach. By searching for specific s or patterns associated with the unwanted contacts, you can quickly identify and select the contacts to be blocked.
    • Apple’s built-in batch-blocking feature allows you to quickly block multiple contacts. This method is a streamlined approach to managing unwanted communication from a large group of individuals.

    Blocking Contacts Across Multiple Devices

    Maintaining consistency in your communication preferences across all your Apple devices is crucial. This seamless experience ensures that you’re protected from unwanted communications regardless of the device you’re using.

    • Your iPhone’s settings are synced with your other Apple devices, such as your iPad and Mac, through iCloud. Blocking a contact on one device automatically blocks them on all other devices.
    • This streamlined approach ensures that you have a consistent level of control over your communication, regardless of the device you’re using.

    Real-World Examples of Advanced Blocking

    Understanding how to block contacts is essential for maintaining a healthy digital environment.

    • A social media influencer might block spam accounts to maintain a professional online image and avoid distractions.
    • A business owner could block customers who consistently make inappropriate demands or violate company policies.
    • A student might block classmates who frequently send disruptive messages, ensuring a productive learning environment.

    Blocking for Specific Contexts

    Blocking contacts can be a helpful tool in managing interactions within specific contexts.

    • Blocking contacts during sensitive periods, such as before a major event or during a period of stress, can help minimize distractions and maintain focus.
    • Blocking contacts during specific hours of the day can limit distractions and manage workflow.
    • Blocking contacts who send unsolicited marketing messages can significantly reduce the volume of such communications.

    Epilogue

    In conclusion, understanding how to see blocked contacts on your iPhone empowers you to maintain a more controlled and organized communication system. By understanding the steps Artikeld in this comprehensive guide, you can effectively manage your blocked contacts list, resolve any issues, and unlock the full potential of your iPhone’s communication features. This knowledge is invaluable for maintaining healthy digital interactions and protecting your personal space.