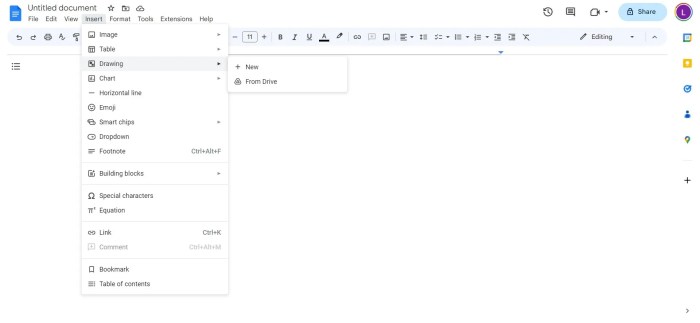
Flip an Image in Google Docs: This guide explores the often-overlooked ability to manipulate images within Google Docs. While Google Docs excels in document creation, its image editing capabilities are limited. This post delves into the possibilities and limitations of flipping images within Google Docs, providing alternative methods and insights into common image types and their suitability for manipulation.
We’ll also examine the use of external tools to overcome these limitations.
Understanding the nuances of image flipping, from horizontal and vertical flips to various orientations like portrait and landscape, is key. We’ll walk you through a step-by-step process, providing examples of images that could benefit from flipping. Ultimately, this guide aims to equip you with the knowledge to effectively manipulate images within Google Docs or leverage external tools for more advanced image editing needs.
Introduction to Image Manipulation in Google Docs
Google Docs, a powerful online word processor, offers basic image manipulation tools. Users can resize, crop, and even rotate images directly within the document environment. However, these capabilities are limited compared to dedicated image editing software. This article explores the image manipulation options available in Google Docs, highlighting its limitations and suggesting alternative methods for more extensive image adjustments.
Image Manipulation Capabilities in Google Docs
Google Docs provides a simple set of tools for basic image adjustments. Users can resize, crop, and rotate images directly within the document. These tools are sufficient for minor adjustments but lack the advanced features of dedicated image editors.
Limitations of Image Flipping in Google Docs
The most significant limitation of Google Docs for image manipulation is the absence of a dedicated “flip” function. While you can rotate images, you cannot easily flip them horizontally or vertically. This limitation prevents complex transformations that are easily achievable in other image editing software.
Alternative Methods for Image Flipping and Editing
If you require more sophisticated image manipulation, such as flipping, rotating, or other complex edits, external image editors are necessary. Popular options include Adobe Photoshop, GIMP, or online tools like Pixlr. These programs provide extensive controls and filters for diverse image manipulations. Exporting the modified image back into the document is usually a simple step.
Common Image Types Used in Google Docs
Common image types used in Google Docs include JPEG, PNG, and GIF. JPEG is ideal for photographs and images with complex colors, while PNG is often preferred for graphics and images with transparent backgrounds. GIFs are typically used for animations or simple images with limited color palettes.
Comparison of Image Manipulation Options
| Feature | Google Docs | Other Software |
|---|---|---|
| Image flipping | Limited (no direct flip function) | Extensive (horizontal/vertical flipping easily available) |
| Image editing | Basic (resizing, cropping, rotation) | Advanced (layers, filters, adjustments) |
| Image format support | Common formats (JPEG, PNG, GIF) | Extensive formats (including specialized formats) |
Understanding the “Flip” Action
Flipping an image is a fundamental image manipulation technique that reverses the image’s orientation. This process, while seemingly simple, has important implications in various applications, from correcting misaligned photographs to creating artistic effects. Understanding the different types of flips and how they interact with image orientation is crucial for effectively utilizing this tool within Google Docs or any image editing software.Flipping an image can be understood as reversing the position of its pixels along a specific axis.
There are three primary ways to flip an image: horizontally, vertically, and both horizontally and vertically. The choice of which flip to use depends on the desired outcome and the original orientation of the image.
Different Types of Flips
Flipping an image can involve reversing the arrangement of pixels along either the horizontal or vertical axis, or both. Horizontal flipping reverses the image from left to right, while vertical flipping reverses the image from top to bottom. Both flips are often used together for complete reversal of the image.
Image Orientations and Their Effect on Flips
Image orientation, such as portrait or landscape, significantly affects how flipping operates. A portrait image, oriented vertically, will experience a different outcome when flipped horizontally compared to a landscape image. The effect of a flip depends on the axis along which the pixels are reversed.
Step-by-Step Procedure for Understanding the Flip Operation
1. Identify the Image Orientation
Determine if the image is in portrait (vertical) or landscape (horizontal) orientation. This step is crucial to understanding the expected result of a flip.
2. Horizontal Flip
Ever needed to flip an image in Google Docs? It’s surprisingly easy, but sometimes a bit of a hidden gem. Speaking of hidden gems, did you know that David Bowie recently penned the theme tune for a new crime drama? This fascinating news is definitely a creative boost, and reminds me that even seemingly mundane tasks, like image manipulation, can be connected to exciting new developments.
Luckily, the process for flipping images in Google Docs is pretty straightforward, and hopefully this post helps you achieve that!
Imagine a mirror placed along the vertical axis of the image. The horizontal flip mirrors the image across this axis, effectively swapping the left and right sides of the image.
3. Vertical Flip
Imagine a mirror placed along the horizontal axis of the image. The vertical flip mirrors the image across this axis, swapping the top and bottom halves of the image.
4. Combined Flip
Combining both horizontal and vertical flips reverses the entire image, producing a mirrored image.
Examples of Images Benefiting from Flipping
Photographs with text or logos
Flipping a photograph of a sign can make the text readable.
Illustrations with specific symmetry
Flipping an illustration might reveal hidden details or patterns.
Document images
Flipping scanned documents can be helpful for improving readability.
Medical images
Flipping medical images can be used to improve the clarity of certain structures.
Artistic effects
Flipping an image can create a mirrored or reversed aesthetic effect.
Methods for Flipping Images in Google Docs (Workarounds): Flip An Image In Google Docs
Flipping an image directly within Google Docs is unfortunately not a built-in feature. This limitation means users need to employ alternative methods to achieve this effect. This exploration delves into various workaround strategies, highlighting their pros and cons, and providing step-by-step instructions for effective implementation.The in-line image manipulation capabilities within Google Docs are restricted. While you can resize, rotate, and apply basic formatting to images, direct flipping isn’t supported.
This necessitates using external tools or techniques for more advanced image adjustments, including mirroring.
External Image Editing Tools
External image editors offer a powerful solution for image manipulation, including flipping. They provide a wider array of tools and options compared to Google Docs’ limited capabilities. Understanding the process of using an external editor is crucial for effectively flipping images.
Using an External Image Editor (Step-by-Step Guide)
This approach involves opening the image in a separate image editing program, flipping it, and then re-inserting the modified image into Google Docs.
- Open the image in your chosen external editor. Popular choices include Photoshop, GIMP, or online editors like Pixlr or Canva. The specific steps will vary based on the software used.
- Locate the flipping tool within the editor. This often involves using a “Flip Horizontal” or “Flip Vertical” function. Specific terminology can differ between software.
- Apply the flip operation to the image. Carefully review the image to ensure the correct orientation is achieved. Some editors might require specific settings to achieve the desired effect.
- Save the edited image in a suitable format, such as JPG, PNG, or GIF. This is essential for ensuring compatibility with Google Docs.
- Return to Google Docs. Locate the image you want to replace. Select the image, and click “Replace image”.
- Locate and select the edited image file from your computer or cloud storage.
- Confirm the insertion of the flipped image into your Google Docs document.
Comparison of Image Editing Tools
Different image editors offer varying features and complexities.
| Software | Pros | Cons | Suitability for Flipping |
|---|---|---|---|
| Adobe Photoshop | Comprehensive features, high-quality results, wide range of adjustments | Steep learning curve, expensive | Excellent |
| GIMP (GNU Image Manipulation Program) | Free and open-source, robust functionality, good for beginners | Steeper learning curve compared to basic editors | Very good |
| Pixlr | Free online editor, user-friendly interface, good for quick edits | Limited features compared to desktop apps | Good |
| Canva | User-friendly interface, good for basic image manipulation, great for quick edits | Limited advanced features | Good |
Using an Online Image Editor
Online image editors provide a convenient method for image manipulation without the need for software installation. Steps for using these services are relatively similar to desktop applications.
- Open the online editor (e.g., Pixlr). This often involves navigating to the website and creating an account or using a guest account.
- Upload the image you wish to flip. This is typically accomplished through an upload button.
- Locate the flipping tools. These are often found in a toolbar or menu within the editor.
- Apply the flip operation to the image. As with desktop software, review the result for accuracy.
- Download the modified image in a desired format.
- Insert the edited image into Google Docs using the “Replace Image” function as detailed earlier.
File Format Limitations and Conversion Needs
Google Docs may not support all image formats directly. Conversion might be necessary to ensure compatibility. Different formats have different compression levels and quality characteristics.
- Image format compatibility can be an issue. If the original image is in a format Google Docs doesn’t recognize, you may need to convert it to a supported format (e.g., JPG, PNG). Various online converters can help with this task.
- Quality loss during conversion is a potential issue. If you convert a high-quality image to a lower-quality format, some visual detail might be lost.
- Consider the file size when selecting a format. Choosing a format that balances image quality and file size is important, especially when working with multiple images.
Alternative Tools and Techniques
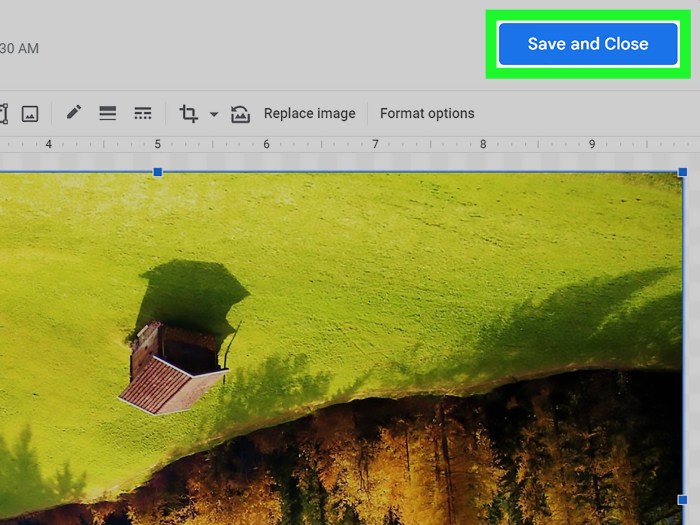
Flipping an image isn’t limited to Google Docs. A wide array of external tools and software offer more comprehensive image editing capabilities, often with features beyond simple flipping. These alternatives provide a wider range of options for manipulating images, making them ideal for more complex tasks and projects.Image manipulation is a fundamental skill in various fields, from graphic design to photography.
Understanding how to use external tools allows users to tailor their images precisely, enhancing their visual appeal and communication effectiveness.
External Image Editing Software
A variety of image editing software provides robust tools for image manipulation, including flipping. These programs often include a broader range of adjustments, allowing for fine-tuning and more complex operations. This versatility is a key advantage over the limited options available within Google Docs.
- GIMP (GNU Image Manipulation Program): A free and open-source software, GIMP is a powerful tool comparable to professional-grade applications. Its extensive features include tools for image manipulation, color adjustments, and various filters, making it a popular choice for both beginners and advanced users. It offers a wide range of options for image flipping and manipulation. GIMP is well-suited for users needing more control over their image edits.
- Adobe Photoshop: A professional-grade image editing software, Photoshop offers advanced features for image manipulation and design. While more expensive than GIMP, its capabilities extend beyond basic flipping, encompassing a wide spectrum of editing tasks. Photoshop’s precision tools allow users to fine-tune their image edits with exceptional control.
- Paint.NET: A free and user-friendly alternative to Photoshop, Paint.NET offers a wide range of features for image editing. Its intuitive interface makes it an excellent choice for users who want a straightforward and effective way to manipulate images, including flipping them.
Using Image Editing Software for Flipping
Image editing software provides a more intuitive approach to image flipping. Generally, these applications have dedicated tools for flipping horizontally and vertically.
- Interface Design: The user interface of image editors usually features specific tools for flipping images. These tools are usually represented by buttons, icons, or menus with clear labels, such as “Flip Horizontal” or “Flip Vertical.”
- Operation: The process typically involves selecting the image, then clicking on the designated flipping tool. The software will then automatically flip the image along the specified axis.
- Precision: These tools often provide a higher degree of precision than the workaround methods in Google Docs, allowing for more nuanced adjustments to the image’s orientation.
Benefits and Drawbacks of External Tools
External tools offer significant advantages over Google Docs for image flipping. However, there are potential drawbacks to consider.
- Advantages: External tools offer a broader range of features, superior control, and a more intuitive approach to image manipulation. They are often more suitable for complex edits that require precise adjustments or detailed manipulations beyond the simple flipping action.
- Disadvantages: External image editors typically require a software installation process. The learning curve for complex applications can be significant. There’s a cost associated with professional software like Photoshop.
Speed and Efficiency Comparison
External tools generally offer faster and more efficient image flipping compared to workarounds in Google Docs.
- Google Docs Speed: Google Docs methods often rely on workarounds or third-party integrations, which can lead to slower or less efficient image manipulation.
- External Tool Speed: Image editors are optimized for image manipulation tasks, providing faster and more efficient flipping actions.
- Example: Flipping a 10-megapixel image will be significantly faster using a dedicated editor compared to a series of workarounds in Google Docs.
File Formats for Image Flipping and Manipulation
The choice of file format can influence the results of image flipping and manipulation.
- Supported Formats: Most image editors support a variety of common image formats, including JPEG, PNG, GIF, and TIFF. These formats have varying degrees of compression and quality. Choosing the appropriate format is essential to maintain image quality and prevent artifacts after manipulation.
- Format Considerations: For critical applications, consider the specific needs of your project and select the file format that best balances image quality and file size.
Image Properties and Flipping
Image manipulation, even a seemingly simple task like flipping, is deeply intertwined with the underlying characteristics of the image itself. Understanding these properties is crucial for achieving the desired outcome and avoiding undesirable artifacts. Flipping an image isn’t just a matter of reversing pixels; it interacts with the image’s intrinsic structure.Flipping an image, whether horizontally or vertically, can be affected by the image’s inherent qualities.
Flipping an image in Google Docs is surprisingly straightforward. It’s a quick task, but if you’re looking for a deeper dive into the digital world, you might enjoy exploring a fascinating timeline of how the EDM bubble burst, like popping the drop a timeline of how edms bubble burst. Ultimately, whether you’re editing images or delving into music history, Google Docs offers useful tools for visual and digital exploration.
These qualities, or properties, include resolution, aspect ratio, format, and compression level. Each of these factors can influence the outcome of the flipping process and potentially introduce distortions or losses in quality.
Flipping an image in Google Docs can be surprisingly tricky, but it’s a handy skill to have. You might find yourself needing this, especially when working on a new project, like collaborating on a new album with a producer, for example, on a project like common working on new lp with producer no id. Thankfully, there are some simple techniques to make it easy.
I’ll cover those in a future post, so stay tuned!
Image Resolution and Flipping Quality
Image resolution, measured in pixels per inch (PPI) or pixels per centimeter (PPC), directly impacts the detail and sharpness visible in the flipped image. Higher resolution images offer greater detail and maintain quality better during flipping, as there are more pixels to work with. Conversely, lower resolution images may exhibit pixelation or blurring after flipping, especially when the image is enlarged to its original size.
For instance, a high-resolution photograph of a landscape will maintain sharp details when flipped, whereas a low-resolution icon may show noticeable pixelation after flipping.
Image Aspect Ratio and Flipping, Flip an Image in Google Docs
The aspect ratio, the proportional relationship between the width and height of an image, plays a crucial role in the flipping process. A square image, with a 1:1 aspect ratio, will appear identical when flipped horizontally or vertically. However, a landscape image (wide and tall) will change its orientation significantly after flipping, and the aspect ratio might be altered if the flipped image is not handled correctly, leading to potential cropping or distortion.
For example, a portrait image of a person, when flipped horizontally, will still have the person’s body oriented the same way, just mirrored from left to right.
Image Formats and Flipping Compatibility
Not all image formats support flipping in the same way. Some formats, like certain vector graphics formats, might handle flipping natively, without loss of quality. Raster image formats like JPEGs, commonly used for photographs, are susceptible to quality degradation when flipped repeatedly, due to the lossy compression nature of the format. GIFs, with their limited color palettes and inherent compression, can also suffer quality loss when subjected to flipping.
TIFFs, on the other hand, are often considered better for lossless manipulation and therefore suitable for flipping.
Image Compression and Flipping Results
Image compression significantly impacts the quality of the flipped image. Lossy compression, commonly found in JPEGs, reduces the number of pixels in the image to store it more compactly. This lossy compression might introduce artifacts, such as pixelation, and reduce the accuracy of the image after flipping. Conversely, lossless compression, found in PNGs, does not introduce any data loss.
Thus, images with lossless compression will likely retain their quality after flipping. This means a JPEG photo flipped several times might show progressively more noticeable compression artifacts, while a PNG will likely maintain its quality after repeated flips.
Illustrative Examples of Flipped Images
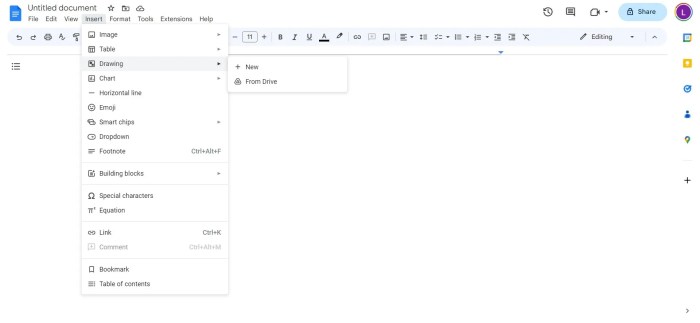
Flipping an image, whether horizontally or vertically, can significantly alter its visual appeal and meaning. This section provides practical examples to demonstrate the impact of flipping on various image types and showcases how different flip scenarios affect the final result. Understanding these examples will aid in choosing the appropriate flip method for specific image editing needs.
Visualizing Horizontal Flips
Flipping an image horizontally reverses the left-to-right orientation of the pixels. This can be a useful technique for creating mirror images or for correcting orientation errors. For instance, a photograph of a person might be flipped horizontally to create a mirror image effect.
- Before: A landscape photograph featuring a picturesque mountain range. The image shows the mountain range stretching from left to right.
After: The same landscape photograph, but the mountain range is now mirrored, stretching from right to left. This creates a reversed perspective of the scene. - Before: A portrait of a person. The person is facing to the right.
After: The same portrait, but the person is now facing to the left. This alters the subject’s perceived direction. - Before: A text-based image. The text reads from left to right.
After: The same text image, but the text now reads from right to left. This changes the readability of the text.
Visualizing Vertical Flips
Flipping an image vertically reverses the top-to-bottom orientation of the pixels. This is particularly useful for correcting images that are upside down or for creating unique artistic effects.
- Before: A portrait image of a person standing. The image shows the person’s head at the top and feet at the bottom.
After: The same portrait image, but now the person’s feet are at the top and the head is at the bottom. This creates a visually inverted image. - Before: A photograph of a building. The image shows the building from ground level up.
After: The same photograph, but now the image shows the building from the roof down. This changes the perspective of the building and creates a unique view. - Before: A text-based image. The text is written from top to bottom.
After: The same text image, but the text is now written from bottom to top. This changes the order in which the text is read.
Combined Horizontal and Vertical Flips
Combining horizontal and vertical flips results in a complete reversal of the image. This can be used to create mirror images of the entire image or to achieve a more abstract visual effect.
- Before: A photograph of a person standing. The image shows the person’s head at the top and feet at the bottom, and facing to the right.
After: The same photograph, but now the person’s feet are at the top, head at the bottom, and facing to the left. This creates a complete reversal of the image. - Before: A graphic design with text and shapes.
After: The same graphic, but now the text and shapes are mirrored in both directions, completely reversed.
Suitability of Image Types for Flipping
The effectiveness of flipping an image depends on the image type. The table below demonstrates the suitability of different image types for flipping.
| Image Type | Suitability for Flipping |
|---|---|
| Photographs | Generally suitable, but the effect may vary depending on the subject and context. |
| Illustrations | Excellent suitability; can enhance visual appeal. |
| Graphics with text | Can be suitable, but consider the readability of the flipped text. |
| Animated GIFs | Suitable, but the animation may be affected. |
Troubleshooting Common Issues
Flipping images in Google Docs, while seemingly straightforward, can sometimes lead to unexpected results. Understanding the potential pitfalls and how to overcome them is crucial for achieving the desired outcome without compromising image quality or functionality. This section delves into common problems and provides practical solutions.
Image Quality Degradation
Image flipping, especially when done repeatedly or with low-quality source images, can lead to a noticeable decrease in image quality. Artifacts like blurring, pixelation, or color distortion can appear. This degradation is often a consequence of the inherent limitations of the image format and the process of flipping. Preventing such degradation often hinges on the initial image quality.
Image Size and Resolution Issues
Problems related to image size and resolution are another frequent source of difficulty. Images that are too small or have insufficient resolution can appear pixelated or blurry after flipping. This issue is particularly pronounced when attempting to flip images that are already low resolution. Carefully consider the image’s resolution and size before performing the flip to prevent unexpected results.
Preventing Issues Before Flipping
Careful preparation can significantly mitigate problems during image flipping. Before initiating the flip, examine the image’s resolution and file format. Images with low resolution may not retain their quality after flipping. Ensuring the image is of sufficient size and quality, considering the desired output, is crucial. Use a higher resolution version of the image if possible, and always consider the context of your document when selecting an image.
If the image is a scanned document, ensure its quality before flipping, as this process will not improve its clarity.
Solutions for Image Flipping Issues
Several approaches can help resolve image flipping problems. If the flipped image exhibits quality degradation, try using a higher resolution version of the original image. For images with poor quality or pixelation, consider using image editing software (like those mentioned in previous sections) for a more precise and controlled flip. Ensure the software supports the image format to avoid incompatibility issues.
Experiment with different flipping methods (including workarounds) to identify the approach that produces the best result.
Dealing with Specific Errors
Certain errors, such as incompatibility between the image format and the software used, can lead to flipping issues. Ensure compatibility between the image format and the software being used to prevent errors. If the software is unable to handle the image format, consider using alternative tools or converting the image to a supported format. If the flipping process is causing unusual distortion, consider that this might indicate a problem with the source image itself.
Check the source image for quality or other issues that may cause this result.
Summary
In conclusion, while Google Docs offers limited direct image flipping, workaround methods using external editors offer a powerful solution. This exploration highlighted the limitations of in-line image manipulation and emphasized the importance of understanding image properties, formats, and resolutions. Ultimately, by leveraging alternative tools, you can achieve desired image flips and enhancements, making your documents visually compelling. Remember to choose the method best suited to your specific needs and image types.
