Replace a Washing Machine Belt is a common household repair that many homeowners can tackle themselves. This guide provides a step-by-step approach to diagnosing and resolving belt issues, from identifying the problem to reassembling the machine. It covers essential safety precautions, tools, and the entire process, ensuring a successful repair.
This comprehensive guide covers everything from identifying the symptoms of a malfunctioning belt to the exact steps for replacing it. We’ll detail the tools needed, safety measures to take, and the precise steps for disassembling, replacing, and reassembling your washing machine.
Identifying the Problem
A malfunctioning washing machine belt can lead to frustrating delays and potential damage. Identifying the problem early can save you time and money. This section details common signs, how to differentiate them from other issues, and steps to diagnose the specific problem.
Common Signs of a Failing Washing Machine Belt
Understanding the subtle signs of a failing belt is crucial for prompt repair. A worn or broken belt often manifests in a variety of ways, from subtle noises to complete failure. These signs can be easily missed if you don’t know what to look for.
- Unusual noises: A squeaking, grinding, or screeching sound during operation is a frequent indicator of a worn or slipping belt. This noise typically increases in intensity as the belt deteriorates further.
- Lack of rotation: The most obvious symptom is the washing machine’s drum not rotating, either during the spin cycle or the entire wash cycle. If the drum doesn’t spin, the belt is likely the culprit.
- Reduced washing machine performance: The washing machine might not agitate clothes effectively, resulting in incomplete cleaning. This is often a gradual decline, starting with less vigorous agitation.
- Wobbly or vibrating drum: A belt that is loose or worn can cause the drum to wobble or vibrate excessively. This is often noticeable during the spin cycle, but may be present during the entire washing process.
- Strange smells: While not always indicative, a burning or unusual smell, particularly during operation, can suggest a problem with the belt, especially if it is rubbing against something hot.
Differentiating Belt Problems from Other Issues
A washing machine has multiple components, each with its own potential failure points. It’s essential to distinguish between belt problems and other possible malfunctions to avoid unnecessary repairs.
Replacing a washing machine belt can be a surprisingly straightforward task, but sometimes a little extra know-how is needed. This weekend, I was wrestling with a balky machine, and while figuring out the mechanics, I was unexpectedly drawn to the heavy soundscapes of David Kilgour and the Heavy Eights’ latest album, “End Times Undone.” It’s a great listen while you’re troubleshooting the whirring machine parts.
Hopefully, with a little patience and a listen to some excellent tunes like david kilgour and the heavy eights end times undone , you’ll be back to clean laundry in no time. Back to the washing machine – time to get that belt replaced!
- Motor issues: A failing motor can cause similar symptoms to a worn belt, such as unusual noises and lack of rotation. However, motor problems often present with additional symptoms, like a burning smell or excessive heat around the motor housing.
- Timer malfunctions: A malfunctioning timer might prevent the machine from starting or completing cycles correctly, causing the drum not to rotate. However, a timer issue is often accompanied by erratic or no display of the current cycle.
- Electrical problems: Electrical issues might prevent the machine from functioning at all. These issues are often accompanied by flickering lights, no power to the appliance, or a complete lack of response.
- Other mechanical problems: Problems with the washing machine’s internal gears or components could cause similar symptoms to a belt issue. However, other mechanical issues typically show other symptoms, like the drum getting stuck or having trouble moving.
Diagnosing the Specific Belt Issue, Replace a Washing Machine Belt
To pinpoint the belt problem, a systematic approach is necessary. These steps should be followed carefully.
- Visually inspect the belt: Check for any visible damage, fraying, or signs of wear. Look for any gaps or missing sections of the belt itself.
- Listen for noises: Carefully observe the sounds produced during different parts of the wash cycle. Pay attention to any changes in the sounds as the washing machine works.
- Feel for vibrations: During operation, feel the machine for any unusual vibrations or wobbles, particularly in the drum area.
- Check for proper tension: A loose belt is a frequent cause of problems. Make sure the belt is correctly positioned and adequately tensioned. If necessary, consult the washing machine’s user manual for tensioning guidelines.
Comparison Table
| Symptom | Broken Belt | Motor Issue | Timer Malfunction |
|---|---|---|---|
| Unusual noises (squeaking, grinding) | Yes | Yes | No |
| Lack of rotation | Yes | Yes | Yes |
| Reduced washing performance | Yes | Yes | Yes |
| Wobbly drum | Yes | No | No |
| Burning smell | Possible | Yes | No |
| Excessive heat | No | Yes | No |
Tools and Materials Needed
Replacing a washing machine belt, while often a DIY-friendly task, requires the right tools and materials. Having the necessary equipment on hand will save you time and frustration, ensuring a smooth and successful repair. Improper tools or a lack of the correct belt type can lead to a faulty repair, potentially causing further damage or requiring a professional intervention.
Essential Tools
Proper tools are crucial for a safe and effective washing machine belt replacement. These tools will help in accurately measuring, removing, and installing the new belt. Thorough preparation ensures a more efficient and precise repair.
- Screwdrivers (Phillips and flathead): Essential for removing screws securing the washing machine’s components, like the motor housing.
- Adjustable wrench or pliers: These tools are necessary for loosening or tightening nuts and bolts, facilitating the removal and installation of the belt.
- Measuring tape: Precise measurement of the belt’s length is crucial to ensure the correct replacement belt is purchased.
- Gloves: Protecting your hands during the repair process is vital, especially when working with metal parts or cleaning the area around the machine.
- Safety glasses: Protecting your eyes from debris or potential hazards during the repair is an essential safety precaution.
Materials Needed
A list of materials needed will ensure you have everything required to complete the washing machine belt replacement. This includes not only the new belt but also any necessary parts for a successful repair.
- New washing machine belt: The correct belt type and size are critical for the washing machine’s operation and lifespan. Incorrect sizing can result in a dysfunctional machine.
- Lubricant (optional): Applying lubricant to the belt pulley system helps maintain proper operation and reduces friction. This can prolong the belt’s lifespan and improve the machine’s performance.
Belt Type Comparison
Different belt types have varying characteristics and are suitable for specific washing machine models. This table provides a comparison of belt types and their applications.
Replacing a washing machine belt can be a surprisingly straightforward task. While you’re tackling that chore, you might find yourself inspired by the latest installment in the Lil Wayne dedication series, lil wayne dedication 6. The dedication series’ intricate details, just like the intricate workings of a washing machine, can be quite fascinating to study. Once you’ve got the belt replaced, you’ll be ready to tackle any laundry load with ease.
| Belt Type | Description | Suitability |
|---|---|---|
| V-belt | A common type of belt with a V-shaped cross-section, providing good power transmission. | Suitable for many standard washing machine models, offering good durability and efficiency. |
| Flat belt | A simple, flat belt design. | Less common in modern washing machines, but may be used in some older models. |
| Timing belt | Precisely designed belts for specific applications. | Usually found in machines with complex mechanisms like timing functions. |
Safety Precautions

Replacing a washing machine belt, while often a straightforward task, requires careful attention to safety. Improper procedures can lead to electrical shocks, cuts, or other injuries. Understanding the potential hazards and following the right safety measures will ensure a smooth and accident-free repair process.Electrical appliances pose unique safety concerns. Improper disconnection can lead to electrical shocks, potentially causing serious harm.
Following the steps Artikeld below will ensure you disconnect the machine safely and effectively. Remember, safety should always be your top priority.
Electrical Safety Procedures
Properly disconnecting the washing machine’s power source is paramount. Ignoring this step can lead to electric shocks. Incorrect disconnection can also lead to the potential risk of fire.
- Locate the circuit breaker or fuse box for the washing machine.
- Identify the specific circuit breaker or fuse associated with the washing machine.
- Turn off the circuit breaker or remove the corresponding fuse.
- Verify the power is completely off by checking the washing machine’s power cord and controls.
These steps ensure the washing machine is completely de-energized, minimizing the risk of electrical shocks. Always double-check the power is off before any work involving electrical components.
Handling Tools and Materials
Using the correct tools and handling them safely is crucial to prevent accidents.
- Inspect all tools for any damage or wear before use.
- Ensure all tools are properly secured and fitted before starting the repair process.
- Wear appropriate safety glasses and gloves to protect your eyes and hands from potential hazards.
- Use appropriate storage methods to keep tools and materials organized and prevent accidents during storage.
Proper handling of tools and materials minimizes the risk of injury and ensures a safe working environment. Store the tools in a designated area or container to prevent them from becoming misplaced or causing tripping hazards.
Specific Safety Tips During Replacement
Implementing specific safety measures during the replacement process will minimize the chance of accidents.
- Ensure the washing machine is stable and level during the replacement procedure.
- Take your time and follow each step carefully to avoid mistakes.
- Be mindful of the surrounding area to prevent any tripping or falling hazards.
- If you encounter any difficulties, seek assistance from a qualified professional.
Following these safety tips will help prevent accidents and keep the work environment safe throughout the process.
Fixing a balky washing machine belt can feel like a minor chore, but sometimes, like tackling a spiritual challenge, it’s a reminder of the practical side of life. Just as maintaining our physical spaces requires consistent effort, so too does maintaining our faith, which is why I encourage you to check out my post on Stay Committed to Your Christian Faith.
Learning to replace a washing machine belt is a rewarding DIY task that builds confidence, much like finding strength in your faith. The satisfaction of a properly functioning machine is comparable to the peace that comes from staying connected to your beliefs.
Tool and Material Storage
Storing tools and materials properly is important for preventing accidents and ensuring easy access.
- Use designated storage containers to organize tools and materials.
- Keep tools and materials in a dry and well-ventilated area.
- Store tools and materials in a safe place that is not accessible to children.
Safe storage of tools and materials will prevent damage, and ensure the tools and materials are readily available when needed.
Disassembling the Washing Machine: Replace A Washing Machine Belt
")
Taking apart your washing machine safely and effectively is crucial for replacing the belt. This section details the steps involved, from disconnecting utilities to accessing and detaching the old belt. Following these instructions carefully minimizes risks and ensures a smooth replacement process.Before you begin, ensure you have gathered all the necessary tools and materials, and reviewed the safety precautions Artikeld earlier.
This will greatly enhance the safety and efficiency of the entire process.
Disconnecting Utilities
Properly disconnecting the washing machine from the power and water supply is paramount. Improper disconnections can lead to electrical shocks or water damage. Unplug the washing machine from the wall outlet and turn off the water supply valves connected to the machine. Ensure the valves are fully closed to prevent water from entering the machine’s interior.
Removing the Access Panel
Locate the access panel or cover on your washing machine. This panel typically covers the belt compartment. The exact location and method for removing the panel vary depending on the specific model. Refer to your washing machine’s user manual for precise instructions. Commonly, screws or clips secure the panel, which should be removed carefully to avoid damage.
Accessing the Belt Compartment
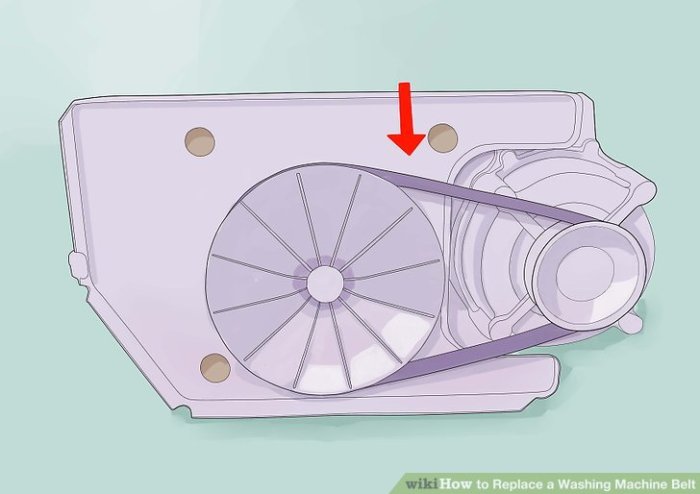
Once the access panel is removed, the belt compartment should be visible. Carefully inspect the compartment to identify the belt and its associated pulleys. This is critical to ensure you’re working with the correct belt. The belt may be visible or concealed behind other components. Take your time to ensure you find the belt and associated pulleys.
Detaching the Old Belt
Detaching the old belt from the pulleys requires careful handling to avoid damaging the pulleys or the belt itself. First, ensure the washing machine’s drum is stationary. This is essential to prevent injury and damage. Locate the tensioner pulley and use the appropriate tools to release the tension on the belt. Then, carefully guide the belt off the pulleys.
Use your hands or a suitable tool to gently slide the belt off the pulleys, taking care not to stretch or damage the belt.
Disassembly Steps
| Step | Action |
|---|---|
| 1 | Disconnect the washing machine from the power source and water supply. |
| 2 | Remove the access panel or cover. |
| 3 | Identify the belt and pulleys. |
| 4 | Release the tension on the belt using appropriate tools. |
| 5 | Carefully detach the old belt from the pulleys. |
Installing the New Belt
Now that you’ve carefully disassembled your washing machine and identified the faulty belt, it’s time to install the new one. This step requires precision and attention to detail to ensure the machine operates smoothly and efficiently. A correctly installed belt avoids potential damage to the machine and provides long-lasting performance.
Measuring the New Belt
Proper measurement is crucial to ensure a precise fit. Incorrect sizing can lead to premature wear and tear on the belt or even damage to the machine’s components. Carefully measure the distance between the pulley centers. Use a flexible measuring tape to obtain the most accurate reading. Take multiple measurements, comparing them to ensure consistency and accuracy.
Installing the Belt onto the Pulleys
The correct installation procedure is vital for the belt to function properly. Start by carefully placing the new belt over the smaller pulley, ensuring that the belt is oriented correctly. Then, guide the belt over the larger pulley, making sure the belt is smooth and not twisted. The belt should lay flat and straight between the pulleys.
Ensure the belt is correctly positioned on both pulleys without any kinks or bends.
Aligning the Belt with the Pulleys
Precise alignment is critical for smooth operation and to avoid premature wear. Visually inspect the belt’s position on both pulleys. The belt should be centered on each pulley, with no noticeable gaps or misalignment. Ensure the belt runs smoothly without any obstructions. Slight adjustments may be necessary to achieve the correct alignment.
Checking the Tension of the New Belt
The correct tension of the belt is essential for efficient operation and longevity. Too loose a belt may slip or not transmit enough power, while too tight a belt may cause damage to the pulleys or other machine components. A properly tensioned belt ensures smooth and continuous operation. Check the tension by gently pressing on the belt.
It should not sag excessively or feel too rigid. A properly tensioned belt will exhibit a slight give without excessive movement.
Reattaching the Belt to the Motor
After installing the belt, carefully reattach the belt to the motor’s pulley, ensuring the proper alignment and tension are maintained. Ensure that the belt is correctly routed around the pulleys and that there are no kinks or twists. Double-check the position of the belt on the motor’s pulley to ensure it’s snug and secure. The belt should fit snugly and securely on the motor’s pulley.
Take your time and check for proper alignment to prevent damage to the belt or the machine.
Reassembling the Washing Machine
Putting your washing machine back together correctly is crucial for its proper functioning and longevity. A careless reassembly can lead to leaks, malfunctions, or even damage to other parts of the appliance. Following the steps Artikeld below will help ensure a safe and successful reinstallation.Reassembling the washing machine involves carefully reversing the disassembly process. This meticulous approach is essential to ensure that all components are correctly aligned and secured.
It’s also vital to pay close attention to the original placement of each part during the disassembly process to ensure optimal functionality.
Reconnecting Power and Water Supply
Before connecting the water supply and power, verify that all electrical connections and water lines are secure and free of any damage. A thorough inspection prevents potential hazards. Ensure all components are properly seated and that no parts are obstructing the flow of water or electricity.
- Turn off the water supply valve to the washing machine.
- Disconnect the washing machine from the power source.
- Carefully reconnect the water supply hoses, ensuring they are properly seated on the machine’s connections.
- Reconnect the washing machine to the power source. Check the circuit breaker to make sure it is in the ‘on’ position.
Replacing the Access Panel or Cover
Replacing the access panel or cover involves precise placement and secure fastening. Improperly installed covers can compromise the washing machine’s structural integrity.
- Carefully align the access panel with the mounting points on the washing machine.
- Secure the panel using the appropriate fasteners (screws, clips, etc.).
- Ensure the panel is snug and fits securely without any gaps or misalignments.
Reassembling Washing Machine Components
Reassembling the washing machine components requires precision and attention to detail. Incorrect reassembly can lead to issues with operation and even damage to components. Carefully follow the steps in reverse order to avoid any confusion.
- Ensure all components are properly aligned and secured before proceeding to the next step.
- Carefully position and fasten the components, using the original fasteners.
- Verify that all connections are secure and tight.
- Inspect all components for any damage or misalignment.
Ensuring Proper Alignment of Parts
Proper alignment of washing machine parts is essential for optimal performance. Misalignment can cause vibrations, noise, and even damage to the machine. A thorough check at each stage of reassembly is vital.
- Visually inspect all components to ensure proper alignment before securing them.
- Utilize a level or other alignment tools if necessary to verify accurate positioning.
- Apply even pressure while securing components to prevent stress on any particular area.
- Ensure all components are positioned in their original location and configuration.
Reassembly Steps (Reverse Order)
The table below Artikels the reassembly steps in reverse order of disassembly, providing a clear guide for reconnecting components.
| Step Number (Disassembly) | Step Number (Reassembly) | Description |
|---|---|---|
| 6 | 1 | Reconnect the belt |
| 5 | 2 | Replace the access panel |
| 4 | 3 | Reconnect the motor |
| 3 | 4 | Replace the drum |
| 2 | 5 | Reconnect the agitator |
| 1 | 6 | Replace the housing |
Testing the Washing Machine
After meticulously replacing the washing machine belt and reassembling the appliance, thorough testing is crucial to ensure everything functions correctly. Proper testing verifies the belt’s secure installation and the overall operational efficiency of the machine. This step is critical to avoiding future malfunctions and ensuring the washing machine performs its intended tasks reliably.Correct operation is essential for the longevity of the washing machine and for optimal cleaning results.
A properly functioning washing machine guarantees effective cleaning, which is critical for maintaining clothes and preventing damage.
Powering Up and Initial Checks
To initiate testing, ensure the washing machine is properly plugged into a working power outlet. Check that all connections are secure. Verify that the machine’s power switch is in the “On” position. Observe the control panel for any unusual lights or indicators that might signal a problem. The machine should respond to user input, with the lights on the panel clearly reflecting the selected settings.
Running a Test Cycle
Begin with a short, light wash cycle. Use a small load of clean clothes or towels. Monitor the machine’s performance throughout the cycle. Pay close attention to the operation of the agitator or tub. The agitator or tub should rotate smoothly and without any unusual noises or vibrations.
The drum should turn steadily and evenly, demonstrating the proper functioning of the motor and belt.
Troubleshooting Common Issues
- Noisy Operation: If the machine emits unusual or excessive noise during operation, it could indicate a loose belt, a problem with the motor, or a misaligned component. Carefully inspect the belt for proper tension and alignment. If the noise persists, contact a qualified technician.
- Machine not Starting: If the machine fails to start, check the power supply, the power switch, and any circuit breakers. Verify that the connections are secure and that the belt is not interfering with the motor’s rotation. If the issue persists, consult a qualified repair professional.
- Uneven Drum Rotation: If the drum rotates unevenly or intermittently, this might indicate a loose or damaged belt, a problem with the motor bearings, or a misalignment in the drive mechanism. Examine the belt for damage or looseness. If the issue continues, seek professional assistance.
- Vibration: Excessive vibration during operation may suggest a loose belt, misaligned components, or a problem with the machine’s mounting. Check the belt tension and secure all components. If the problem persists, consult a professional.
- Lack of Water Intake: If the machine doesn’t fill with water, check the water supply connections, hoses, and valves. Ensure the water supply is functioning correctly. Verify that the water inlet valve is functioning correctly and that there are no obstructions in the supply lines. If the issue remains, consult a professional.
Verification of Correct Functioning
After the test cycle, inspect the clothes for signs of proper cleaning. If the clothes are clean and the machine operates smoothly throughout the cycle, the belt installation and reassembly are successful. Verify that the machine completes the cycle without any unusual sounds or vibrations. Any issues, like loud noises or the machine not completing a cycle, warrant further investigation.
Identifying and Resolving Problems
A thorough inspection is necessary to determine the root cause of any issues that arise. By methodically examining each component, including the belt, the motor, and the drive mechanism, one can identify the specific problem. Once the problem is pinpointed, appropriate troubleshooting and repair measures can be undertaken. If the issue is beyond your capabilities, consult a qualified technician for assistance.
Outcome Summary
Successfully replacing a washing machine belt is achievable with careful attention to detail and a methodical approach. This guide provides a roadmap for tackling this common repair, empowering you to resolve the issue and restore your washing machine to its full functionality. Remember to prioritize safety and follow the instructions precisely for optimal results. Happy fixing!
Leave a Reply