Make a Private Album on an iPhone is crucial for safeguarding precious memories and sensitive images. This guide walks you through creating, accessing, and sharing private albums, emphasizing security and privacy measures. We’ll cover everything from the initial setup to troubleshooting common issues, empowering you to manage your photos with confidence and control.
Private albums on iPhones offer a high level of security, unlike public albums where anyone with a link can view your photos. Understanding the differences between public and private albums is key to maintaining your privacy. This comprehensive guide delves into the practical aspects of creating, managing, and sharing photos within these secure digital spaces.
Introduction to Private Albums on iPhone
 - wikiHow")
Private albums on iPhones offer a powerful way to safeguard sensitive or personal photos and videos. They provide a dedicated space for storing content that you want to keep secure and inaccessible to unauthorized individuals. This feature is particularly useful for storing intimate moments, family heirlooms, or professional material that you wish to maintain a high level of privacy over.Using private albums helps maintain control over your digital memories.
They create a separate repository for images and videos, effectively separating them from your public photo library. This ensures that only those you specifically authorize can view the content, enhancing security and privacy.
Security Measures in Private Albums
Private albums employ robust security measures to protect the confidentiality of their contents. Access to these albums is restricted to authorized users, and they are not publicly accessible. This is achieved through various security protocols that ensure only individuals with explicit permission can view the stored photos and videos.
Differences Between Public and Private Albums
This table Artikels the key distinctions between public and private photo albums on iPhones:
| Feature | Public Album | Private Album |
|---|---|---|
| Access | Anyone with the link | Only authorized users |
| Sharing | Can be shared easily | Requires explicit permission |
| Privacy | Limited privacy | High level of privacy |
Public albums, by their nature, are designed for sharing. Anyone with the shared link can access the images and videos. This is beneficial for sharing family photos with extended relatives or showcasing work projects. Conversely, private albums provide a higher degree of control over access and sharing. The user maintains strict control over who sees the contents, fostering a greater level of privacy.
Creating a Private Album
Creating a private album on your iPhone is a simple process that allows you to securely store photos and videos that you want to keep away from prying eyes. This is especially useful for sensitive content or memories you want to protect from unwanted access. This guide will walk you through the steps involved, from initial setup to adding and organizing your media.Private albums offer a layer of privacy, keeping your personal content secure and accessible only to you.
Figuring out how to make a private album on your iPhone can be surprisingly straightforward. While I’m currently obsessed with the news that the Fugees have postponed their reunion tour, fugees postpone reunion tour , it’s a good time to organize those personal photos and music files into a private album. This way, you can keep cherished memories safe and sound, without worrying about unwanted eyes on your collection.
This is a critical aspect of digital security, especially when dealing with personal information or sensitive moments.
Creating a New Private Album
This section Artikels the steps to create a new private album on your iPhone.
- Open the Photos app on your iPhone.
- Tap the “+” button located at the bottom-right corner of the screen. This action initiates the creation of a new album.
- Select “Create Album” from the options presented.
- Choose the option “Private Album”.
- A new album will be created. Enter a name for the album that clearly identifies its contents. Avoid generic names like “New Album” to ensure easy identification later.
Naming and Categorizing Photos
This section explains how to effectively name and categorize photos within your private album for easy retrieval.
- Tap on the newly created private album.
- To add photos, tap the “Add Photos” button, typically located at the top of the screen.
- Select the photos you wish to add from your photo library.
- Optionally, you can rename the photos or add s to better categorize them. The system allows you to use multiple tags to ensure clarity.
- To rename a photo, tap the photo, then tap “Edit” and type the desired name in the photo’s title field. To categorize, tap on “Tags” to add relevant s.
Adding Photos and Videos
Several methods allow you to add photos and videos to your private album. Choose the method that best suits your needs.
- Direct Import: Select the photos or videos you want to add from your camera roll or other sources and add them directly to the private album. This method is simple and straightforward.
- Bulk Import: If you have a collection of photos or videos you want to add, select the files to be imported and choose the album. This allows you to add multiple items at once.
- Sharing: If the photos are from another source (e.g., email attachments or messages), you can save them to your camera roll and then import them to the private album. This is useful for adding photos that are not directly captured on your iPhone.
Step-by-Step Guide to Creating a Private Album
This detailed guide provides a comprehensive approach to creating a private album.
- Open the Photos app on your iPhone.
- Navigate to the “Albums” tab.
- Tap the “+” button at the bottom-right of the screen.
- Select “Create Album”.
- Choose “Private Album” from the options.
- Name the album descriptively. For example, “Vacation Memories (2024)” or “Family Gathering”.
- Add photos and videos by selecting the items from your photo library or other sources.
- Organize the photos by adding relevant tags or renaming them for easier retrieval.
Accessing and Managing Private Albums
Accessing and managing private albums on your iPhone is straightforward. Once created, these albums offer a secure way to store photos and videos that you want to keep private. This section will detail how to navigate, manage, and share content within these special albums.
Figuring out how to make a private album on your iPhone can be tricky, but it’s surprisingly straightforward. While you’re mastering the art of digital privacy, have you considered optimizing your Windows experience? Learning how to enable Task Manager in Windows, for example, can dramatically improve your system performance. Enable Task Manager in Windows can unlock hidden performance potential and is a great skill to have, even if your focus is primarily on your iPhone’s photo organization.
Ultimately, creating a private album on your iPhone is all about safeguarding your memories and controlling who sees them.
Accessing a Private Album, Make a Private Album on an iPhone
Private albums are designed for discreet storage, ensuring only you have access. To locate a private album, navigate through the Photos app on your iPhone. The exact path will vary slightly depending on the iPhone model and iOS version. Generally, you’ll find private albums listed separately from your other photo collections. The album’s name will clearly indicate its private status, providing a visual distinction from public albums.
Managing Photos and Videos
Within a private album, you can perform common photo management tasks. Editing, deleting, and rearranging photos are all possible. These actions follow standard iOS photo management procedures.
Deleting Photos and Videos
Deleting photos and videos from a private album is straightforward. Select the images or videos you want to remove, then tap the delete button. A confirmation prompt will typically appear to ensure you intend to delete the selected items.
Editing Photos and Videos
Editing photos and videos within a private album is similar to editing in other photo libraries. Use the editing tools available within the Photos app to adjust brightness, contrast, filters, and other parameters.
Rearranging Photos and Videos
Rearranging photos and videos is possible. You can drag and drop images or videos to reposition them within the album’s sequence.
Sharing Photos and Videos
Sharing photos and videos from a private album is carefully controlled. You can share selected items with specific contacts or groups. Sharing options might include sending via Messages, email, or using other compatible apps.
Methods for Accessing and Managing Private Albums
Managing your private albums involves various methods. This table Artikels different approaches.
| Method | Description | Example |
|---|---|---|
| App Interface | Navigate the Photos app to access the album. | Tap on the private album icon. |
| File System | Access through a file system app (if supported). | Use a file explorer app (limited support for this method). |
| Third-party apps | Utilize third-party photo management apps. | Use an image editing app for editing photos in the private album. |
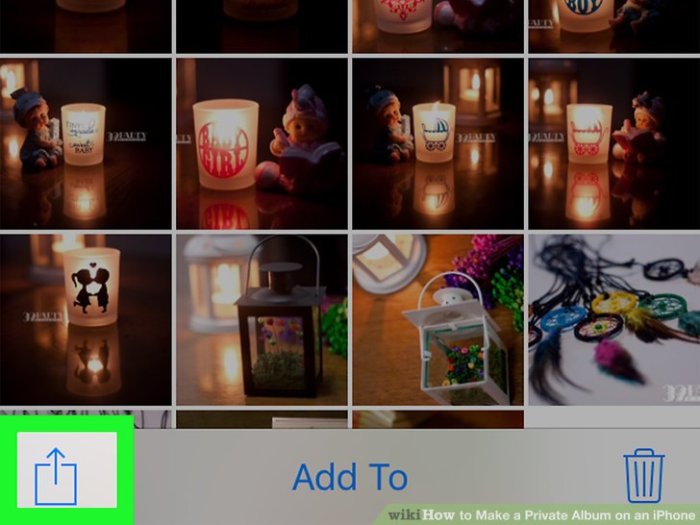
Sharing Photos from a Private Album
 - wikiHow")
Sharing photos within a private album allows for a controlled and selective distribution of images. This feature is invaluable for preserving sensitive or personal moments while ensuring that only trusted individuals have access. This section will explore various methods for sharing photos from a private album, emphasizing security and privacy.Sharing photos from a private album offers several advantages.
It lets you selectively share specific images with individuals or groups, preventing unwanted exposure. This control also allows you to maintain the privacy and security of your content.
Different Ways to Share Photos
Sharing photos from a private album can be done in several ways, each with varying levels of control and recipient access. Direct sharing allows for targeted distribution, while group sharing is useful for broader dissemination within a pre-defined circle.
- Direct Sharing: This method allows you to share photos with specific individuals. It is ideal for situations where you want to share images with only a select few people. This approach provides the highest level of control over who sees the shared content.
- Group Sharing: Sharing with a group of people is facilitated through the use of existing contacts or groups. This is particularly useful when you need to distribute photos to a larger audience, such as family members or colleagues, while maintaining a degree of privacy.
Sharing with Specific Individuals
To share photos with specific individuals, you typically select the desired images and choose the recipient from your contacts. The exact procedure may vary slightly depending on the iPhone model and iOS version. However, the general steps remain consistent.
- Locate the private album containing the photos you wish to share.
- Select the images you want to share.
- Choose the “Share” option from the album’s menu or within the image selection.
- Select the desired recipient from your contacts list. This is usually done via a contact selection interface.
- Confirm the sharing request to finalize the process.
Sharing with a Group of People
Sharing with a group of people is often done through existing contacts or groups. This approach simplifies sharing with numerous individuals.
- Identify the group or contact group you want to share the photos with.
- Select the images you want to share from the private album.
- Choose the “Share” option and select the group or contact group from the sharing interface.
- Confirm the sharing request to complete the process.
Controlling Sharing Permissions
Controlling sharing permissions for photos within a private album is crucial to maintaining privacy. This level of control allows you to manage access and limit exposure of sensitive images.
- Expiration Date: Set an expiration date for the shared photos, after which the images will no longer be accessible to the recipient. This is a helpful feature for time-sensitive sharing, such as event photos.
- Download Restrictions: Prevent recipients from downloading the shared images by selecting the appropriate option in the sharing settings. This ensures that the photos remain within the controlled environment.
- Viewing Permissions: Limit viewing permissions to specific durations. This feature can be beneficial in situations where you need to share images temporarily.
Security Considerations
Sharing photos from a private album requires careful consideration of the recipient and their trustworthiness. Be cautious about sharing sensitive information.
Sharing sensitive or private information through a private album demands meticulous consideration of the recipient. Ensure you are comfortable with the recipient’s ability to maintain the confidentiality of the shared content. Avoid sharing images that could compromise your personal safety or privacy.
Security and Privacy Considerations
Protecting your private photos is paramount. Apple’s iOS provides robust security features, but understanding how to leverage them is key to maintaining your privacy. This section delves into the security and privacy aspects of private albums, outlining how to safeguard your sensitive images.Private albums, while designed for enhanced privacy, require a proactive approach to security. A combination of iOS features and user-applied strategies ensures your photos remain confidential.
Knowing how to prevent unauthorized access and understand the associated privacy policies is essential.
Security Features of Private Albums
Private albums on iPhones leverage encryption to protect their contents. This means that even if someone gains physical access to your device, the photos within the private album remain protected. The encryption process transforms the data into an unreadable format, making it extremely difficult to decipher without the correct decryption key (your device’s passcode).
Figuring out how to make a private album on your iPhone can be a snap. It’s all about those settings, and honestly, it’s super straightforward. But, if you’re also looking for ways to manage your computer remotely, you might find Remotely Shutdown a Computer a useful resource. Ultimately, creating a private photo album is a simple process that lets you control who sees your memories, and it’s a great way to keep your photos organized and secure.
Privacy Policies Related to Private Albums
Apple’s privacy policy covers how your data, including photos in private albums, is handled. Crucially, Apple states that it does not access the content of private albums unless a court order or other legal process compels it. This policy underscores the confidentiality of your private data.
Preventing Unauthorized Access to Private Albums
Strong passcodes are essential. Enable Face ID or Touch ID for added security layers, and consider using two-factor authentication where available for enhanced security. These measures prevent unauthorized access to your device, and subsequently, your private albums. Actively monitoring your device for any unusual activity is also a crucial part of protecting your private albums.
Examples of Privacy Settings for Controlling Access
Controlling access to your private albums is crucial. You can restrict access to certain photos by assigning different access levels to individual contacts. Sharing albums with limited access controls empowers you to control who sees what and when. You can choose whether to allow contacts to download, edit, or simply view the photos within the album.
Recommendations for Securing Your iPhone and Its Data
Regularly updating your iPhone’s software ensures that you benefit from the latest security patches. These updates often include crucial fixes that address vulnerabilities, safeguarding your device from potential threats. Keeping your device’s operating system updated is vital. Employing a strong passcode, enabling two-factor authentication (where applicable), and regularly backing up your device’s data, including private albums, are further essential steps in securing your iPhone and its data.
This allows for recovery in case of device loss or damage.
Troubleshooting Private Albums
Private albums offer a secure way to store cherished photos and videos. However, occasional issues can arise. This section provides solutions to common problems you might encounter while managing your private albums on your iPhone.Understanding the potential pitfalls and knowing how to resolve them empowers you to maintain the privacy and integrity of your photos.
Common Issues with Private Albums
Issues with private albums can stem from various factors, including incorrect settings, temporary glitches, or even accidental deletions. A proactive approach to troubleshooting can prevent frustration and ensure you have access to your private photos.
- Album Not Accessible: This issue arises when the iPhone cannot locate or access the private album. Possible causes include insufficient storage space, corrupted data within the album, or an app glitch. Checking storage space and restarting the device are often effective solutions. If the problem persists, a backup and restore operation might be necessary.
- Sharing Permissions Not Set Correctly: If you encounter problems sharing photos from a private album, verify that the sharing permissions are properly configured. Ensure that the recipient has been granted the appropriate access rights. Review the sharing settings within the album to confirm that the correct contacts or groups have been added. If the problem persists, a complete review of sharing settings or contacting support might be required.
- Photo Deletion Issue: Accidental or unexpected photo deletions from private albums are frustrating. Ensure that the deletion wasn’t a result of a faulty app update, or other system-related issues. Double-check the intended actions to confirm whether the deletion was accidental. In case of accidental deletion, exploring recovery options is essential. This may involve checking the device’s backup or contacting support.
Resolving Album Accessibility Issues
Addressing accessibility problems in private albums often involves a systematic approach. Troubleshooting steps can range from simple actions like restarting the device to more involved methods like restoring from a backup.
- Insufficient Storage: Free up space on your iPhone by deleting unnecessary files, apps, or media. A full device can cause problems with accessing private albums.
- Corrupted Data: If the album is corrupted, a backup and restore from a previous point might be necessary. This process can be complex, so refer to the Apple support website for detailed instructions.
- App Glitch: Restarting the Photos app or even the entire device might resolve temporary app glitches. If the problem persists, uninstalling and reinstalling the Photos app may help.
Recovering Deleted Photos
Losing photos from a private album can be distressing. Employing the right recovery techniques can help you regain access to these cherished memories.
- Backup and Restore: If you have enabled iCloud Photo Library or a local backup, restoring from a previous backup might recover deleted photos.
- Recovery Software: Third-party recovery software might be able to retrieve deleted photos, but use caution when using such software. Ensure you understand the risks and potential consequences involved before proceeding.
Contacting Support
If troubleshooting steps fail to resolve the issue, contacting Apple support might be necessary. Gather information about the problem, including the error messages and steps you have already taken.
- Documentation: Before contacting support, gather information about the issue, such as error messages, and the steps you have already taken.
- Support Channels: Apple provides various support channels, including online help, phone support, and in-person assistance. Choose the channel that best suits your needs.
Common Errors
- Error 1: Album Not Accessible: This error suggests the album’s data might be corrupted or inaccessible due to insufficient storage. Try restarting your iPhone or checking storage space.
- Error 2: Sharing Permissions Not Set Correctly: Verify that the sharing settings within the album are correctly configured and the intended recipient has the correct access permissions.
- Error 3: Photo Deletion Issue: Confirm that the deletion wasn’t accidental or due to a system issue. Explore backup options or recovery software if necessary.
Closing Notes: Make A Private Album On An IPhone
In conclusion, creating and managing private albums on your iPhone is a straightforward process that provides essential control over your photos and videos. By understanding the steps Artikeld in this guide, you can confidently protect your privacy and share photos selectively. Remember to prioritize security measures and be mindful of sharing permissions to maintain the confidentiality of your private album contents.
Leave a Reply