Category: Home Improvement

  • Polish Granite Counter Tops A Luxurious Choice

    Polish Granite Counter Tops A Luxurious Choice

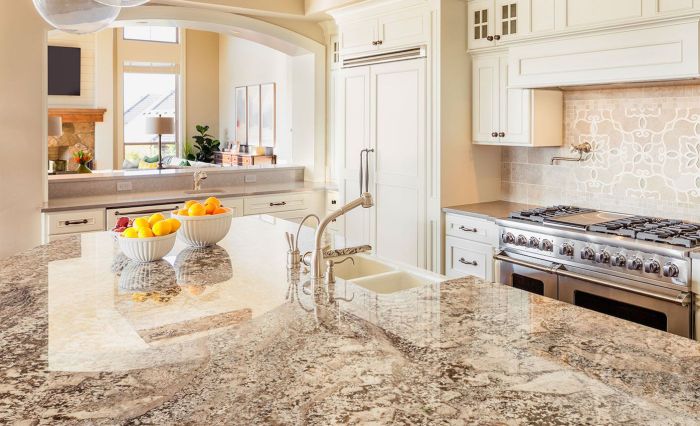
    Polish Granite Counter Tops offer a stunning blend of elegance and durability. From their unique geological origins to the diverse array of colors and finishes, these countertops are a sophisticated choice for any kitchen. This comprehensive guide explores the captivating world of Polish granite, delving into its properties, design considerations, installation, and cost factors.

    Polish granite countertops are known for their remarkable strength and resistance to stains and scratches. Their rich veining patterns and polished surfaces create a sophisticated and timeless aesthetic, complementing various kitchen styles. Discover the beauty and practicality of Polish granite as we explore its advantages, maintenance, and environmental impact.

    Introduction to Polish Granite Countertops

    Polish granite countertops are a popular choice for homeowners seeking a luxurious and durable surface for their kitchens and bathrooms. Their distinctive beauty, coupled with exceptional resilience, makes them an attractive option for a wide range of design styles. The natural variations in color and texture, combined with the ease of maintenance, contribute to their appeal.Polish granite, sourced from specific geological formations, possesses unique characteristics that set it apart from other types of granite.

    These properties, along with the intricate craftsmanship of the finishing process, result in a stunning and enduring countertop. Understanding the origin, composition, and processing of Polish granite provides a deeper appreciation for its value and aesthetic qualities.

    Origin and Geological Formation

    Polish granite is derived from the igneous rock formations found within Poland. These formations are typically formed from the slow cooling and crystallization of molten rock material deep beneath the Earth’s surface. The unique mineral composition and cooling process contribute to the distinctive patterns and colors observed in Polish granite. The geological processes that shaped the granite deposits are responsible for the variations in grain size, color, and texture within each slab.

    This natural variability is a significant factor in the aesthetic appeal of Polish granite.

    Types and Colors

    A wide array of colors and patterns are characteristic of Polish granite. Examples include: “Imperial Gold,” featuring a rich golden hue with subtle black speckles; “White Pearl,” a striking white background with shimmering pearl-like inclusions; “Black Forest,” showcasing dark gray tones with hints of black and subtle mineral accents; and “Red Jasper,” exhibiting a deep red base with white and beige veining.

    Visual descriptions often include terms like “veining,” “speckling,” “streaking,” and “marbling” to illustrate the unique patterns in each type. The variability in colors and patterns makes each slab unique.

    Finishes and Polishing Methods, Polish Granite Counter Tops

    Polish granite countertops are available in various finishes, each affecting the overall aesthetic and level of shine. Common finishes include polished, honed, and brushed. Polished finishes create a high-gloss, reflective surface. Honed finishes produce a subtle matte effect, reducing glare. Brushed finishes provide a slightly textured surface, adding a rustic or contemporary feel.

    The polishing process involves precise grinding and buffing techniques, creating a smooth and flawless surface. Different polishing methods affect the final finish and luster.

    Thickness and Dimensions

    Typical thickness ranges for Polish granite slabs are between 2 and 3 centimeters. These slabs are often cut and shaped into various sizes, depending on the specific countertop design. The dimensions of the finished countertop will depend on the layout of the kitchen or bathroom space. Slab dimensions are usually measured in meters or feet. This information allows for precise planning and installation.

    Properties and Advantages of Polish Granite

    Polish granite countertops are renowned for their exceptional durability and aesthetic appeal. Their natural beauty, coupled with impressive resistance to various elements, makes them a popular choice for homeowners seeking long-lasting and low-maintenance surfaces. This robust material offers a sophisticated look that seamlessly integrates into diverse kitchen and bathroom designs.

    Polish granite countertops are seriously stylish, offering a sophisticated look in any kitchen. But while I’m admiring the sleek surfaces, Diplo just dropped some major news – he’s releasing a new song with Justin Bieber! Check it out here. Seriously though, the cool factor of those countertops just got a whole lot cooler. The polished shine really complements any modern design aesthetic.

    Durability and Resistance to Stains and Scratches

    Polish granite, owing to its dense crystalline structure, exhibits remarkable resistance to scratches and stains. This inherent strength stems from the interlocking nature of the mineral grains, creating a hard, non-porous surface. While not completely impervious to damage, it is significantly more resilient to everyday wear and tear compared to other countertop materials. Deep scratches are uncommon, and minor surface marks are easily polished out.

    Spills are less likely to penetrate the surface, reducing the risk of staining. However, extreme impacts or very sharp objects can still cause damage.

    Resistance to Heat and Chemicals

    Polish granite’s high heat resistance makes it ideal for high-traffic kitchen environments. The material can withstand the heat from hot pots and pans without suffering damage. However, direct contact with extremely high temperatures, such as placing a hot pan directly on the surface without a trivet, may still result in damage. Its resistance to chemicals is also noteworthy.

    Common household cleaning solutions, while effective, won’t harm the granite. Strong acids or alkalis, however, can cause etching or discoloration over time. It is crucial to use appropriate cleaning solutions and avoid prolonged exposure to these corrosive substances.

    I’ve been seriously considering Polish granite countertops for my kitchen, and the sleek, modern look is just amazing. Plus, the durability is a major plus! Speaking of amazing, did you hear about Jose Gonzalez announcing a tour with ymusic? jose gonzalez announces tour with ymusic That’s fantastic news! Regardless of the music, the timeless beauty of polished granite countertops is hard to beat for a kitchen remodel, and I’m leaning towards this material for the stylish and long-lasting look.

    Maintenance Requirements

    Maintaining the beauty and longevity of Polish granite countertops requires a regular, albeit straightforward, cleaning regimen. A simple cleaning with warm soapy water and a soft cloth effectively removes most daily spills and dirt. Avoid abrasive cleaners or scouring pads, which can scratch the surface. Using a granite-specific sealer can further enhance the countertop’s resistance to stains.

    Regular sealing is recommended to maintain the countertop’s pristine appearance.

    Lifespan and Longevity Expectations

    Polish granite countertops are known for their exceptional lifespan, often exceeding 20 years with proper care. In many instances, homeowners report their granite countertops lasting well over a decade, with minimal visible wear and tear. The longevity of Polish granite is largely influenced by factors such as the quality of the stone, installation techniques, and consistent maintenance practices.

    Careful handling and avoidance of extreme impacts are also crucial in maximizing its lifespan.

    Comparison with Other Countertop Materials

    Compared to other countertop materials, Polish granite generally requires less maintenance. For instance, compared to quartz, which often requires sealing, granite’s inherent resistance to staining and scratching reduces the need for such procedures. Natural stone countertops, such as marble, are more susceptible to staining and scratches, demanding more meticulous care. Laminate countertops are prone to chipping and scratching, while solid surface countertops, though durable, may not possess the same aesthetic appeal or the inherent beauty of polished granite.

    The lower maintenance of Polish granite contributes to its long-term cost-effectiveness.

    Design Considerations for Polish Granite

    Polish Granite Counter Tops

    Polish granite’s striking beauty and durability make it a compelling choice for kitchen countertops. Beyond its inherent qualities, thoughtful design considerations can elevate the aesthetic impact and functionality of the space. Careful planning ensures the granite countertops seamlessly integrate with the overall kitchen design, enhancing both visual appeal and practicality.

    Design Styles Pairing Well with Polish Granite

    Choosing a countertop material as impactful as Polish granite requires aligning it with the desired kitchen style. The natural beauty of Polish granite, with its varied colors and veining patterns, can complement a wide range of design aesthetics.

    Style Color Palette Fixtures Additional Design Elements
    Modern Farmhouse Warm neutrals, light greys, creams, subtle blacks Stainless steel or matte black faucets, simple pendant lights Exposed beams, shiplap backsplash, natural wood accents
    Contemporary Darker shades of grey, black, white, or bold colours Sleek, minimalist faucets, recessed lighting Geometric backsplashes, metallic accents, open shelving
    Traditional Creams, beige, browns, and muted blues Traditional brass or bronze faucets, ornate lighting fixtures Classic subway tile backsplash, detailed cabinetry, ornate hardware
    Rustic Earthy tones, browns, creams, and grays Rustic bronze or copper faucets, warm-toned pendant lights Stone or brick backsplashes, reclaimed wood accents, exposed brick

    Color and Veining Patterns

    The inherent color and veining patterns of Polish granite offer a canvas for creative design. Darker colors, such as blacks and deep greys, create a dramatic and sophisticated look. Lighter colors, such as creams and beiges, lend a warm and inviting atmosphere. The veining patterns can be used as a focal point, drawing the eye to specific areas of the countertop.

    Strategic placement of lighting can highlight these veining patterns, adding depth and dimension to the design.

    Impact of Lighting on Polish Granite

    Proper lighting plays a crucial role in showcasing the beauty of Polish granite. Natural light, especially during the day, highlights the natural variations in color and veining. Strategic placement of recessed lighting, under-cabinet lighting, and pendant lights can accentuate the countertops, creating a warm and inviting ambiance. Consider the color temperature of the lighting – warmer tones can create a more inviting feel, while cooler tones can provide a more modern look.

    Backsplashes and Decorative Elements

    A well-chosen backsplash can enhance the aesthetic appeal of Polish granite countertops. A subway tile backsplash in a complementary color or material can create a cohesive look. Alternatively, a stone or mosaic backsplash can provide a unique visual interest. Other decorative elements, such as pendant lights, open shelving, or decorative trays, can further complement the design. Careful consideration of the overall color palette and material choices ensures a harmonious and visually appealing kitchen design.

    Kitchen Layouts Incorporating Polish Granite

    Several kitchen layouts can effectively incorporate Polish granite countertops:

    • U-Shaped Kitchen: A U-shaped layout maximizes counter space, creating an efficient workflow. The dramatic veining patterns of the Polish granite can be highlighted by strategically placing lighting fixtures. A combination of cabinetry colors and a contrasting backsplash can accentuate the granite’s beauty, enhancing the kitchen’s aesthetic appeal.
    • L-Shaped Kitchen: An L-shaped kitchen provides ample workspace, especially in smaller spaces. The large surface area of the Polish granite can be used to maximize storage and display items. Lighting fixtures strategically placed above the granite can highlight the countertops’ unique patterns and colors.
    • Galley Kitchen: A galley kitchen, with its narrow design, benefits from a visually appealing layout. The polished surface of the Polish granite will help to reflect light, making the space feel brighter and more spacious. A backsplash with a contrasting design or color can draw attention to the granite, creating a balanced and visually appealing kitchen.

    Installation and Care of Polish Granite Countertops

    Polish granite countertops offer a beautiful and durable addition to any kitchen or bathroom. However, proper installation and ongoing care are crucial to maintain their aesthetic appeal and longevity. This section delves into the steps involved in the installation process, provides a detailed guide on maintenance and cleaning, and highlights potential issues to prevent problems.Installation requires meticulous planning and execution to ensure a flawless finish.

    Careful consideration of the substrate, proper sealing, and precise cutting are essential. The right tools and techniques will minimize errors and ensure a safe installation. Maintaining these countertops involves understanding their unique properties and implementing a suitable cleaning routine.

    Installation Process

    The installation of Polish granite countertops typically involves several steps. Preparation is key to a successful outcome. First, the surface must be meticulously prepared. This includes ensuring the countertop substrate is level, smooth, and free of debris. A level surface ensures a uniform installation, avoiding future issues.

    • Substrate Preparation: The existing countertop surface should be thoroughly cleaned, inspected for any damage or irregularities, and leveled if necessary. This often involves patching any cracks or holes and ensuring a solid foundation for the granite slab.
    • Cutting and Shaping: Precise cutting and shaping of the granite slab are crucial for achieving a perfect fit. Specialized tools like granite saws and precision-cutting equipment are essential for this stage.
    • Installation of Underlayment (if applicable): In some cases, an underlayment is used to improve the stability and support of the countertop. This layer can protect the substrate from moisture and provide a smoother surface for the granite.
    • Grouting (if applicable): If the countertop is installed with a grout or adhesive, ensure the material is appropriate for granite and the application process is executed properly. Using the wrong grout can lead to discoloration or damage.
    • Sealants and Finish: A sealant is applied to the granite countertop after installation to protect it from staining and moisture absorption. This step is crucial for preserving the countertop’s aesthetic and longevity.

    Maintenance and Cleaning

    Maintaining Polish granite countertops involves understanding their composition and using appropriate cleaning products. Regular cleaning and preventive measures are vital to preserving their beauty and extending their lifespan.

    • Regular Cleaning: Use a mild, non-abrasive cleaner and a soft cloth to wipe down the countertop regularly. Avoid harsh chemicals or abrasive cleaners that could scratch or damage the surface. Mild dish soap and water usually suffice for daily cleaning.
    • Spot Cleaning: For spills, act quickly. Blot up spills immediately with a clean cloth to prevent staining. Certain spills, like acidic substances, require immediate attention.
    • Specialized Cleaners: For stubborn stains or spills, consider using specialized granite cleaners. Always test a small, inconspicuous area first to ensure the cleaner doesn’t affect the countertop’s finish.
    • Sealing: Regular sealing is essential for preventing stains and protecting the countertop. Professional sealing is recommended every few years, or more frequently depending on use and environmental conditions.

    Potential Issues and Prevention

    During installation or maintenance, several issues can arise. Understanding potential problems and implementing preventative measures can save time and money.

    • Cracks or Chips: Care during handling and installation can minimize the risk of cracks or chips. Support the slab carefully during transport and cutting. Using appropriate tools and techniques for cutting and shaping the granite will help prevent these issues.
    • Staining: Understanding the susceptibility of granite to certain substances is crucial for preventing staining. Prompt removal of spills and regular sealing can significantly reduce the risk of staining.
    • Scratches: Avoid using abrasive cleaners or sharp objects on the surface. Using cutting boards and trivets can prevent damage from utensils and cookware.

    Tools and Equipment

    The correct tools and equipment are essential for both installation and maintenance.

    • Installation Tools: Granite saws, tile nippers, measuring tools, level, safety glasses, gloves, and a variety of other hand tools are essential.
    • Cleaning Supplies: Soft cloths, non-abrasive cleaners, specialized granite cleaners, and sealants are required.

    Cost and Pricing Factors for Polish Granite Countertops

    Polish granite countertops offer a luxurious and durable aesthetic, but understanding the pricing structure is crucial for any homeowner considering this material. Knowing the factors influencing cost, from slab size to installation, allows for informed budgeting and a realistic expectation of the overall project expenditure. A well-planned approach to pricing can help ensure the project aligns with your budget and delivers the desired results.Granite’s beauty often comes with a price premium.

    The natural variations in color, veining, and patterns of each slab contribute to its uniqueness, but also make pricing more complex than simply assessing square footage. The quality of the granite, the expertise of the installer, and the desired finishing touches all affect the final cost.

    Typical Cost Ranges for Polish Granite Slabs

    Understanding the typical cost range for different sizes and types of Polish granite slabs is essential for a realistic budget. The cost varies significantly depending on the specific type of granite, the size of the slab, and the complexity of the design.

    Granite Type Slab Size (sq. ft.) Installation Cost (USD) Finishing Cost (USD)
    Brazilian Black Granite 10 $1,500 – $2,500 $500 – $1,000
    Calacatta Gold Granite 15 $2,000 – $3,500 $700 – $1,200
    Indian Emperador Granite 20 $2,500 – $4,500 $800 – $1,500
    White Pearl Granite 25 $3,000 – $5,000 $1,000 – $1,800

    Note

    These are approximate ranges and can vary based on specific slab characteristics, local labor costs, and chosen finishes.*

    Factors Influencing Polish Granite Countertop Prices

    Several factors contribute to the overall cost of Polish granite countertops. These factors are crucial to consider when budgeting for the project.

    • Granite Type and Quality: Different types of granite have varying prices based on their rarity, color patterns, and overall quality. Rare and highly sought-after granites command higher prices. The quality of the slab, including the absence of significant flaws, directly impacts the final cost.
    • Slab Size and Shape: Larger slabs generally cost more per square foot, while intricate shapes or unusual sizes necessitate additional cutting and labor, further increasing the price. The size of the countertop plays a critical role in the final cost.
    • Installation Complexity: Installation complexity, including the intricacy of the design or the need for specialized cutting techniques, significantly affects the installation cost. This also includes the layout of the countertop, which may require special cutting and shaping. Custom cuts and complex installations will naturally increase the price.
    • Finishing Options: The chosen finishing options, like polishing, sealing, or edge treatments, can impact the final price. The type of edge finish, such as a bullnose or ogee, adds to the total cost. The desired finish directly affects the final cost.
    • Labor Costs: Local labor costs play a significant role in the overall installation price. Variations in regional wage rates can greatly impact the final cost.

    Comparing Polish Granite to Other Countertop Materials

    Polish granite countertops often fall in the mid-range price category compared to other popular countertop materials. Solid surface materials, like quartz, often have a lower initial cost but may have higher maintenance requirements over time. Natural stone alternatives, like marble, offer a unique aesthetic but often come with higher price tags and greater maintenance needs.

    Pricing Structures for Polish Granite

    Understanding the different pricing structures for Polish granite countertops is crucial for budgeting.

    • Slab Costs: Slab costs are typically quoted per square foot and depend on the specific type and quality of granite. The pricing structure for granite slabs is based on factors like the rarity and quality of the stone.
    • Installation Costs: Installation costs vary based on the complexity of the job, labor rates in the area, and the size of the project. Installation costs are influenced by the complexity of the installation and the experience of the installers.
    • Finishing Costs: Finishing costs, including polishing, sealing, and edge treatments, are usually calculated as an additional charge and can vary depending on the selected options.

    Repair and Replacement Costs

    Repair or replacement costs for Polish granite countertops can vary widely, depending on the extent of damage or the required work. A chipped edge might involve a simple repair, while a significant crack might necessitate replacing a section or the entire countertop.

    Environmental Impact of Polish Granite

    Polish granite, a beautiful and durable countertop material, offers a sophisticated aesthetic. However, its production and use also have environmental implications. Understanding these impacts is crucial for responsible consumers and businesses alike. This section will delve into the environmental footprint of Polish granite, exploring its quarrying, transportation, and disposal, alongside sustainable practices and regulations.The environmental impact of any material, including granite, must be assessed throughout its lifecycle.

    This includes the extraction of raw materials, processing, transportation, installation, and eventual disposal. A comprehensive evaluation helps identify potential ecological challenges and encourages environmentally conscious choices.

    Quarrying and Transportation Impacts

    Quarrying granite involves significant environmental impacts. Exploitation of granite deposits often involves deforestation, habitat disruption, and soil erosion. Heavy machinery used in quarrying can also lead to noise and air pollution. Transportation of granite slabs, from the quarry to the manufacturing plant and ultimately to the customer, contributes to carbon emissions, depending on the distance and mode of transport.

    The sheer volume of material transported can have a considerable impact.

    Comparison to Other Countertop Materials

    Different countertop materials have varying environmental footprints. Recycled materials, like recycled glass or concrete, often have a lower impact compared to materials requiring extraction of virgin resources. The energy consumption throughout the production and transport processes significantly influences the environmental impact. While granite is often seen as a natural material, its extraction and processing can cause significant environmental damage.

    Sustainable Practices in Sourcing and Use

    Sustainable sourcing of granite involves working with quarries that employ environmentally sound practices. This may include measures to minimize deforestation, manage water usage responsibly, and mitigate pollution. Responsible consumers can choose granite sourced through certified programs that prioritize environmental protection. Reducing the demand for new granite by extending the lifespan of existing countertops also contributes to lower environmental impact.

    Recycling and Disposal Options

    Granite countertops, unlike some other materials, are not easily recyclable in the same way that paper or plastic are. However, the material itself can be reused in other construction projects. Granite slabs that are damaged or no longer meet aesthetic requirements can be repurposed as decorative elements or aggregate in construction. The crucial aspect is to minimize waste and prioritize responsible disposal.

    Environmental Regulations Related to Polish Granite

    Polish environmental regulations govern the quarrying and transportation of granite. These regulations may involve permits, limitations on extraction rates, and stipulations on waste management. Companies sourcing Polish granite must adhere to these regulations, and it is important to verify compliance to ensure responsible practices. Consumers should also look for certifications or labels that indicate compliance with environmental standards.

    Polish Granite vs. Other Countertop Materials

    Choosing the right countertop material for your kitchen is a crucial decision, impacting both the aesthetics and the long-term functionality of your space. Beyond the inherent beauty of Polish granite, understanding how it compares to other popular options like quartz, marble, and concrete is essential for making an informed choice. This comparison delves into the nuances of each material, highlighting their respective strengths and weaknesses in the kitchen environment.Understanding the unique characteristics of each material allows you to make a well-informed decision, ensuring your countertops meet your specific needs and preferences.

    Factors like durability, maintenance, and cost are all crucial elements to consider.

    Aesthetic Comparison

    Polish granite’s polished surface provides a sleek, sophisticated look, often showcasing subtle variations in color and veining. Quartz countertops, available in a wide array of colors and patterns, offer a consistent aesthetic, mimicking natural stone or other designs. Marble’s distinctive veining and natural patterns create a luxurious and timeless appeal, while concrete countertops bring a raw, industrial, or modern feel, depending on the finish.

    Each material’s visual character contributes to a unique kitchen ambiance.

    Polish granite countertops are gorgeous, but choosing the right one can be tricky. Just like picking the perfect countertop, sometimes it’s the little things that matter most, like when a guy responds quickly to your texts. When a Guy Responds Quickly to Your Texts might offer some insight into what that means. Ultimately, though, the perfect polish on your granite counters is worth the effort.

    Durability and Maintenance Comparison

    Polish granite is known for its exceptional durability, resisting scratches, stains, and heat. Quartz is another highly durable option, often surpassing granite in its resistance to chipping and cracking. Marble, while beautiful, is more susceptible to scratches and stains than both granite and quartz. Concrete, while incredibly durable, requires sealing to prevent staining and maintain its integrity. The choice of material should align with the anticipated level of use and care in the kitchen.

    Pros and Cons of Polish Granite vs. Other Materials

    Material Durability Maintenance Cost
    Polish Granite High; resists scratches, stains, and heat Moderate; requires occasional sealing and cleaning Medium to High; varies based on type and size
    Quartz Very High; highly resistant to stains, scratches, and heat Low; easy to clean and maintain Medium to High; comparable to granite
    Marble Moderate; susceptible to scratches and stains High; requires frequent sealing and meticulous cleaning Medium to High; often higher than granite
    Concrete High; durable and strong High; requires sealing and regular maintenance Low to Medium; generally less expensive than other options

    Advantages and Disadvantages in Kitchen Use

    Polish granite, with its high durability and resistance to staining, is an excellent choice for high-traffic kitchen areas. Its aesthetic appeal adds a touch of sophistication. However, the cost of Polish granite can be a factor. Quartz, due to its low maintenance, is ideal for busy kitchens with children or pets. Marble’s beauty is undeniable, but its maintenance requirements make it less practical for everyday kitchen use.

    Concrete, with its unique aesthetic, is a viable option for modern kitchens but demands careful sealing and maintenance. Consider your lifestyle and priorities when making your decision.

    Illustrative Examples of Polish Granite Countertops: Polish Granite Counter Tops

    Polish Granite Counter Tops

    Polish granite countertops offer a unique blend of beauty and durability, making them a popular choice for homeowners seeking a sophisticated and long-lasting kitchen upgrade. This section provides detailed examples showcasing the versatility of Polish granite in various kitchen designs and architectural styles. From modern minimalist aesthetics to traditional farmhouse charm, the examples highlight how Polish granite can be seamlessly integrated into diverse spaces.Polish granite’s remarkable aesthetic qualities, coupled with its inherent strength and low maintenance, make it an attractive option for kitchens of all sizes and styles.

    These examples demonstrate how carefully chosen color palettes and design elements can transform a kitchen into a stunning and functional space.

    A Contemporary Kitchen with a Sleek Polish Granite

    This contemporary kitchen boasts a sleek design featuring a deep charcoal gray Polish granite countertop. The countertop’s smooth, polished surface creates a sophisticated backdrop for the modern cabinetry. The countertop’s deep color enhances the sense of spaciousness in the kitchen, reflecting the light and creating a modern ambiance. Stainless steel appliances and minimalist lighting fixtures complement the sleek aesthetic, showcasing a harmonious blend of form and function.

    The space is open-plan, seamlessly integrating the kitchen with the dining and living areas, emphasizing the airy and contemporary feel. The polished granite is used for the island and backsplash, creating a cohesive look. White subway tiles provide a subtle contrast, allowing the granite’s rich tones to shine.

    A Traditional Kitchen with Warm Polish Granite

    In contrast, this traditional kitchen showcases a warm beige Polish granite. The countertop is used in a classic style, with the granite’s warm tones complementing the rich wood tones of the cabinetry. The kitchen features an abundance of natural light, enhancing the warmth of the granite’s color. Soft, warm lighting accentuates the intricate veining within the granite, adding a touch of elegance to the space.

    The granite’s subtle variations in color and texture create a visually appealing backdrop for the traditional farmhouse sink and vintage-style fixtures. The kitchen is designed with a focus on functionality and warmth, highlighting the versatility of Polish granite in traditional settings. Open shelving and antique accents further enhance the traditional character.

    Polish Granite in a Modern Farmhouse Kitchen

    This modern farmhouse kitchen seamlessly blends traditional and contemporary elements, with a light gray Polish granite countertop as the focal point. The granite’s cool tones are offset by warm wood tones in the cabinetry and accents, creating a balanced and inviting atmosphere. Exposed beams and large windows add to the rustic charm, while sleek appliances and modern fixtures maintain the contemporary feel.

    The granite countertop, used extensively throughout the kitchen, including the island and breakfast bar, provides a cohesive design element. The open layout and abundant natural light enhance the kitchen’s airy feel.

    Polish Granite Across Architectural Styles

    Polish granite’s versatility extends beyond specific kitchen styles. In a modern architectural setting, the granite can be used with minimalist cabinetry and clean lines. In a rustic setting, the granite’s natural veining can be highlighted with exposed beams and natural wood accents. A coastal-style kitchen could utilize a lighter shade of granite with lighter cabinetry and nautical accents, creating a refreshing and airy feel.

    The possibilities are endless, showcasing the adaptable nature of Polish granite across diverse architectural styles.

    Ending Remarks

    In conclusion, Polish granite countertops represent a substantial investment in both style and longevity. Their durability, aesthetic appeal, and variety of colors and finishes make them a compelling option for kitchen remodeling projects. By considering the design, maintenance, and cost implications, homeowners can make an informed decision that enhances their kitchen’s beauty and functionality for years to come.

    We’ve explored the ins and outs, from the initial sparkle of the polished surface to the long-term sustainability.

  • Lubricate a Garage Door Smooth Operation

    Lubricate a Garage Door Smooth Operation

    Lubricate a Garage Door: Keeping your garage door operating smoothly is crucial for both convenience and longevity. This comprehensive guide will walk you through the entire process, from identifying lubrication needs to maintaining optimal performance. We’ll cover different garage door types, various lubrication methods, safety precautions, and troubleshooting common problems. Get ready to keep your garage door running like new!

    Different garage doors have varying lubrication requirements. Sectional doors, for example, typically need more frequent attention to their tracks and rollers than overhead doors. This article will provide tailored advice for each type, ensuring your door remains a reliable and efficient access point. We’ll also cover the importance of a regular maintenance schedule to prevent costly repairs down the line.

    Introduction to Garage Door Lubrication

    Keeping your garage door in tip-top shape is crucial for both its longevity and smooth operation. Regular lubrication is a simple yet effective way to ensure your door functions reliably and safely for years to come. Ignoring this maintenance can lead to increased wear and tear, noisy operation, and potentially costly repairs down the road.Proper lubrication reduces friction between moving parts, enabling the door to open and close with ease and minimizing the strain on the system.

    This translates into a quieter, more efficient, and safer experience. Different types of garage doors require specific lubrication strategies, and understanding these nuances is key to achieving optimal performance.

    Garage Door Types and Lubrication Needs

    Garage doors come in various forms, each with unique mechanisms. Understanding these differences is vital to choosing the right lubrication strategy. Sectional garage doors, the most common type, are composed of panels that move up and away from the opening, typically utilizing springs and tracks. Overhead doors, on the other hand, consist of a single large panel that lifts vertically.

    Both types have different moving parts that necessitate different lubrication approaches. Sectional doors usually require lubrication of hinges, rollers, and tracks, while overhead doors may require lubrication of pulleys, chains, and tracks.

    Benefits of Proper Garage Door Lubrication

    Proper lubrication offers a multitude of benefits. It leads to quieter operation, reducing the annoying and disruptive sounds that can be associated with a poorly maintained door. Lubrication also reduces friction, which translates to less wear and tear on the door’s components, extending their lifespan. Smooth operation is another significant benefit. A well-lubricated door opens and closes with ease, avoiding jerky movements or sticking.

    Safety is another important factor. A properly maintained door is less likely to malfunction, minimizing the risk of accidents and injuries. Finally, lubrication can lower energy consumption, leading to lower operational costs over time.

    Comparison of Lubrication Methods

    | Method | Pros | Cons ||—|—|—|| White Lithium Grease | Excellent for high-stress areas, resists water and temperature changes, effective in reducing friction. | Can be difficult to apply evenly, and can attract dust and debris over time. || Spray Lubricant | Easy to apply, widely available in various types, suitable for quick lubrication and spot treatments. | Can be less effective in high-stress areas, and may not be as durable as grease.

    || Silicone Spray Lubricant | Excellent for moving parts, provides a smooth, protective coating, effective in reducing friction, and is ideal for use in areas that are exposed to water or moisture. | Can be more expensive than other options, and might not be suitable for all types of garage doors. || Dry Film Lubricant | Long-lasting, resists moisture, effective in reducing friction and wear, suitable for various surfaces.

    | Can be more challenging to apply, and may require specific tools for precise application. |

    Identifying Lubrication Needs

    Knowing when your garage door needs lubrication is crucial for its smooth operation and longevity. Ignoring signs of insufficient lubrication can lead to costly repairs down the road. Proper lubrication prevents squeaking, sticking, and premature wear, ensuring years of reliable service from your garage door.Identifying the telltale symptoms of needing lubrication allows you to proactively address the issue, preventing more serious problems.

    This proactive approach will save you time, money, and effort in the long run. A well-lubricated garage door is a quieter, more efficient, and safer garage door.

    Common Signs of Lubrication Needs

    Proper lubrication is essential for a smooth-running garage door system. Several indicators can signal the need for lubrication, allowing for timely intervention and preventing more serious issues. Recognizing these signs can help avoid costly repairs and maintain optimal performance.

    • Loud Squeaking or Grinding Sounds: A common and noticeable sign of insufficient lubrication is the production of loud squeaking or grinding noises. These sounds often emanate from the hinges, rollers, or tracks, indicating friction between moving parts. Consistent squeaking or grinding necessitates immediate lubrication to prevent further damage and discomfort.
    • Sticking or Difficulty Opening/Closing: If your garage door is experiencing difficulty opening or closing, it may be a sign of insufficient lubrication. Sticky or stiff movement often indicates a lack of lubrication on the rollers, hinges, or tracks. Addressing this promptly will restore smooth operation and prevent more serious damage.
    • Visible Wear and Tear: Inspecting the garage door components for visible signs of wear and tear is important. Excessive wear on the rollers, hinges, or tracks often points to inadequate lubrication, leading to accelerated deterioration. This proactive approach to lubrication can significantly extend the lifespan of your garage door.

    Symptoms of Insufficient Lubrication

    Insufficient lubrication can manifest in several ways, affecting the garage door’s overall performance and lifespan. Understanding these symptoms can help you schedule timely lubrication sessions.

    • Increased Friction: Insufficient lubrication results in increased friction between moving parts, causing the garage door to operate with more resistance and noise. This increased friction can lead to faster wear and tear on the components.
    • Reduced Lifespan: Prolonged lack of lubrication can significantly shorten the lifespan of your garage door system. The increased friction and wear lead to premature failure of the rollers, hinges, tracks, and other components.
    • Safety Hazards: An improperly lubricated garage door may become difficult to operate, potentially causing safety hazards. Sudden stops, unexpected movements, or sticking can lead to accidents.

    Garage Door Lubrication Inspection Checklist

    Regular inspections are essential for maintaining the performance and longevity of your garage door. This checklist ensures that all crucial components are thoroughly inspected and lubricated.

    1. Visual Inspection of Rollers: Examine the rollers for any visible signs of damage, wear, or rust. Look for any areas of excessive friction or unusual wear patterns. Pay particular attention to the roller wheels and tracks for proper lubrication.
    2. Check Tracks for Obstructions: Inspect the tracks for any debris, dirt, or obstructions that could interfere with smooth operation. Removing these obstacles is vital for proper lubrication and operation.
    3. Assess Hinge Lubrication: Carefully examine the hinges for signs of rust or dryness. Proper lubrication on the hinges prevents friction and noise.
    4. Listen for Sounds: Pay attention to any unusual sounds, such as squeaking, grinding, or scraping, during the operation of the garage door. This allows you to pinpoint the specific areas that require lubrication.
    5. Examine Spring Tension: Ensure the springs are properly tensioned and not exhibiting any signs of wear or damage. This step is crucial for safety and the proper operation of the garage door.

    Importance of Regular Lubrication Schedules

    Regular lubrication schedules are critical for maintaining a garage door’s smooth operation and longevity. A consistent schedule prevents problems and ensures optimal performance.

    • Proactive Maintenance: Regular lubrication is a proactive maintenance step, preventing potential problems and extending the lifespan of your garage door.
    • Reduced Repair Costs: Addressing lubrication needs promptly can save significant repair costs in the long run. Early intervention prevents the accumulation of more serious problems.
    • Enhanced Safety: A well-maintained and lubricated garage door ensures smooth operation and reduces potential safety hazards.

    Choosing the Right Lubricant

    Lubricate a Garage Door

    Picking the right lubricant for your garage door is crucial for smooth operation and longevity. Different lubricants offer varying properties, making some more suitable for specific parts and weather conditions than others. Understanding these differences will help you maintain your garage door in top shape.Choosing the right lubricant is a key part of garage door maintenance. It’s not just about slapping on any grease; different parts of the system respond better to specific lubricant types.

    This guide will explore the various options and help you select the best one for your garage door, ensuring years of reliable service.

    Types of Lubricants

    Various lubricant types are available, each with its own characteristics. Understanding these differences is vital for effective garage door maintenance.

    • White Lithium Grease: This grease is a popular choice for its excellent extreme pressure (EP) properties. It provides a thick, durable film that protects metal parts from wear and tear, especially in high-stress areas. White lithium grease is known for its resistance to water and temperature fluctuations, making it suitable for a wide range of climates.
    • Spray Lubricants: Spray lubricants are convenient for quick application, particularly on moving parts like hinges and rollers. They often contain petroleum-based oils or synthetic compounds, providing a thin layer of lubrication. While effective for short-term solutions, they may not offer the same level of long-term protection as grease, and can be washed away by rain or moisture.
    • Silicone-based Lubricants: These lubricants are popular for their ability to resist moisture and high temperatures. They often come in spray form and are particularly well-suited for use on garage door springs, as they are excellent at preventing rust and corrosion.

    Properties of Lubricants

    The effectiveness of a lubricant depends on several key properties.

    • Extreme Pressure (EP) Properties: EP greases, like white lithium, are designed to withstand high pressures and stresses. This is crucial for parts like gears and hinges that experience significant force during operation.
    • Water Resistance: Some lubricants are better at resisting water than others. This is important in areas with high humidity or frequent rainfall. White lithium grease, for instance, is highly water-resistant, while spray lubricants might require more frequent reapplication in damp conditions.
    • Temperature Resistance: Extreme temperatures can affect the viscosity and effectiveness of lubricants. Choosing a lubricant that can maintain its properties in your specific climate is essential. White lithium grease, again, excels in both extreme heat and cold.

    Effectiveness in Different Weather Conditions

    Weather conditions can significantly impact the performance of lubricants.

    • High Humidity: High humidity can lead to moisture accumulation, potentially diminishing the effectiveness of spray lubricants. White lithium grease, with its water-resistance, is a more suitable choice in these conditions.
    • Extreme Temperatures: Extreme heat can cause lubricants to thin out, losing their effectiveness. Conversely, extreme cold can make some lubricants too thick to flow properly. Lubricants with good temperature resistance are essential for consistent operation throughout the year.
    • Freezing Conditions: In freezing temperatures, some lubricants might solidify, hindering their ability to lubricate the moving parts. Choose a lubricant that remains effective at freezing temperatures to ensure proper functionality.

    Recommendations for Specific Parts

    Different parts of a garage door mechanism require different types of lubrication.

    Keeping your garage door running smoothly often involves simple maintenance, like lubricating the tracks and hinges. Speaking of smooth, did you hear that Bryan Ferry just announced a new album, Avonmore, featuring a stellar lineup including Johnny Marr, Nile Rodgers, Todd Terje, Flea, and Ronnie Spector? This incredible album is sure to have some amazing tunes, but in the meantime, a well-lubricated garage door will keep things moving smoothly for you too.

    So, grab some lubricant and get those tracks and hinges squeaking less!

    • Springs: Silicone-based lubricants are excellent choices for springs due to their resistance to corrosion and high temperatures. These conditions are common in garage door springs. Avoid spray lubricants, as they might not provide sufficient protection against rust and corrosion.
    • Hinges and Rollers: Spray lubricants work well for hinges and rollers due to their ease of application. However, consider using a light coating of white lithium grease in areas prone to significant wear or high friction, to ensure the lubricant remains in place over time.
    • Gears and Tracks: White lithium grease, due to its high EP properties, is ideal for gears and tracks. This grease will withstand the considerable pressure and stress applied to these components.

    Preparing for Lubrication: Lubricate A Garage Door

    Before diving into the satisfying task of lubricating your garage door, meticulous preparation is key. Proper safety precautions and a well-defined procedure will ensure a smooth and safe experience, minimizing the risk of injury and maximizing the effectiveness of your lubrication efforts. A methodical approach to disengaging the opener and securing the door is essential for both your safety and the longevity of your garage door system.

    Safety Precautions

    Ensuring a safe environment is paramount before initiating any lubrication process. Always prioritize personal safety by taking necessary precautions. This includes wearing appropriate safety gear such as safety glasses to protect your eyes from flying debris or lubricant particles. Consider using gloves to prevent skin irritation from certain lubricants. Furthermore, be aware of the potential for tripping hazards around the garage door area.

    Maintaining a clear workspace free of obstructions is crucial.

    Disengaging the Garage Door Opener, Lubricate a Garage Door

    Correctly disengaging the garage door opener is a critical first step in preparing for lubrication. A step-by-step procedure is Artikeld below to ensure a safe and effective disengagement.

    1. Locate the garage door opener’s control panel and identify the button or lever to disconnect the power to the garage door motor. Press or engage this control.
    2. Verify the door’s complete halt. Check for any movement or residual momentum before proceeding.
    3. Disconnect the power cord to the garage door opener at the wall outlet to eliminate any electrical risk.

    Securing the Garage Door

    Ensuring the garage door remains stationary during the lubrication process is critical. Employing proper methods to secure the garage door is crucial for safety and efficiency. The following method is a safe way to accomplish this.

    1. Locate the emergency release mechanism for the garage door. This release is usually located at the bottom of the door’s side panels. Engage the mechanism, usually a lever or handle.
    2. With the door in a lowered or raised position, use a strong, sturdy support to hold the door securely in place. A combination of heavy-duty blocks or a specialized door-holding device is often suitable for this purpose.
    3. Verify the door is stable and won’t move during the lubrication process. This is crucial to prevent accidents.

    Tools Needed

    The following table Artikels the essential tools for a successful garage door lubrication session. Having the right tools on hand streamlines the process and ensures the job is completed efficiently.

    | Tool | Description ||—|—|| Safety Glasses | Protects eyes from flying debris or lubricant. || Work Gloves | Protects hands from lubricant and potential hazards. || Lubricant | Specific lubricant suitable for garage door tracks and rollers (refer to previous section for selection). || Garage Door Opener Remote (or Manual Release) | To confirm the opener is completely disconnected from the door. || Sturdy Blocks/Supports | To safely secure the garage door in place during lubrication. || Rags/Cloth | For cleaning up any spills or excess lubricant. || Small Screwdriver (if necessary) | For disassembling components if needed, or adjusting door mechanisms. |

    Lubrication Procedures

    Proper lubrication is crucial for the smooth and efficient operation of your garage door. Regular maintenance, including lubrication, prevents wear and tear, extends the lifespan of your system, and minimizes the risk of costly repairs. By following the detailed procedures Artikeld below, you can effectively lubricate your garage door and maintain its optimal performance.Lubrication procedures are straightforward and don’t require specialized tools or skills.

    Following these steps will help you achieve the best results, ensuring your garage door operates quietly, reliably, and safely for years to come.

    Lubricating Garage Door Tracks

    Proper lubrication of the garage door tracks prevents friction and ensures smooth operation. This process is essential for minimizing wear and tear on the tracks and the door itself.

    • Apply a thin film of lubricant to the entire length of the tracks. Use a lubricant specifically designed for metal-on-metal contact. Avoid over-lubrication, as excess lubricant can attract dirt and debris, potentially hindering the door’s operation.
    • Ensure the lubricant is evenly distributed along the tracks. Use a lubricant applicator or a clean cloth to spread the lubricant consistently. This even distribution ensures that all moving parts receive the necessary lubrication.
    • Pay special attention to the areas where the door’s rollers make contact with the tracks. Concentrate lubricant in these areas to minimize friction and wear.

    Lubricating Garage Door Rollers

    Garage door rollers are essential for smooth movement and play a significant role in the overall performance of your garage door. Maintaining these rollers with appropriate lubrication will ensure they function efficiently and minimize wear.

    • Locate the rollers on the door and the track. Identify any areas where the rollers show signs of wear or friction. Focus your lubrication efforts on these areas.
    • Apply a small amount of lubricant to each roller. A light coat is sufficient. Excessive lubricant can attract debris and potentially affect the door’s operation.
    • Ensure the lubricant is applied to the metal surfaces of the rollers and the parts of the tracks they interact with.

    Lubricating Hinges and Other Moving Parts

    Proper lubrication of hinges and other moving parts is essential for maintaining a smooth and quiet operation of your garage door. Hinges, in particular, are susceptible to rust and friction.

    • Identify the hinges and other moving parts on your garage door. These include any other components that move or rotate, such as the springs.
    • Apply a small amount of lubricant to each hinge and moving part. Use a lubricant specifically formulated for metal-to-metal contact. Apply a light coat and avoid excessive amounts.
    • Pay attention to the areas where friction is most evident. Concentrate lubricant in these specific points to effectively minimize friction and enhance smooth operation.

    Applying Lubricant Evenly and Efficiently

    Even and efficient application of lubricant is crucial for effective lubrication. This ensures that all necessary parts receive the proper amount of lubricant, minimizing friction and maximizing performance.

    • Use a lubricant applicator designed for the specific type of lubricant being used. These applicators can ensure precise and controlled application.
    • Apply lubricant in a thin, even layer, avoiding excessive buildup. An even coat of lubricant will ensure better distribution and performance.
    • Wipe away any excess lubricant with a clean cloth. This will prevent lubricant from attracting dirt and debris and ensure a clean and efficient operation.

    Maintaining Lubrication

    Keeping your garage door well-lubricated is crucial for its smooth operation and longevity. Proper maintenance ensures quiet operation, prevents premature wear and tear, and minimizes the risk of costly repairs down the line. A well-maintained garage door is not just a convenience; it’s a testament to responsible homeownership.Regular lubrication is vital to the overall health of your garage door system.

    Think of it like oiling a machine – consistent lubrication reduces friction, allowing the moving parts to glide effortlessly. This translates to less strain on the system, extending its lifespan significantly.

    Importance of Consistent Lubrication

    Maintaining a consistent lubrication schedule prevents the accumulation of dust, debris, and grime. This buildup can act as an abrasive, causing significant wear on the rollers, springs, and tracks. Regular lubrication creates a protective barrier against these harmful elements, extending the life of your garage door system. Consistent maintenance ensures the components remain in optimal condition.

    Frequency of Re-lubrication

    The frequency of re-lubrication depends on several factors, including the type of lubricant used, the climate, and the intensity of use. A garage door that’s used daily in a humid environment will require more frequent attention than one used less often in a dry climate.

    • Daily/Heavy Use: For high-traffic garage doors, re-lubrication should occur every 1-3 months. This ensures that the lubricant remains effective and protects the system from wear and tear. Frequent use generates more friction, necessitating more frequent lubrication.
    • Moderate Use: Garage doors used several times a week might need re-lubrication every 3-6 months. The frequency will still depend on the environment, the specific lubricant, and the overall condition of the door.
    • Seasonal Considerations: Extreme weather conditions, like prolonged periods of drought or humidity, can affect the longevity of lubricants. Adjust your lubrication schedule accordingly to ensure optimal performance. In particularly harsh climates, consider using specialized lubricants formulated for extreme conditions.

    Preventing Future Lubrication Issues

    Addressing potential issues before they escalate is key to preventing costly repairs. Regular inspections and proactive maintenance are crucial in the long run.

    • Regular Inspections: Visually inspect the rollers, tracks, and springs for any signs of wear or damage. This will help you identify problems early on, before they become major issues. Regular visual checks are essential to proactively identify and address any potential problems.
    • Cleanliness: Keeping the garage door area clean and free from debris will extend the life of the lubricant. Dust, dirt, and other particles can clog the system and reduce the effectiveness of the lubrication. A clean garage door area allows for effective lubrication.
    • Lubricant Selection: Choose a lubricant specifically designed for garage doors. Different lubricants have different properties, and using the wrong type can be counterproductive. A suitable lubricant prevents corrosion and extends the life of the garage door system.

    Cleaning Garage Door Tracks and Rollers

    Proper cleaning of the tracks and rollers is essential for maintaining lubrication. A clean surface ensures the lubricant works effectively and doesn’t get trapped in debris.

    1. Gather Supplies: Gather a stiff brush, a garden hose (optional), a bucket of soapy water, and a clean cloth.
    2. Preparation: Disconnect the garage door opener to avoid accidental activation. This precaution prevents unexpected operation during cleaning.
    3. Cleaning Tracks: Use the stiff brush to scrub the tracks, removing any dirt, grime, or debris. A garden hose can help flush away loose debris. A bucket of soapy water can effectively loosen stubborn dirt. Ensure the tracks are thoroughly cleaned to remove any debris or residue.
    4. Cleaning Rollers: Carefully clean the rollers with the stiff brush or a clean cloth. Pay special attention to the wheels and shafts, ensuring a complete cleaning.
    5. Drying: Thoroughly dry all the tracks and rollers with a clean cloth. This prevents rust and ensures optimal lubrication performance. Thorough drying prevents moisture from damaging the tracks and rollers.

    Troubleshooting Lubrication Problems

    Keeping your garage door smoothly operating relies heavily on consistent lubrication. However, despite proper application, issues like squeaking or sticking can arise. This section dives into common lubrication problems, offering solutions and troubleshooting steps to diagnose and resolve them. Understanding the source of these problems is crucial for preventing future issues and maintaining the longevity of your garage door.

    Common Lubrication Problems

    Garage door lubrication problems often stem from improper application, the wrong type of lubricant, or neglecting regular maintenance. Common issues include squeaking, sticking, or a complete lack of smooth operation. Identifying the specific problem is the first step toward effective troubleshooting.

    Solutions for Squeaking Garage Doors

    Squeaking often indicates insufficient lubrication or the use of an inappropriate lubricant. Addressing the squeak requires precise application and the selection of the right lubricant for the specific moving parts. A common solution is to reapply lubricant to the affected areas, ensuring thorough coverage. If the squeak persists, inspect the hinges, rollers, and tracks for any debris or rust that might be causing the noise.

    Solutions for Sticking Garage Doors

    A sticking garage door can stem from various causes, including insufficient lubrication, accumulated dirt or debris, or worn-out rollers and tracks. If lubrication is the issue, reapplying the correct lubricant to the affected areas is essential. However, if the door still sticks, consider cleaning the tracks thoroughly, removing any obstructions, and replacing worn-out rollers or springs.

    Troubleshooting Steps for Lubrication-Related Issues

    Troubleshooting lubrication problems involves a systematic approach. First, identify the specific problem (squeaking, sticking, etc.). Next, determine the affected areas (hinges, rollers, tracks). Thoroughly clean the affected areas before reapplying lubricant. If the issue persists, consider the possibility of worn-out components, such as rollers or springs.

    Identifying the Source of Lubrication Problems

    Pinpointing the source of lubrication problems is essential for effective solutions. A detailed inspection of the garage door’s moving parts, including hinges, rollers, and tracks, is vital. Check for any visible debris, rust, or signs of wear. Listen for any unusual noises, such as grinding or scraping, which might indicate a mechanical problem. By carefully inspecting the components and paying attention to any anomalies, the root cause of the lubrication issue can be determined.

    Keeping your garage door running smoothly is important, just like Obi-Wan Kenobi’s meticulous training regimen. A well-lubricated garage door ensures quiet operation and extends its lifespan. Think about how a Jedi Master like Obi-Wan Kenobi obi wan kenobi typical day maintains focus and precision; the same dedication applies to lubricating your garage door. Regular maintenance, like a well-oiled machine, is key to preventing future problems.

    So, grab your lubricant and get started!

    Safety Considerations

    Keeping your garage door in top working order is crucial, but safety should always be paramount. Proper lubrication procedures, while seemingly straightforward, require careful attention to detail and appropriate safety measures. Ignoring these precautions can lead to significant injuries or damage to the door mechanism.

    Importance of Safety Gear

    Proper safety gear is essential for protecting yourself during garage door lubrication. This includes, but is not limited to, safety glasses, work gloves, and sturdy footwear. Eye protection shields your eyes from flying debris or accidental lubricant splashes. Gloves protect your hands from potential cuts or abrasions, and robust footwear provides stability, preventing slips and falls. Neglecting safety gear can result in minor to serious injuries.

    Keeping your garage door humming smoothly often involves a simple task like lubrication. But sometimes, preparing for a big presentation, like Do a Presentation in Class , can be just as demanding. It’s all about focusing on the details, whether you’re greasing the tracks or nailing that presentation. Proper garage door lubrication can save you a lot of headaches down the line, just like mastering presentation skills can save you from a lot of anxiety.

    Risks of Improper Lubrication Techniques

    Improper lubrication techniques can lead to a variety of risks. For example, applying excessive lubricant can lead to spills, making the garage floor slippery and increasing the risk of falls. Applying lubricant to moving parts without proper safety precautions can cause the door to malfunction or accelerate wear and tear, necessitating more frequent repairs and potentially leading to expensive replacements.

    Improper technique also increases the chance of getting lubricant in the eyes or on the skin.

    Emergency Procedures

    Having a clear plan for emergency situations is critical. If a malfunction occurs during lubrication, immediately disconnect the power supply to the garage door opener. If a person is injured, call emergency services immediately. Document the incident and any details relevant to the malfunction for future reference. For example, a sudden loud noise might signal a broken gear, while a lingering smell could point to a fire hazard.

    Maintaining a well-stocked first-aid kit and knowing first aid procedures is a must.

    Flowchart for Handling Safety Concerns

    This flowchart Artikels the steps to follow when encountering safety concerns during garage door lubrication:

    Start -->
    |
    V
    Check for power supply disconnection. (Yes/No)
    |
    V
    If No, disconnect power supply.
    |
    V
    Wear safety gear (glasses, gloves, footwear).
    |
    V
    Inspect the garage door and identify potential hazards.
    |
    V
    Apply lubricant according to instructions.
    |
    V
    Monitor for any malfunctions or unusual sounds.
    |
    V
    If malfunction occurs, immediately disconnect power supply and document the incident.
    |
    V
    If injury occurs, call emergency services and provide first aid.
    |
    V
    End
     

    Additional Tips and Recommendations

    Optimizing garage door performance and longevity goes beyond just lubrication.

    Implementing preventative maintenance and understanding the role of environmental factors are crucial. This section provides additional strategies to maximize the lifespan and smooth operation of your garage door.

    Proper maintenance, including consistent lubrication and periodic inspections, is essential for a garage door’s longevity. Ignoring these aspects can lead to costly repairs and potentially dangerous situations. By understanding the specific needs of your garage door, you can ensure it functions reliably for years to come.

    Optimizing Garage Door Performance

    Regular inspection is key to identifying potential problems early on. This proactive approach prevents minor issues from escalating into major repairs. Visual checks should be part of a routine, examining the door’s tracks, springs, and hinges for any signs of wear or damage.

    • Regular Inspection: Conduct visual checks of the tracks, springs, hinges, and rollers at least once a month. Note any unusual noises, sticking, or uneven movement. Early detection prevents larger problems.
    • Adjusting the Door’s Alignment: Slight misalignments can cause the door to bind or jam. Professional adjustment can significantly improve performance and prevent wear and tear.
    • Proper Door Balance: Ensure the door is properly balanced. An imbalanced door puts excessive stress on the system, leading to premature wear and tear on the springs and other components. A professional should check this regularly.

    Preventing Damage and Extending Lifespan

    Protecting your garage door from the elements is as important as internal maintenance. Extreme weather conditions can significantly impact the lifespan and efficiency of your garage door.

    • Protecting from the Elements: Proper insulation and sealing can minimize the impact of harsh weather conditions. This includes preventing moisture accumulation in the tracks and ensuring the door’s seals are intact.
    • Regular Cleaning: Dust and debris can accumulate in the tracks and on the door’s surface. Regular cleaning helps prevent the build-up of grime and rust, improving the overall functionality of the system.
    • Storing Equipment Properly: If you store items near your garage door, ensure that these items do not damage the tracks or door. Proper storage minimizes wear and tear.

    Maintenance Schedules and Lubrication Routines

    Establishing a regular maintenance schedule is vital for preserving your garage door’s functionality. The frequency of maintenance depends on the specific type of door and the environmental conditions.

    Maintenance Type Frequency Details
    Visual Inspection Monthly Check for any signs of wear, damage, or unusual noises.
    Lubrication Quarterly or as needed Lubricate moving parts as per the manufacturer’s recommendations.
    Professional Inspection Annually Have a qualified technician inspect the entire system for any potential issues.

    Impact of Climate on Garage Door Lubrication

    Extreme temperatures and humidity can affect the effectiveness of lubrication. Understanding how climate impacts your garage door’s operation can help optimize maintenance.

    • High Temperatures: High temperatures can cause lubricants to evaporate more quickly. More frequent lubrication may be necessary during the warmer months.
    • Low Temperatures: Low temperatures can make lubricants thicker, potentially hindering smooth operation. Choosing the right lubricant for cold weather conditions can help.
    • Humidity: High humidity can accelerate rust formation in the tracks and other metal components. Ensuring the garage door is properly sealed and maintaining a regular lubrication schedule is vital in humid environments.

    Last Word

    Lubricate a Garage Door

    In conclusion, lubricating your garage door isn’t just a chore; it’s an investment in its longevity and your peace of mind. By understanding your door’s specific needs, choosing the right lubricant, and following the safety guidelines, you can ensure years of smooth, trouble-free operation. Regular maintenance is key, and this guide equips you with the knowledge to keep your garage door running like a well-oiled machine.

    Remember to always prioritize safety throughout the process.

  • Expert Choose Wood to Build a Shed A Comprehensive Guide

    Expert Choose Wood to Build a Shed A Comprehensive Guide

    Expert Choose Wood to Build a Shed: This guide dives deep into the crucial decision of selecting the right wood for your shed project. From comparing various wood types to understanding the impact of climate and budget, we’ll equip you with the knowledge to make an informed choice. Whether you’re a seasoned DIYer or a novice builder, this comprehensive guide will help you construct a durable and aesthetically pleasing shed that stands the test of time.

    Choosing the right wood for your shed involves a careful consideration of factors such as durability, cost, and maintenance. Different wood species offer varying levels of resistance to rot, insects, and weather, and the selection process should be informed by the specific environmental conditions in your area. This guide will walk you through the entire process, from wood selection and preparation to finishing and protection, providing detailed insights and practical advice to help you succeed.

    Choosing Wood Types for Shed Construction

    Building a shed requires careful consideration of the wood you choose. The right wood type can significantly impact the longevity, aesthetics, and overall value of your project. Factors like climate, budget, and desired lifespan play a crucial role in selecting the optimal material. This guide delves into various wood types, their strengths and weaknesses, and how to select the best option for your shed.Selecting the appropriate wood for your shed construction is paramount for its durability and longevity.

    Different wood types exhibit varying levels of resistance to rot, insects, and weather, impacting the shed’s lifespan. Understanding these differences is crucial to making an informed decision.

    Wood Types Suitable for Outdoor Sheds

    Various wood species excel in outdoor environments, offering excellent resistance to decay, insects, and weather. Choosing the right wood ensures your shed stands the test of time.

    • Cedar: Known for its natural resistance to rot and insects, cedar is a popular choice for outdoor structures. Its attractive reddish-brown color adds a touch of elegance to any shed. Cedar’s inherent oils provide a natural defense against decay and pests, minimizing the need for extensive treatments.
    • Pressure-Treated Lumber: This wood has been chemically treated to increase its resistance to rot, decay, and insect infestation. This treatment significantly extends the lifespan of the shed compared to untreated lumber, making it a cost-effective choice for longevity.
    • Pine: A relatively affordable option, pine can be a good choice for sheds, especially when combined with preservative treatments. While not as naturally resistant as cedar, pine’s strength and availability make it a viable alternative.
    • Redwood: Known for its exceptional durability and resistance to rot and decay, redwood is an excellent choice for longevity. Its natural oils provide exceptional protection against moisture and insects. However, it’s typically more expensive than other options.

    Untreated vs. Treated Lumber

    The choice between untreated and pressure-treated lumber depends on your budget, desired lifespan, and the severity of the local climate conditions.

    • Untreated Lumber: Untreated lumber, while often less expensive, requires more maintenance and is susceptible to rot, insects, and decay. This necessitates periodic treatments with preservatives to extend its lifespan.
    • Treated Lumber: Pressure-treated lumber offers enhanced resistance to decay and insects, significantly extending the life of your shed. This treatment is typically more expensive than untreated lumber, but the reduced maintenance and extended lifespan make it a worthwhile investment.

    Wood Preservation Techniques

    Proper wood preservation techniques are essential for extending the lifespan of your shed. These methods significantly contribute to the long-term structural integrity of your project.

    • Applying preservatives: Regular application of wood preservatives is crucial to prevent rot and insect damage. Following the manufacturer’s instructions for application ensures effective protection.
    • Proper sealing: Proper sealing of wood joints and exposed surfaces protects the wood from moisture and decay. This includes caulking gaps and using weather-resistant sealants.
    • Avoiding moisture: Moisture is a major enemy of wood. Ensuring proper drainage around the shed foundation and avoiding excessive moisture exposure significantly extends the lifespan of your shed.

    Wood Type Comparison Table

    This table summarizes the cost, durability, resistance to rot, and maintenance requirements of different wood types.

    Wood Type Cost Durability Resistance to Rot Maintenance
    Cedar Medium High High Low
    Pressure-Treated Pine Medium-Low High High Moderate
    Redwood High Very High Very High Low
    Untreated Pine Low Moderate Low High

    Factors Influencing Wood Selection for a Shed

    Choosing the right wood for your shed is crucial for its longevity and aesthetic appeal. Beyond simply selecting a visually pleasing species, factors like climate, budget, and intended use play a significant role in determining the ideal wood type. Careful consideration of these elements will result in a shed that not only looks great but also withstands the test of time.Understanding the interplay between these factors allows you to make informed decisions, ensuring your shed project meets your needs and expectations.

    A well-considered selection process will translate into a structure that will provide reliable service for many years.

    Climate Conditions

    Climate significantly impacts the durability of wood. Regions with high humidity or extreme temperature fluctuations require more durable wood species. For example, in areas prone to heavy rainfall or frequent snowmelt, pressure-treated lumber is a wise choice due to its enhanced resistance to rot and decay. In arid climates, the choice might lean towards naturally resistant species like cedar or redwood.

    Understanding your local climate is paramount in ensuring your shed stands up to the elements. This consideration can prevent costly repairs and premature structural failures down the road.

    Budget Constraints

    Budget plays a vital role in wood selection. Pressure-treated lumber, while durable, can be more expensive than untreated options. If budget is a primary concern, consider less expensive options like pine or fir, though these may require more maintenance over time. Often, the balance between cost and durability is a key consideration. You need to find a suitable wood that aligns with your budget without compromising the structural integrity of the shed.

    Lumber Grades

    Different lumber grades offer varying levels of strength and appearance. Higher grades, like Select or Better, are typically stronger and more uniform in appearance, translating into a more visually appealing shed. However, these higher grades often come with a higher price tag. Lower grades, like Common or No. 2, might be more affordable but could have knots or variations in appearance.

    Understanding the trade-offs between grade and cost is essential for making the best decision within your budget. Careful inspection of the lumber is crucial to assess its suitability for the intended use and overall aesthetic.

    Shed Size and Intended Use

    The size and intended use of the shed influence the type of wood needed. A small storage shed might not require the same level of structural support as a larger workshop or potting shed. A shed used primarily for storage may not need the same quality wood as one designed for heavy use or frequent access. Consider the intended load and usage patterns when making your selection.

    This consideration will directly impact the long-term stability and performance of your shed.

    Factors to Consider When Selecting Wood

    Factor Description Impact on Cost Impact on Durability Impact on Aesthetics
    Climate Local weather conditions (humidity, temperature extremes) Can influence choice of pressure-treated lumber Determines resistance to rot and decay May affect wood species selection
    Budget Available funds for materials Directly impacts cost of lumber May limit choice to less expensive options Potential trade-offs in appearance
    Lumber Grade Quality and strength of the wood Higher grades are more expensive Higher grades offer greater strength and stability Higher grades provide a more consistent and appealing appearance
    Shed Size/Use Dimensions and intended purpose of the shed Larger sheds may require more costly lumber Load-bearing requirements impact durability needs Intended use may influence wood species for aesthetic appeal

    Building a Shed with Chosen Wood

    Choosing the right wood is only half the battle. Successfully building a sturdy and attractive shed requires careful preparation, precise cutting, and meticulous assembly. This section delves into the practical steps involved in transforming your chosen lumber into a functional and long-lasting structure.

    Preparing the Wood for Construction, Expert Choose Wood to Build a Shed

    Proper wood preparation is crucial for a strong and durable shed. This involves more than just getting the lumber; it’s about ensuring it’s ready to be assembled. The following steps are essential:

    • Inspect and Sort: Carefully examine each board for any defects like knots, cracks, or rot. Sort the lumber into categories based on its intended use (e.g., framing, sheathing, roofing). This ensures that the strongest, most suitable pieces are used for load-bearing elements.
    • Cut to Length: Using a saw (circular saw, miter saw, or hand saw), precisely cut the lumber to the dimensions required for each shed component. Accurate measurements are critical for a snug fit and a structurally sound shed. A well-maintained, sharp blade will result in clean cuts and reduce splintering.
    • Pre-Drilling: For larger, heavier components, pre-drilling holes for fasteners is recommended. This helps prevent wood splitting and ensures a more secure connection. Pre-drilling is especially important when using screws or nails.
    • Treating for Protection: Applying wood preservatives or sealants is a crucial step to protect the wood from rot and insects. Choose a treatment appropriate for the specific wood type and the environment in which the shed will be located. This step significantly increases the shed’s lifespan.

    Cutting and Assembling Wooden Components

    The assembly process demands precision and attention to detail. A well-planned strategy will save time and reduce errors.

    Choosing the right wood for your shed is crucial, and experts often recommend pressure-treated lumber for its durability. While I’m researching different types of wood for my own shed project, I’ve been jamming out to some awesome new tunes, like the latest “clip sunset blvd new song listen” here. Ultimately, selecting the perfect wood for a shed is a satisfying process, balancing aesthetics and longevity.

    1. Frame Construction: Begin by assembling the frame. This involves carefully joining the posts, beams, and rafters using the appropriate fasteners. Ensure that all connections are square and aligned to create a stable structure. Use a level and a framing square to ensure accuracy.
    2. Sheathing: Attach the sheathing (exterior covering) to the frame. This can be plywood, OSB, or other similar materials. Use appropriate fasteners and spacing to ensure the sheathing is properly secured and aligned.
    3. Roofing: Install the roof framing and roofing materials. This includes rafters, decking, and the roofing material itself (shingles, asphalt, or metal). Carefully follow the manufacturer’s instructions for proper installation to ensure water resistance and structural integrity.
    4. Doors and Windows: Install doors and windows according to the manufacturer’s instructions. Ensure proper alignment and security to prevent drafts and ensure smooth operation.

    Securing Wood Pieces Together

    Proper fastening is essential for a strong and durable shed. Different fasteners are suitable for different applications.

    • Nails: Common for simple connections, nails offer a relatively inexpensive and straightforward method. Choose appropriate gauge and length for the specific application.
    • Screws: Provide a more secure and adjustable connection than nails. Use wood screws appropriate for the thickness of the wood. Pre-drilling is highly recommended.
    • Fasteners: For larger components, specialized fasteners such as lag screws or bolts might be necessary. These are ideal for connections that will bear significant weight or stress.

    Preventing Wood Rot and Insect Damage

    Maintaining a shed’s structural integrity relies on protecting the wood from rot and insects.

    • Wood Preservatives: Apply wood preservatives or sealants to prevent fungal growth and insect infestations. Choose a treatment appropriate for the wood type and environment.
    • Proper Ventilation: Ensure adequate ventilation within the shed to minimize moisture buildup. This can help prevent rot and mold.
    • Regular Inspection: Periodically inspect the wood for any signs of damage. Early detection of rot or insect infestation allows for prompt treatment and prevents further damage.

    Building Shed Construction Sequence

    Step Description Estimated Time
    1 Prepare wood (cut, inspect, treat) 2-4 hours
    2 Assemble frame 4-6 hours
    3 Attach sheathing 2-3 hours
    4 Install roof 4-6 hours
    5 Install doors and windows 2-4 hours
    6 Final assembly and finishing 1-2 hours

    Wood Finishing and Protection

    Expert Choose Wood to Build a Shed

    Protecting the exterior of your shed is crucial for its longevity and aesthetic appeal. Proper finishing not only enhances the shed’s appearance but also shields the wood from the elements, preventing rot, decay, and insect damage. A well-maintained shed will stand the test of time, providing you with years of reliable storage space.Careful selection and application of wood finishes are vital for the shed’s overall health.

    The right finish will create a protective barrier against moisture, UV rays, and pests, significantly extending the life of the structure.

    Importance of Wood Finishing

    Finishing the wood exterior of a shed is essential for preventing damage. Wood is naturally susceptible to moisture damage, which can lead to rot, warping, and structural weakening. Exposure to sunlight and rain can also cause the wood to fade and become brittle over time. Finishing creates a barrier against these elements, protecting the wood and extending the lifespan of the shed.

    A well-finished shed will retain its attractive appearance and structural integrity for many years.

    Choosing the right wood for your shed is crucial, and experts often recommend pressure-treated lumber for its durability. While researching different types, I stumbled upon this fascinating video of Bon Iver and Justin Vernon performing at Coachella, complete with the legendary shouting matches – a truly unforgettable concert experience. watch bon ivers justin vernon play coachella with the shouting matches Ultimately, though, the best wood for a shed depends on your budget and desired lifespan.

    My next project will definitely include pressure-treated wood for longevity.

    Wood Finishes for Sheds

    Various wood finishes are available for shed construction, each with its own set of benefits and drawbacks. The best choice depends on the specific needs and preferences of the homeowner.

    • Sealers: Sealers create a protective barrier on the wood surface, preventing moisture penetration. They typically offer good protection against rot and decay but often have a limited impact on UV-induced fading. Sealers are often recommended for use with pressure-treated lumber, which is less likely to need a stain. Some sealers also offer resistance to insect damage. A clear sealer is a common choice for maintaining the natural look of the wood.

    • Stains: Wood stains penetrate the wood’s surface, coloring it while providing some protection against the elements. Stains offer a more visually appealing option than sealers, allowing the natural wood grain to show through while protecting the wood. Stains come in a variety of colors and can be transparent or opaque, allowing for customization. The drawback of stains is their limited UV protection, so regular reapplication may be necessary.

    • Paints: Paints offer excellent protection against the elements, including UV rays, moisture, and pests. Paints provide a robust barrier and are available in a wide range of colors, allowing for easy customization of the shed’s appearance. However, paints can sometimes obscure the natural beauty of the wood and require more frequent reapplication compared to sealers or stains. Painting can also be more costly than other options.

    Applying Wood Sealant or Stain

    Proper application of a sealant or stain is crucial for achieving effective protection. This process ensures a consistent and durable finish.

    Choosing the right wood for a shed is crucial, and experts often consider factors like durability and weather resistance. This often involves understanding local conditions, like the specific characteristics of taragana pyjarama lo ng which can influence the best wood choices. Ultimately, the right wood selection for a shed depends on a variety of factors, ensuring longevity and a sturdy structure.

    1. Preparation: Thoroughly clean the wood surface, removing any dirt, debris, or loose paint. Repair any damaged areas before applying the finish. Sanding the wood can improve adhesion and create a smoother surface for the finish.
    2. Application: Follow the manufacturer’s instructions for the specific finish. Apply the finish in thin, even coats, allowing each coat to dry completely before applying the next. Using a brush, roller, or sprayer will depend on the finish type.
    3. Drying and Curing: Allow the finish to dry completely according to the manufacturer’s instructions. Avoid exposing the finished shed to moisture or direct sunlight until the finish has cured. This will prevent issues with the finish bonding with the wood.

    Comparing Wood Protection Methods

    Different wood protection methods vary in their effectiveness and longevity.

    • Sealers offer a long-lasting protective barrier, but the finish may not be as visually appealing as stains or paints. The clear finish is an ideal choice to retain the natural beauty of the wood.
    • Stains are a good option for enhancing the appearance of the wood while providing protection against the elements. However, they may need to be reapplied more frequently than sealers or paints.
    • Paints provide the highest level of protection but can sometimes obscure the natural wood grain and require more frequent maintenance.

    Exterior Finishes Comparison Table

    Finish Type Cost Durability Appearance
    Sealers Moderate High Natural, subtle
    Stains Moderate Medium Appealing, wood-toned
    Paints High High Customizable, vibrant

    Tools and Materials Needed for Wood Shed Construction: Expert Choose Wood To Build A Shed

    Expert Choose Wood to Build a Shed

    Building a shed requires careful planning and the right tools and materials. Choosing the right wood type is crucial, but equally important is having the necessary equipment and supplies to ensure a strong, durable, and aesthetically pleasing structure. This section details the essential tools, lumber types, and protective materials needed for your shed project.

    Essential Tools for Woodworking

    Proper tools are essential for a successful shed project. Investing in quality tools will save time and effort, leading to a higher quality finished product. A well-equipped toolbox will include:

    A variety of saws (hand saws, circular saws, reciprocating saws), drills (drill bits in various sizes), measuring tools (tape measures, levels, squares), and fasteners (nails, screws, and anchors).

    A good set of hand tools is crucial for accurate cuts and precise assembly. These include a combination square, try square, and a level. Electric tools like a circular saw, drill, and reciprocating saw will make large tasks like cutting lumber and driving screws significantly faster and more efficient. A cordless drill is a versatile tool that simplifies various tasks.

    Types of Lumber for Shed Construction

    Selecting the appropriate lumber is vital for the structural integrity and longevity of your shed. Different lumber types offer varying strengths and resistances to environmental factors.

    Common lumber types include pressure-treated lumber, dimensional lumber, and plywood.

    Pressure-treated lumber is resistant to rot and insect damage, making it ideal for ground contact. Dimensional lumber, such as 2x4s and 2x6s, is used for framing and support. Plywood, in various thicknesses, is used for sheathing walls and roofs. Consider the load-bearing requirements of your shed when choosing the appropriate lumber type. For example, if your shed will house heavy tools, use thicker lumber for support beams.

    Wood Protection Materials

    Protecting your wood from moisture and insects is crucial for the longevity of your shed. This involves using preservatives and sealants.

    Applying wood preservatives and sealants is essential to prevent decay and insect infestations.

    Pressure-treated lumber is often treated with preservatives. For other types of lumber, exterior-grade wood preservatives are crucial for protection. Exterior-grade paint or stain can further protect the wood from weathering. Applying multiple coats, especially in high-moisture areas, is recommended for optimal protection.

    Foundation and Securing Materials

    Securing the shed to the foundation is crucial for its stability. This requires specific tools and materials.

    Appropriate anchors and fasteners are necessary for securely attaching the shed to the foundation.

    Foundation materials like concrete or gravel are essential to provide a stable base. Appropriate anchors, such as concrete anchors, are necessary to securely attach the shed frame to the foundation. This step ensures the shed’s stability and longevity. Use appropriate fasteners, like galvanized steel screws or nails, to ensure a strong connection between the lumber and the anchors.

    This prevents the shed from shifting or detaching over time.

    Tools and Materials Summary

    The following table summarizes the essential tools and materials for shed construction, categorized by their function:

    Category Tools/Materials
    Saws Hand saws, circular saws, reciprocating saws
    Drills Drill bits, cordless drills, impact drivers
    Measuring & Marking Tape measures, levels, squares, marking pencils
    Fasteners Nails, screws, anchors, galvanized nails
    Wood Protection Pressure-treated lumber, wood preservatives, exterior paint/stain
    Foundation & Securing Concrete, gravel, concrete anchors, galvanized steel screws
    Other Safety glasses, work gloves, protective gear, work boots

    Final Conclusion

    In conclusion, constructing a shed using the right wood is a multifaceted process that requires careful planning and execution. This guide has provided a comprehensive overview of the key factors to consider, from selecting the perfect wood species to ensuring proper finishing and protection. By following these steps, you can build a sturdy and beautiful shed that will serve you well for years to come.

    Remember to tailor your choices to your specific needs and preferences, ensuring a shed that is both functional and aesthetically pleasing.

  • Fix a Sinking Desk Chair A Complete Guide

    Fix a Sinking Desk Chair A Complete Guide

    Fix a Sinking Desk Chair: Learning how to diagnose and fix a sinking desk chair can save you money and frustration. This comprehensive guide will walk you through the process, from identifying the problem to implementing effective solutions, ensuring your chair is once again a comfortable and supportive companion.

    We’ll delve into the various causes of sinking, from worn springs to faulty gas lifts, providing clear explanations and actionable steps to assess the situation. We’ll also explore DIY fixes, professional repair options, and essential preventative measures to keep your chair in tip-top shape for years to come.

    Identifying the Problem: Fix A Sinking Desk Chair

    A sinking desk chair can be a frustrating issue, impacting comfort and potentially even your posture. Understanding the specific symptoms of a sinking chair is crucial before attempting any fixes. This often involves a careful examination to differentiate the problem from other chair malfunctions. Ignoring the problem can lead to long-term discomfort and potential health issues.

    Common Signs of a Sinking Chair

    Recognizing the symptoms of a sinking desk chair is the first step in addressing the problem. Various signs indicate a potential issue, ranging from subtle to pronounced. Sagging, tilting, and unevenness are key indicators.

    • Sagging: A chair that sinks in the middle or on one side when you sit, causing a dip or a noticeable depression, is a clear sign of sagging. This can happen gradually over time or suddenly after a specific incident.
    • Tilting: If the chair tilts forward or backward while you’re sitting, it might be a sign of uneven support or weakened components. This can be accompanied by a feeling of instability or wobbling.
    • Unevenness: An uneven distribution of support, such as one leg sinking more than others, is a strong indicator of a sinking issue. This unevenness can manifest as the chair leaning to one side or causing discomfort on one side of your body.

    Distinguishing Sinking from Other Chair Malfunctions

    Accurately diagnosing the problem is crucial. A sinking chair isn’t always the only issue. Other potential malfunctions may present similar symptoms.

    • Loose or broken parts: Loose or broken parts like screws, joints, or wheels can create wobbly or tilting sensations, mimicking sinking. A thorough inspection is essential to identify the source of the problem.
    • Damaged springs: Faulty or damaged springs, especially in a posture-supporting chair, might lead to sinking and unevenness. Listen for unusual sounds, like creaks or pops, when moving the chair.
    • Defective cushions or padding: If the chair’s padding or cushions are worn out or damaged, this can contribute to a sinking feeling. Inspect the padding for tears or lumps that might be affecting the chair’s support.

    Importance of Accurate Diagnosis

    Before attempting any repairs, correctly diagnosing the sinking issue is paramount. Incorrect diagnosis can lead to wasted time and resources, or worse, worsen the problem.

    • Avoid unnecessary repairs: Misdiagnosis could lead to fixing a symptom rather than the root cause. This could be costly and inefficient.
    • Prevent further damage: Understanding the root cause helps avoid making the situation worse. Attempting a fix based on incorrect assumptions could damage the chair beyond repair.
    • Ensure optimal repair: A precise diagnosis ensures the right repair solution, leading to a more effective and lasting fix.

    Causes of a Sinking Desk Chair

    Identifying the underlying causes of a sinking chair is crucial for effective repair.

    Cause Description
    Worn-out springs or mechanisms Over time, the springs or mechanisms supporting the chair can weaken or break down, leading to sinking.
    Damaged or broken components Structural damage or breaks in the chair’s frame or components can cause unevenness and sinking.
    Excessive weight or usage Prolonged use or excessive weight placed on the chair can stress the structure and cause sinking.
    Poor quality materials Chairs made from inferior materials may not be able to withstand the stresses of daily use, leading to sinking over time.
    Manufacturing defects Some chairs might have manufacturing flaws that lead to structural weakness, causing the chair to sink.

    Assessing the Chair’s Structure

    Fix a Sinking Desk Chair

    A sinking desk chair isn’t just a minor inconvenience; it can impact posture and overall comfort. Understanding the chair’s internal structure is crucial to identifying the root cause of the problem. Proper assessment will help pinpoint the specific components that are failing to support the weight adequately.Careful examination of the chair’s components can pinpoint the source of the sinking.

    This involves identifying potential issues in springs, gas lifts, and other critical mechanisms that maintain the chair’s support. Understanding the role each component plays is essential to a successful repair or replacement strategy.

    Typical Desk Chair Components and Their Role

    Desk chairs are complex pieces of furniture with multiple components working together to provide support and adjustability. A breakdown of the components and their function helps understand why a chair might sink.

    • Seat Frame: The seat frame is the foundational structure of the chair’s seat. Made from materials like steel or wood, its integrity is critical. A damaged or weakened frame will directly affect the chair’s ability to support weight evenly. A warped frame, for example, will cause uneven sinking.
    • Backrest Structure: The backrest supports the user’s back, offering comfort and posture support. If the backrest structure is damaged or worn, the chair’s ability to maintain its proper shape is compromised, leading to sinking in the seat. Loose or broken parts in the backrest framework contribute to a poor seated experience.
    • Gas Lift Mechanism: This mechanism controls the height of the chair. A faulty gas lift can either prevent the chair from adjusting to the correct height or allow the seat to drop unexpectedly, causing sinking. A common cause of sinking is a weakened or leaking gas cylinder.
    • Springs: Springs, particularly in the seat cushion or back support, contribute to the chair’s resilience and provide some support. Weak or broken springs may result in a gradual sinking or uneven support, causing the chair to sag.
    • Casters: While not directly related to support, damaged or worn casters can contribute to uneven sinking if the chair isn’t balanced properly on the floor.

    Potential Contributing Components to Sinking

    Several chair components can contribute to the sinking problem. Pinpointing these components is crucial for effective repair or replacement.

    • Bent or Broken Springs: A bent or broken spring can cause the seat to sag or sink unevenly in specific areas. This issue is more prevalent in chairs with spring-loaded mechanisms for cushioning.
    • Faulty Gas Lift: A leaking or weak gas lift cylinder will cause the chair to drop unexpectedly or sink in a non-adjustable manner. This issue affects the chair’s height adjustment and support, contributing to the sinking.
    • Damaged Seat Frame: A damaged or warped seat frame directly affects the chair’s ability to distribute weight evenly. Cracks or warping in the frame compromise the structural integrity and will lead to sinking.

    Inspecting the Chair’s Structure

    Thorough inspection is crucial for determining the source of the sinking problem.

    1. Visual Inspection: Begin by visually inspecting the chair for any visible damage to the seat frame, backrest, springs, and gas lift. Look for cracks, dents, or loose parts.
    2. Functionality Check: Test the chair’s height adjustment and stability. Note any unusual movement or sinking.
    3. Spring Assessment: If the chair has springs, examine them for any signs of damage, such as bending or breakage. Pay close attention to the areas where the springs are attached to the frame.
    4. Gas Lift Examination: Check the gas lift cylinder for any leaks or signs of damage. Attempt to adjust the height of the chair and note any unusual movements.

    Table: Chair Components and Sinking

    This table summarizes the potential connection between chair components and their contribution to the sinking issue.

    Chair Component Potential Contribution to Sinking
    Seat Frame Warping, cracks, or structural weakness lead to uneven weight distribution and sinking.
    Gas Lift Leaking or weak cylinders prevent proper height adjustment and support, causing the seat to sink.
    Springs Broken or bent springs provide uneven support, resulting in sinking in specific areas.
    Backrest Damage or wear in the backrest structure compromise the chair’s overall support, contributing to seat sinking.

    Potential Fixes for a Sinking Chair

    A sinking desk chair can be a frustrating problem, impacting comfort and potentially leading to back pain. Fortunately, various solutions exist, ranging from simple DIY fixes to more involved professional repairs. Understanding the causes and potential fixes can empower you to restore your chair to its former glory.Addressing a sinking chair often involves identifying the specific cause of the issue.

    Is the foam padding compressed? Are the springs or mechanisms weakened? Pinpointing the root cause is crucial for selecting the most effective repair strategy.

    DIY Repair Options

    Several DIY methods can address a sinking chair, depending on the underlying problem. These methods are often cost-effective and allow for a hands-on approach.

    • Replacing the foam padding: If the foam is compressed, replacing it can significantly improve the chair’s support. This usually involves removing the old foam, measuring the area to ensure a proper fit, and carefully installing the new foam. Tools needed include a utility knife, measuring tape, and a new piece of foam that conforms to the chair’s dimensions. Effectiveness varies based on the chair’s design; in some cases, this is the most efficient and cost-effective solution.

      A high-density foam may provide better support over time.

    • Adjusting or Replacing Springs: If the chair’s springs are the culprit, carefully adjusting their tension might restore the chair’s functionality. If adjustment is not feasible, replacing the springs with new ones may be necessary. This requires removing the seat cushion and carefully examining the spring mechanism. This task often necessitates specific tools, like pliers and screwdrivers, depending on the chair’s construction.

      Care must be taken to maintain the correct tension to avoid further issues.

    • Reinforcing the chair’s structure: If the chair’s frame or components are showing signs of wear or damage, reinforcing these areas might be necessary. For example, adding extra support or bracing to the frame can prevent future sinking. The specifics of this method vary considerably depending on the chair’s design. This may involve using wood glue, screws, or other reinforcement materials.

      Assessing the structural integrity is essential to avoid worsening the problem.

    Professional Repair Options

    Professional repair services are an alternative for more complex or intricate chair repairs. These services provide expertise and specialized tools that may not be readily available to the average user.

    • Professional Upholstery Services: If the foam padding needs replacement or extensive repair, a professional upholstery service can provide a clean and efficient solution. They typically have the experience and tools to handle a wide range of upholstery needs. This option may involve removal and replacement of the cushion.
    • Chair Repair Specialists: Specialized chair repair technicians are equipped to diagnose and repair a wider range of issues, from damaged springs to broken frames. These professionals have the knowledge and tools to assess the chair’s structural integrity and implement appropriate repairs.

    Comparison Table

    This table summarizes the different repair approaches, their estimated costs, and time requirements. These are approximate values, and actual costs and times may vary depending on the complexity of the repair and the specific chair.

    Repair Approach Estimated Cost Estimated Time
    DIY Foam Replacement $20-$50 1-3 hours
    DIY Spring Adjustment $10-$30 1-4 hours
    Professional Upholstery $50-$200 2-5 days
    Chair Repair Specialist $75-$300+ 1-3 days

    Preventing Future Sinking

    A sinking desk chair is more than just an uncomfortable seating experience; it’s a sign that something is amiss. Proactive maintenance and understanding the chair’s limitations are crucial to extend its lifespan and prevent further issues. Ignoring warning signs can lead to costly repairs or replacements down the line.Preventing sinking goes beyond simply fixing the current problem; it’s about establishing a routine to keep the chair in optimal condition.

    This includes understanding the mechanics of the chair, recognizing potential problems early, and adopting practices that minimize stress on the chair’s components.

    Regular Maintenance Practices

    Regular maintenance is vital for prolonging the life of any piece of furniture, and desk chairs are no exception. Routine checks can identify minor issues before they escalate into significant problems. This includes inspecting the chair’s springs, mechanisms, and cushioning. Cleaning the chair regularly, removing any debris or dust, will also help maintain the chair’s structural integrity.

    Proper Usage for Prevention

    Proper usage plays a significant role in preventing sinking issues. Using the chair according to its intended design is essential. Avoid excessive leaning or stretching, as these actions can put undue strain on the chair’s support structure. Gentle and controlled movement are key to avoiding abrupt or forceful stress on the chair’s mechanisms.

    Maintaining Weight Limits

    Exceeding the weight limit for a desk chair can lead to significant damage and premature sinking. Each chair has a specified maximum weight capacity. This is often clearly marked on the chair or in its product documentation. Understanding and adhering to this limit is crucial to the chair’s long-term functionality. For example, if a chair’s weight limit is 250 pounds, exceeding that weight will put undue stress on the chair’s frame and potentially cause it to sink or collapse.

    Preventive Measures

    To avoid future sinking issues, several proactive steps can be taken:

    • Regularly check the chair’s springs and mechanisms for signs of wear and tear.
    • Inspect the chair’s cushioning and ensure it’s properly supporting your weight.
    • Avoid leaning excessively on the chair, as this can stress the support mechanisms.
    • Ensure you are sitting within the chair’s designated weight limit.
    • Clean the chair regularly to prevent dust buildup and maintain its structural integrity.
    • Store the chair in a dry environment, away from direct sunlight and extreme temperatures, to minimize potential damage.

    Identifying Warning Signs

    Early detection of potential sinking issues is crucial to preventing further damage. Look for signs such as uneven seating, creaking sounds, or a noticeable decrease in the chair’s support. If you notice any of these warning signs, take immediate action to address the problem. Addressing these early can prevent a chair from sinking completely. A chair that groans or squeaks when you sit or lean on it is a clear indicator that there might be stress points on the chair’s structural components.

    Safety Precautions During Repair

    Fix a Sinking Desk Chair

    Fixing a sinking desk chair can be a rewarding DIY project, but safety should always be paramount. Ignoring safety precautions can lead to injuries, damage to the chair, or even more serious issues. Understanding potential hazards and employing appropriate safety gear is crucial for a successful and injury-free repair.A crucial aspect of any repair project, especially involving mechanical components like desk chairs, is recognizing and mitigating potential risks.

    Proper safety measures prevent accidents and ensure the integrity of the work environment, minimizing the chances of injury and damage. Understanding the inherent risks associated with the repair process empowers you to make informed decisions and implement effective preventative measures.

    Potential Hazards and Risks

    Repairing a desk chair can expose you to a variety of hazards, ranging from minor cuts and scrapes to more serious injuries. Improper handling of tools, loose parts, or damaged components can lead to accidents. The mechanics of the chair, including springs, screws, and other metal parts, can be sharp or cause pinching if not handled carefully. Additionally, improper lifting or awkward postures can result in muscle strains or sprains.

    Dust and debris generated during disassembly can also affect your respiratory system.

    Safety Equipment

    Prioritizing safety equipment is essential for a safe and efficient repair process. The right tools and gear can significantly reduce the risk of injury. A well-equipped workspace ensures you have everything needed for the job.

    • Safety glasses or goggles: Protect your eyes from flying debris, dust, or small parts.
    • Work gloves: Protect your hands from cuts, abrasions, and sharp objects.
    • Heavy-duty work gloves: Especially important when handling metal components to prevent slips and injuries.
    • Closed-toe shoes: Prevent foot injuries from dropped tools or sharp objects.
    • A sturdy work surface: Prevents the chair from moving or tipping during disassembly.

    These safety measures ensure the safety of the repairer during the process.

    Preventing Injuries During Repair, Fix a Sinking Desk Chair

    Implementing safety measures is not just about wearing gear; it’s about a cautious and methodical approach. Proper technique minimizes risks.

    • Inspect the chair thoroughly before starting any disassembly. Identify any loose or damaged components and address them before proceeding.
    • Use appropriate tools for the task. Avoid using tools that are damaged or worn, as this can compromise their effectiveness and safety.
    • Work in a well-lit area to avoid accidents due to poor visibility.
    • Take breaks to avoid fatigue and maintain focus on the task. Overexertion can lead to mistakes and injuries.
    • If you encounter a problem you’re unsure about, consult a professional or seek help from a knowledgeable friend or family member.

    Careful planning and adherence to safety protocols ensure a successful and injury-free repair.

    Safety Precautions Table

    Potential Hazard Safety Precautions
    Sharp edges/components Wear safety glasses and gloves; inspect chair thoroughly for loose parts; use protective coverings where necessary.
    Falling parts Secure the chair and work area; use appropriate tools and techniques; keep a stable workspace.
    Lifting heavy parts Use proper lifting techniques; enlist help if necessary; avoid straining muscles.
    Dust/debris inhalation Work in a well-ventilated area; wear a dust mask or respirator if needed.
    Slips/trips Maintain a clean and organized workspace; wear appropriate footwear; use a sturdy work surface.

    Following these safety precautions during desk chair repair will greatly minimize the risk of injury and ensure a safe and productive repair experience.

    Troubleshooting Common Issues

    Fixing a sinking desk chair can be a rewarding experience, but unexpected problems can arise during the repair process. Understanding potential issues and their solutions is crucial for a successful outcome. This section will detail common problems, their potential causes, and troubleshooting steps to help you navigate any challenges you might encounter.Troubleshooting involves identifying the root cause of a problem, not just the symptom.

    By carefully examining the chair’s structure and understanding the mechanisms at play, you can address the issue effectively and avoid future problems. This section will help you diagnose and fix various common issues during the chair repair process.

    Identifying and Resolving Loose Screws

    Loose screws are a frequent problem during chair repair. They can be caused by over-tightening, gradual loosening due to stress on the chair, or issues with the screw itself. Tightening loose screws is a common fix, but the root cause must be addressed to prevent future problems. Using the correct screwdriver and torque settings is crucial for preventing further damage.

    Fixing a sinking desk chair can be a real pain, but thankfully, it’s often a simple fix. Listening to Aimee Mann’s latest album, aimee mann bachelor no 2 or the last remains of the dodo , while tackling the wobbly chair, actually made the whole process more enjoyable. Ultimately, a few well-placed shims or a new chair part might be all it takes to have that comfortable workspace back again.

    Assessing Broken Springs

    Broken springs are another potential problem. These springs can snap due to excessive weight, impact, or age. If a spring is broken, it can lead to instability and discomfort. Replacing broken springs is essential for restoring the chair’s functionality and comfort. Careful removal and replacement of springs are important to maintain the chair’s structure and avoid further damage.

    Addressing Worn-Out or Damaged Mechanisms

    Worn-out or damaged mechanisms, such as the swivel or tilt mechanisms, can contribute to chair sinking. Wear and tear can cause these parts to malfunction, affecting the chair’s stability and functionality. Identifying and replacing worn-out parts is vital to restore the chair’s proper functioning.

    Fixing a sinking desk chair can be a real pain, but hey, at least it’s not as frustrating as trying to figure out why someone decided to remix the Fresh Off the Boat theme song with the style of Danny Brown. Seriously, though, that whole project, danny brown does the fresh off the boat theme song , is something else! Back to the chair, though – some simple adjustments might just be the ticket to getting you back to a comfortable work setup.

    Troubleshooting Issues with the Chair’s Base

    Issues with the chair’s base can also lead to sinking. Loose or damaged base components, such as the castors or the support structure, can impact the chair’s stability. Addressing these issues is important for restoring the chair’s functionality.

    Fixing a sinking desk chair can feel like tackling a frustrating problem, almost as if you’ve had a tough time yourself. It’s a real pain, isn’t it? Sometimes, those everyday struggles, like a wobbly chair, can make you wonder, “Have You Had a Difficult Life?” Have You Had a Difficult Life. But, with a little know-how and some basic tools, you can get that chair feeling sturdy again, and your back will thank you.

    So, let’s get this sinking desk chair fixed!

    Table: Troubleshooting Steps for Common Chair Problems

    Problem Potential Cause Troubleshooting Steps
    Loose Screws Over-tightening, stress on the chair, or issues with the screw Use the correct screwdriver, apply appropriate torque, and check the screw for damage. If the screw is damaged, replace it.
    Broken Springs Excessive weight, impact, or age Identify the broken spring and replace it with a new one of the correct type and size.
    Worn-out/Damaged Mechanisms Wear and tear on the swivel or tilt mechanisms Identify the worn-out part and replace it with a new one or repair the mechanism.
    Issues with the Chair’s Base Loose or damaged base components Inspect the base components for damage. Tighten loose bolts or replace damaged components.

    Illustrations and Visual Aids

    Visual aids are crucial for understanding the intricacies of a sinking desk chair. They help break down complex mechanisms into digestible parts, allowing for easier troubleshooting and repair. This section provides visual representations of chair components, internal structures, signs of sinking, repair methods, and comparative analyses of sinking issues.

    Desk Chair Components

    A clear understanding of a desk chair’s parts is essential for identifying the source of sinking. The following diagram illustrates the key components: Desk Chair Components Diagram

    The diagram above displays a standard office chair, highlighting components like the seat pan, backrest, base, and adjustable mechanisms. Each part plays a vital role in the chair’s functionality, and defects in any of these parts can contribute to sinking.

    Internal Structure of the Chair

    Visualizing the chair’s inner workings provides insights into potential causes of sinking. Desk Chair Internal Structure Diagram

    This diagram reveals the internal structure, showcasing the springs, levers, and support mechanisms within the seat pan. These components are essential for proper support and prevent sinking. Defects or wear in these components can lead to reduced support, resulting in the chair sinking.

    Identifying Signs of Sinking

    Recognizing the signs of sinking is the first step in effective troubleshooting. Desk Chair Sinking Signs Diagram

    This diagram illustrates various signs of sinking, from uneven seating to excessive sag. The diagrams indicate different levels of sinking, helping determine the severity of the problem and the potential causes. Identifying these early indicators is crucial to prevent further damage and discomfort.

    Repair Methods

    Understanding the various repair methods is vital for addressing the sinking issue effectively. Desk Chair Repair Methods Diagram

    The illustrations depict different repair approaches, from tightening loose screws to replacing worn springs. The step-by-step diagrams guide users through the repair process, enabling them to address the problem effectively. Proper tools and techniques are crucial for successful repairs and to avoid further damage.

    Comparison of Sinking Issues and Causes

    A comparative analysis of sinking issues and their root causes provides a comprehensive understanding of the problem.

    Sinking Issue Possible Cause Diagram
    Uneven Sag Loose screws, worn springs, or damaged frame [Diagram placeholder for uneven sag]
    Excessive Sag Damaged springs, weak frame, or worn-out support mechanisms [Diagram placeholder for excessive sag]
    Sudden Drop Broken springs, fractured frame, or loose joints [Diagram placeholder for sudden drop]

    This table illustrates how different sinking issues correlate with specific causes. This comparison helps in diagnosing the problem accurately and determining the most suitable repair approach.

    Conclusion

    In conclusion, fixing a sinking desk chair is a manageable task with the right knowledge and approach. By carefully diagnosing the issue, understanding the chair’s structure, and employing the appropriate repair methods, you can restore comfort and functionality to your workspace. This guide has equipped you with the tools and insights to tackle this common problem, ensuring your chair provides long-lasting support.

  • Caulk the Kitchen Sink A Complete Guide

    Caulk the Kitchen Sink A Complete Guide

    Caulk the Kitchen Sink: A comprehensive guide to properly sealing your kitchen sink, ensuring a watertight and aesthetically pleasing finish. This post covers everything from choosing the right caulk type to preparing the surface, applying the caulk, and achieving a professional-looking result. We’ll also explore different sink styles and the specific caulking considerations for each, along with essential safety precautions.

    Proper caulking is crucial for kitchen sink maintenance. It prevents water damage, mold growth, and keeps your sink looking its best. This guide will walk you through the entire process, from initial preparation to final touches, equipping you with the knowledge and confidence to tackle this DIY project with ease.

    Introduction to Caulking a Kitchen Sink: Caulk The Kitchen Sink

    Caulking a kitchen sink is a crucial part of maintaining its water-tightness and aesthetic appeal. Properly applied caulk creates a barrier against water damage, preventing leaks and mold growth, which are common issues in kitchens. It also ensures a clean, seamless look around the sink’s perimeter, maintaining the overall visual appeal of the countertop. A well-maintained caulk seal protects the surrounding materials from moisture, extending the lifespan of the sink and countertop.Caulking involves applying a sealant material to the joint between the sink and countertop.

    This process not only addresses potential leaks but also improves the overall appearance of the kitchen. The right type of caulk is essential for a successful job, ensuring longevity and effectiveness. Different caulk types are available, each with its unique properties and compatibility with various materials.

    Types of Caulking for Kitchen Sinks

    Choosing the right caulk is critical for a lasting and effective seal. Various caulk types offer different properties, and selecting the correct one for your sink’s material is paramount. Understanding the characteristics of each type is essential for a successful installation.

    • Silicone Caulk: Silicone caulk is a popular choice for kitchen sinks due to its excellent water resistance, flexibility, and durability. It can withstand moisture and temperature fluctuations, making it ideal for wet areas. Silicone caulk is also mold and mildew resistant, which is a significant advantage in a kitchen environment. It’s compatible with a wide range of materials, including ceramic, porcelain, and most types of countertop materials.

    • Acrylic Caulk: Acrylic caulk is another common choice, known for its ease of application and relatively low cost. It’s often preferred for its simple application process and quick drying time. However, it may not be as durable or water-resistant as silicone caulk. Acrylic caulk is suitable for some types of countertops and is generally more cost-effective.
    • Polyurethane Caulk: Polyurethane caulk is a highly durable option, providing a strong and resilient seal. It is frequently used in demanding applications and offers exceptional weather resistance. However, it can be more challenging to work with compared to other types, and may not be the ideal choice for every kitchen sink installation.

    Materials of Kitchen Sinks and Compatible Caulks

    The material of your kitchen sink significantly influences the appropriate caulk choice. Compatibility is key for achieving a long-lasting and effective seal.

    Sink Material Compatible Caulks Considerations
    Ceramic/Porcelain Silicone, Acrylic Silicone is generally recommended for its water resistance and durability.
    Stainless Steel Silicone, Polyurethane Silicone is a good choice due to its flexibility and water resistance; Polyurethane offers exceptional strength.
    Granite Countertops Silicone, Polyurethane Silicone is recommended for its water resistance and flexibility. Polyurethane is a strong choice for high-impact areas.
    Solid Surface Countertops Silicone, Acrylic Silicone offers good adhesion and water resistance; Acrylic is a good choice due to its ease of application.

    Selecting the correct caulk type for your specific sink material is critical for a lasting and reliable seal. This ensures the caulk will effectively withstand the demands of a kitchen environment.

    Preparation for Caulking

    Caulk the Kitchen Sink

    Getting your kitchen sink ready for caulking is crucial for a successful and long-lasting repair. Proper preparation ensures a tight, waterproof seal and prevents future leaks or mold growth. This involves meticulous cleaning, careful surface preparation, and efficient removal of old caulk. Thoroughness in these initial steps will significantly impact the final result.

    Cleaning the Sink

    A clean sink is essential for a good caulk job. Residue, grease, and food particles can prevent the caulk from adhering properly. Use a solution of warm water and a mild detergent or a dedicated sink cleaner to thoroughly scrub the area. Pay close attention to crevices and corners, ensuring all debris is removed. Allow the sink to dry completely before proceeding to the next step.

    This ensures a clean and dry surface for optimal caulk adhesion.

    Surface Preparation

    Preparing the surface for caulking involves more than just cleaning. Any rough or uneven surfaces will prevent a smooth and lasting caulk seal. Using fine-grit sandpaper, carefully smooth out any imperfections. This step is crucial, as a perfectly smooth surface ensures even caulk application and a watertight seal. If necessary, use a putty knife to fill any significant gaps or holes.

    Removing Old Caulk

    Removing old caulk is an important part of the preparation process. Old caulk can become brittle and ineffective, leading to future leaks. A variety of methods can be used, each with its own advantages and disadvantages.

    Methods for Removing Old Caulk

    • Utility Knife or Caulk Remover Tool: This method is efficient for removing relatively soft caulk. The utility knife can be used to score the caulk, and then the caulk remover tool can be used to pry it off. This method can be effective, but care must be taken to avoid damaging the surrounding surface. A sharp utility knife or a specialized caulk removal tool is critical for this step.

    • Caulk Remover: Caulk remover is a chemical solution that softens the caulk, allowing it to be easily scraped away. It is often effective on various types of caulk, but it may also damage certain materials or leave a residue if not properly cleaned. Apply the remover according to package instructions and use a putty knife to scrape off the softened caulk.

      Protecting surrounding surfaces with painter’s tape is important when using caulk remover.

    • Heat Gun: Using a heat gun to soften the caulk before scraping it off is another option. This method works well for tougher caulk, but extreme care is required to avoid scorching or damaging the sink. Apply the heat gun carefully and only for a short time to prevent any damage to the sink.

    Measuring and Cutting Caulk

    Accurate measurement is vital for a proper caulk job. Use a measuring tape to determine the length of caulk required. Cut the caulk tube using a sharp utility knife or a caulk cutter. For precise cuts, use a caulk cutter or a sharp knife.

    Tools Needed for the Job

    The right tools can significantly improve the efficiency and quality of your caulk job. These are essential for a successful caulk application.

    • Measuring Tape: Essential for accurately measuring the length of caulk needed.
    • Utility Knife or Caulk Cutter: Needed for cutting the caulk tube to the required length.
    • Putty Knife: Used for smoothing the caulk and filling gaps.
    • Caulk Gun: This tool is essential for applying the caulk evenly and smoothly.
    • Fine-Grit Sandpaper: For smoothing out any imperfections in the sink’s surface.
    • Caulk Remover (optional): Used for removing old caulk, if necessary.
    • Cleaning Supplies: A mild detergent, warm water, and cleaning cloths are crucial for thoroughly cleaning the sink and removing any residue.
    • Painter’s Tape (optional): Protect the surrounding areas from caulk.

    Applying the Caulk

    Getting the caulk job right is crucial for a watertight and aesthetically pleasing result. Proper application technique, coupled with the right tools and pressure, will significantly impact the final outcome. A well-caulked kitchen sink not only looks professional but also prevents water damage and mold growth.Applying caulk effectively involves more than just squeezing it out of the tube.

    Precision in beading, smoothing, and using the correct amount of pressure is key to achieving a flawless finish. Understanding the different caulking tools and their respective strengths will guide you to a superior result.

    So, I’m tackling the kitchen sink caulk project. It’s a surprisingly involved process, but I’m determined to get it done right. Thinking about the meticulous precision needed to match the existing grout, I can’t help but draw a parallel to the intense artistry in Jenny Hval’s work, like her portrayal of a female vampire, jenny hval female vampire.

    Hopefully, my caulk job will be as meticulously done as her music. Now, back to the silicone and the caulking gun!

    Caulk Beading Techniques

    A consistent bead is essential for a professional look and ensures proper water sealing. Varying bead sizes will depend on the specific application and gap size. A smooth, even bead prevents gaps and minimizes the risk of leaks. A proper bead, applied with the right pressure and tools, is crucial for a successful caulking job.

    Pressure Application

    Applying the correct pressure is critical for a smooth, even application. Too much pressure can cause the caulk to be squeezed out of the beading, creating uneven surfaces and potential for cracking. Too little pressure, on the other hand, might result in a thin bead that won’t adequately seal the gap. Finding the right balance is important for creating a resilient and visually appealing seal.

    A good example would be applying pressure as if you were spreading butter on bread – firm, but not forceful.

    Caulking Tools and Effectiveness

    Several tools are available for caulking, each with its own advantages. A caulking gun is a standard tool that provides controlled application. Its use ensures even pressure and consistent beading. Caulk guns with different pressure settings allow for adjusting the force, making it ideal for a variety of situations. Caulk scrapers and putty knives are valuable for smoothing and shaping the caulk bead.

    They provide precision in smoothing and refining the finished caulk. Using the correct tool for the job is essential for achieving the desired result.

    Achieving a Clean Finish

    A clean and professional finish is attainable through careful attention to detail. Cleaning the area to be caulked thoroughly before application is paramount. Remove any dust, dirt, or debris that could interfere with the caulk’s adhesion. Wipe the surface with a damp cloth or sponge to ensure it’s clean and dry. After applying the caulk, immediately wipe away any excess caulk with a damp cloth or sponge while the caulk is still wet.

    This ensures a neat and clean final result. Using a damp sponge and a smooth, flat tool like a putty knife to spread the caulk is helpful in achieving a clean and professional finish. Using a damp sponge to smooth and remove excess caulk, working with the grain of the bead, will lead to a clean finish.

    Finishing Touches and Maintenance

    Caulk the Kitchen Sink

    The final steps in caulking a kitchen sink are crucial for a professional-looking and long-lasting result. Careful cleanup, understanding drying times, and proactive maintenance will prevent future issues and ensure your caulking job stands the test of time. This section covers these important aspects, providing you with the knowledge to complete the project with confidence.

    Okay, so I finally tackled caulking the kitchen sink. It was a bit of a pain, but hey, at least it’s watertight now. Speaking of things that are watertight, did you hear about how the Binding of Isaac developer is working on a new, totally secret project? the binding of isaac developer confirms hes working on a secret project Pretty cool, right?

    Now, back to the sink – I’m going to have to replace that sponge soon. Maybe get a nice, new one for the caulked sink!

    Cleaning Up Excess Caulk

    Proper cleanup is essential to avoid unsightly blemishes and ensure a smooth, finished look. Immediately after applying caulk, use a damp sponge or a damp cloth to wipe away any excess caulk that has squeezed out from the joint. Use a utility knife or a putty knife to carefully remove any stubborn or large amounts of caulk. This proactive approach prevents caulk from hardening in undesirable places, saving you time and effort in later cleanup.

    Caulk Drying Times and Curing

    Caulk requires a specific amount of time to cure and fully harden. Different types of caulk have varying drying times. Allowing the caulk to cure completely is critical for its long-term durability and effectiveness in sealing the joint. Rushing this process can lead to cracking, chipping, or the caulk coming loose over time.

    Importance of Maintenance for Prevention

    Regular maintenance is key to preventing future caulking issues. Inspect the caulked area periodically for any signs of damage or deterioration. If you notice any cracks, gaps, or peeling, address them promptly. Early intervention can prevent small issues from escalating into larger problems that require extensive repairs. Regular wiping down of the caulked area can also prevent dirt and grime from accumulating and potentially causing damage over time.

    Caulk Type Comparison

    The following table compares common caulk types based on drying time, durability, and ease of application:

    Caulk Type Drying Time Durability Ease of Application
    Silicone 24-72 hours High Medium
    Acrylic 24 hours Medium Easy
    Polyurethane 24-48 hours High Medium

    Understanding these differences allows you to choose the appropriate caulk type for your specific needs and project requirements. For example, silicone caulk is often preferred for wet areas like bathrooms due to its superior water resistance. Acrylic caulk, on the other hand, is generally easier to work with and suitable for many interior applications. Always refer to the manufacturer’s instructions for specific drying times and application guidelines.

    Troubleshooting and Common Mistakes

    Caulking a kitchen sink is a relatively straightforward task, but even experienced DIYers can encounter problems. Understanding common mistakes and how to troubleshoot them is crucial for a successful and lasting result. Proper caulking ensures a watertight seal, preventing leaks and maintaining the aesthetic appeal of your kitchen.Caulking issues, if not addressed promptly, can lead to water damage, mold growth, and the need for costly repairs.

    Careful attention to detail throughout the process, from preparation to finishing, is key to avoiding these problems. Identifying potential issues early and implementing effective solutions will save you time and money in the long run.

    Identifying Common Caulking Mistakes

    Common mistakes during caulking often stem from rushing the process or neglecting crucial steps. Inadequate preparation, improper application techniques, and neglecting post-caulking maintenance can all contribute to problems. Addressing these issues early minimizes the need for costly repairs.

    Troubleshooting Caulking Issues

    This section details how to identify and fix common caulking problems. By understanding the root cause of the issue, you can implement the right solution. Prompt action is key to preventing further damage and maintaining the integrity of your kitchen.

    Problem Cause Solution
    Gaps in the caulk Improper application or insufficient caulk, using too little caulk, or not applying even pressure. Incorrect beading technique or improper priming of the surface also contribute. Re-apply caulk, ensuring proper beading and consistent pressure throughout the application. Use a caulking gun to maintain a consistent bead and apply enough caulk to fill the gap completely. Ensure the surface is clean, dry, and primed before application.
    Uneven surface Improper smoothing, using too much pressure, or not using the correct smoothing tool. Uneven surface preparation also contributes to uneven caulk. Use a damp cloth or a specifically designed caulk smoothing tool to gently create an even surface. Work in small sections and avoid applying too much pressure. Apply smooth, consistent pressure while smoothing to prevent uneven surfaces and ridges.
    Cracks in the caulk Drying too quickly, insufficient bonding between the caulk and the surface, or improper surface preparation. Using the wrong type of caulk for the job can also contribute. Remove the cracked caulk section using a utility knife or a scraper. Clean the area thoroughly and apply a fresh bead of caulk, ensuring proper surface preparation. Ensure the caulk is appropriate for the specific material and environment (e.g., exterior or interior).
    Mold or mildew growth Moisture trapped behind the caulk or poor surface preparation. The caulk may not be watertight enough to prevent moisture from seeping through. Remove the affected caulk and thoroughly clean the area. Ensure the surface is completely dry and free of any moisture. Apply a mildew-resistant sealant to the surface to prevent future growth.

    Preventing Future Caulking Problems, Caulk the Kitchen Sink

    Proper preparation is key to avoiding future problems. A clean, dry, and primed surface is crucial for a strong, long-lasting seal. Using the right type of caulk for the specific application is essential for ensuring durability and longevity. Regular maintenance and vigilance can prevent future issues.

    Different Kitchen Sink Styles and Caulking

    Caulking a kitchen sink is crucial for water-tightness and a polished aesthetic. However, the technique varies depending on the sink style. Understanding these differences is vital for a successful and lasting job. Proper caulking ensures that water doesn’t seep into the surrounding areas and creates a seamless transition between the sink and the countertop.Different sink types require specific caulking techniques to achieve a watertight seal and a visually appealing finish.

    This section will explore the various sink styles and the corresponding caulking considerations. It will also provide examples and a table outlining the differences in caulking for each type.

    Undermount Sink Caulking

    Undermount sinks are installed below the countertop, creating a flush, seamless appearance. The caulking process for an undermount sink focuses on sealing the perimeter where the sink meets the countertop. A bead of caulk is applied along the entire perimeter, ensuring a complete seal. This ensures water doesn’t seep into the gap between the sink and countertop.

    The caulk should be a color that blends seamlessly with the countertop for a unified look. A professional-looking job involves applying a thin, even bead of caulk, smoothing it out with a wet finger, and removing any excess. The caulk needs to be cured properly before the countertop is placed back in place.

    Okay, so caulking the kitchen sink. It’s a pretty mundane task, but you know, sometimes those little jobs can be surprisingly satisfying. Like, the meticulous precision needed reminds me of the intricate layers in Tyler, the Creator’s Igor album. tyler the creator igor really delves into that feeling of meticulous crafting. Getting that perfect bead of caulk, it’s almost like creating a sonic masterpiece, just on a much smaller scale.

    Back to the sink, gotta get that sealant perfect!

    Drop-in Sink Caulking

    Drop-in sinks sit on the countertop, creating a more visible joint line. The caulking for a drop-in sink is slightly different. It involves caulking around the edges and the back of the sink. The caulk creates a seal along the sink’s perimeter, ensuring water doesn’t seep into the space between the sink and countertop. A visible bead of caulk is often acceptable, and a sealant that matches the countertop or a similar color is preferred.

    Proper curing of the caulk before using the sink is critical.

    Sink Feature Caulking Considerations

    Caulking around sink features like the drain and faucet is equally important for a complete watertight seal. For the drain, a bead of caulk should be applied around the drain opening. The caulk should be a smooth, even layer, ensuring a complete seal. Caulking around the faucet is done similarly, ensuring a tight seal between the faucet and the sink.

    When applying caulk around these features, make sure to press firmly to ensure adhesion.

    Caulking Examples for Different Sink Styles

    An undermount sink, seamlessly integrated beneath the countertop, requires caulking only along the perimeter. A drop-in sink, resting on the countertop, needs caulk around the edges and back, ensuring a watertight seal around the sink.

    Table of Caulking Differences

    Sink Style Caulking Considerations Visual Example
    Undermount Caulk the perimeter of the sink, ensuring a tight seal along the entire edge where the sink meets the countertop. Imagine a sink recessed into a countertop with a thin, even bead of caulk precisely along the entire perimeter. The caulk should be the same color as the countertop for a seamless look.
    Drop-in Caulk around the edges and the back of the sink, ensuring a complete seal along the sink’s perimeter and back edge. Visualize a sink sitting on the countertop, with a noticeable bead of caulk around the edges and the back, providing a watertight seal.

    Safety Precautions

    Caulking a kitchen sink, while often a DIY project, requires careful attention to safety. Improper handling of caulk and other materials can lead to significant health risks and costly mistakes. This section details essential safety precautions to ensure a safe and successful project.Proper safety measures are crucial when working with construction materials, especially caulk. Ignoring these precautions can result in adverse health effects and damage to your project.

    Chemical Exposure Hazards

    Caulk, primers, and other materials used in kitchen sink repair often contain chemicals that can irritate the skin, eyes, and respiratory system. Long-term exposure can lead to more serious health problems.

    • Always wear appropriate personal protective equipment (PPE), including gloves, eye protection, and a respirator, when handling caulk and other materials. This will help prevent direct contact with harmful substances.
    • Work in a well-ventilated area. Adequate ventilation minimizes inhalation of harmful fumes and vapors, thus reducing the risk of respiratory issues.
    • Follow the manufacturer’s instructions carefully regarding material handling, ventilation, and safe disposal of leftover materials. Manufacturers provide crucial safety guidelines that should always be followed.
    • If you experience any adverse reaction, such as skin irritation or breathing difficulties, immediately discontinue work and seek medical attention. Your health is paramount; don’t hesitate to take necessary action.

    Physical Hazards

    Besides chemical hazards, there are potential physical risks involved in caulking. These risks can range from minor cuts to more serious injuries.

    • Use caution when handling tools like utility knives or putty knives. Sharp objects require careful handling to prevent cuts and injuries.
    • Ensure a stable and secure work area. A slippery or unstable surface can lead to falls and injuries. Choose a level and sturdy workspace.
    • When working with caulk guns, maintain a firm grip and control to avoid accidental discharges. Incorrect handling can lead to the caulk being applied in unexpected places.
    • Take frequent breaks to avoid fatigue, which can increase the risk of accidents. Taking breaks helps maintain focus and prevents errors.

    Safety Equipment

    Using the correct safety equipment is critical for minimizing potential risks during caulking.

    • Gloves: Protective gloves, such as nitrile or latex gloves, should be worn to prevent skin irritation and chemical exposure from the caulk.
    • Eye Protection: Safety glasses or goggles are essential to protect your eyes from splashes or fumes.
    • Respirator: A respirator, if necessary, should be used in poorly ventilated areas to prevent inhalation of harmful vapors and dust.
    • Work Clothing: Wear old clothes or a protective apron to prevent staining or soiling. This prevents the caulk from permanently marking your clothes.

    Safety Measures

    Following a comprehensive set of safety measures ensures a safe and efficient caulking process.

    1. Thoroughly read and understand the manufacturer’s instructions for all materials and tools. This step is critical to avoid potential hazards.
    2. Ensure proper ventilation in the work area. Adequate airflow helps to reduce exposure to harmful fumes and vapors.
    3. Wear all necessary personal protective equipment (PPE) at all times during the project. PPE provides an essential barrier against potential hazards.
    4. Store all materials safely and securely, away from children and pets. Proper storage prevents accidents and unintended exposures.
    5. Clean up any spills or messes immediately. This helps to prevent slips, falls, and further contamination.

    Caulk Types and Their Applications

    Choosing the right caulk for your kitchen sink is crucial for a watertight seal and a professional finish. Different caulk types have varying properties, making some better suited for specific applications than others. Understanding these differences will help you avoid costly mistakes and ensure your caulking job lasts for years to come.Selecting the correct caulk type depends on factors like the sink material, the location of the caulking, and the desired level of flexibility and water resistance.

    Different caulks offer varying degrees of these properties, which directly impact the longevity and effectiveness of the seal. Consider the potential for movement or expansion of the sink material and the frequency of water exposure when making your choice.

    Silicone Caulk

    Silicone caulk is a popular choice for kitchen sinks due to its excellent water resistance and flexibility. It can withstand repeated exposure to moisture and temperature fluctuations, making it ideal for areas prone to splashing or high humidity. Its flexibility allows it to conform to slight imperfections in the surface, further enhancing its suitability for sealing around sinks.

    Acrylic Caulk

    Acrylic caulk is a more affordable option, but it doesn’t offer the same level of water resistance or flexibility as silicone. It’s generally suitable for applications where water exposure is minimal and the risk of movement is low. While it may be easier to apply and remove, its durability is lower, especially in high-moisture environments.

    Butyl Caulk

    Butyl caulk is a good choice for sealing around sinks where there’s a need for an extremely strong and durable seal, often in areas with significant movement or expansion. It’s known for its strong adhesion to a wide variety of surfaces, but its flexibility is limited, and it might not be ideal for areas where movement is expected. This is important to consider when installing the caulk around a sink, especially if the material will experience changes in temperature or expansion/contraction.

    Comparison Table of Caulk Types

    Caulk Type Pros Cons
    Silicone Water-resistant, flexible, long-lasting, good adhesion to various surfaces Can be difficult to remove, may require more tools, potentially more expensive
    Acrylic Affordable, easy to apply, easy to remove Lower water resistance, less flexible, shorter lifespan in high-moisture areas
    Butyl Excellent adhesion, strong seal, suitable for areas with significant movement Less flexible, may not be ideal for areas with potential for movement or expansion, can be difficult to apply

    Selecting the Right Caulk for Your Kitchen Sink

    To choose the best caulk type for your kitchen sink, consider these factors:

    • Material of the sink: Different materials may react differently to various caulks. For instance, stainless steel sinks might work well with silicone or acrylic, while composite materials might need a specific caulk.
    • Location of the caulking: Areas prone to constant water exposure, such as the base of the sink, require a more water-resistant caulk like silicone. Less-exposed areas might be suitable for acrylic.
    • Desired flexibility: If there’s potential for movement or expansion of the sink, a flexible caulk like silicone is recommended. Rigid caulks like butyl may be better suited for applications with little to no movement.

    For example, a kitchen sink with a stainless steel countertop and a noticeable gap around the sink would benefit from a flexible, water-resistant silicone caulk. This ensures a durable seal that withstands water exposure and potential movement. Conversely, a sink with a stable composite countertop in a low-humidity area could be sealed with acrylic caulk, due to its ease of application and lower cost.

    Final Thoughts

    In conclusion, caulking your kitchen sink is a straightforward process that can significantly enhance its longevity and appearance. By following the steps Artikeld in this guide, you can achieve a watertight seal and a professional-looking finish. Remember to choose the right caulk type for your sink material, prepare the surface thoroughly, apply the caulk with precision, and allow ample drying time.

    Addressing potential issues and understanding different sink styles further ensures a successful project.

    This guide is a complete resource to make your kitchen sink caulking project a success. With the right knowledge and preparation, you can transform your kitchen sink into a watertight and visually appealing feature.

  • Change the Faucet Hose in a Kitchen Sink A Guide

    Change the Faucet Hose in a Kitchen Sink A Guide

    Change the Faucet Hose in a Kitchen Sink: This guide walks you through the essential steps for replacing your kitchen sink faucet hose, from initial preparation to final cleanup. A worn or damaged hose can lead to leaks, water waste, and potential damage to your countertop. Knowing how to safely and efficiently replace it is a valuable DIY skill.

    From identifying the right hose for your faucet type to isolating the water supply, we’ll cover every step in detail. We’ll also Artikel the necessary tools and potential hazards, empowering you to tackle this task with confidence and minimal risk.

    Introduction to Faucet Hose Replacement

    A worn or damaged kitchen faucet hose can lead to leaks, water damage, and even potential safety hazards. Replacing a leaky or deteriorated hose is a relatively straightforward task that can save you money and prevent more serious problems. This guide will walk you through the process, from shutting off the water supply to selecting the correct replacement hose.

    Properly replacing your faucet hose is crucial for maintaining a safe and functional kitchen environment.Replacing a kitchen faucet hose is a simple DIY project that can save you money and prevent costly repairs. A faulty hose can cause leaks, wasting water and potentially damaging your kitchen’s cabinetry or flooring. Furthermore, a compromised hose might not be properly sealed, increasing the risk of water-related hazards.

    Understanding the steps and safety precautions involved will ensure a smooth and successful replacement.

    Safety Precautions

    Ensuring safety is paramount when working with water lines. Properly shutting off the water supply before starting any plumbing work is essential to prevent water damage and personal injury. Failing to shut off the water can lead to significant flooding and costly repairs. This section details the critical steps for safely turning off the water supply.

    Turning Off the Water Supply

    Before starting any plumbing work, it’s critical to turn off the water supply to the affected area. This prevents accidental water damage. This involves locating and shutting off the shut-off valves for the hot and cold water lines. These valves are typically located near the water supply lines entering the wall or under the sink. The precise location may vary depending on the plumbing configuration.

    Carefully identify and turn these valves clockwise to fully shut off the water supply.

    Necessary Tools

    Proper tools are essential for a safe and efficient replacement. The following tools are necessary for the job:

    Tool Description
    Adjustable Wrench Used to loosen and tighten connections, ensuring secure fittings.
    Pliers Useful for gripping and holding components, preventing slippage during the replacement process.
    Rags For cleaning up spills and maintaining a clean workspace.
    Bucket For collecting drips and preventing water damage to the surrounding area.

    Faucet Hose Types and Compatibility

    Different types of kitchen faucet hoses exist, each with its own specifications. It’s essential to select a replacement hose compatible with your current faucet. Incompatibility can lead to improper connections and leaks. Refer to the manufacturer’s instructions or consult a plumber if unsure about the correct hose type. Understanding the different types will ensure a proper fit and prevent issues during installation.

    Changing a kitchen faucet hose is surprisingly straightforward, though a little messy. It’s a surprisingly common DIY task, and often easier than you might think. Speaking of unexpected connections, did you know that Radiohead collaborator Nigel Goodrich has a cameo in Star Wars: The Force Awakens? This Radiohead collaborator Nigel Goodrich appearance in Star Wars is a fun little fact, but getting back to the faucet hose, just remember to turn off the water supply first, and you’ll be good to go!

    Identifying the Problem Faucet Hose

    Change the Faucet Hose in a Kitchen Sink

    Spotting a worn-out or damaged faucet hose is crucial for a successful replacement. A failing hose can lead to leaks, water damage, and even costly repairs if ignored. Knowing the signs of a compromised hose will help you avoid these issues and make the replacement process straightforward.Identifying the problem starts with visual inspection. A worn-out hose often exhibits signs of deterioration, making it apparent that replacement is necessary.

    This involves looking for telltale signs of damage and considering the specific type of faucet in your kitchen.

    Changing the faucet hose in a kitchen sink can be surprisingly straightforward. You’ll need some basic tools, and maybe a little elbow grease. It’s a surprisingly satisfying DIY project, kind of like watching a fascinating online performance like trash talk performs explode dig. Once you get the old hose off, you’ll be ready to install the new one and have a perfectly functioning faucet again.

    Visual Characteristics of a Worn-Out Hose

    A worn-out faucet hose might display various visual cues. Look for brittle or cracked sections, particularly in the areas that are most stressed. The hose might show signs of splitting, bulging, or discoloration. These visual cues indicate weakening of the material, and this could lead to leaks. Pay close attention to the areas where the hose connects to the faucet and the water supply line.

    These connections are critical, and any signs of damage there should prompt a replacement. Also, check for unusual kinks or bends in the hose, which can restrict water flow or cause leaks. If the hose is significantly older, this is an additional reason to consider replacing it.

    Identifying the Specific Hose Type, Change the Faucet Hose in a Kitchen Sink

    Matching the new hose to the existing connections is vital for a successful replacement. A precise fit ensures proper water flow and prevents leaks. The faucet’s spout style will dictate the appropriate hose type. A standard spout requires a standard hose, a pull-down spout needs a flexible hose, and a high-arc spout necessitates a long hose to accommodate its design.

    Consider the spout’s reach and adjustability to ensure a suitable hose length and flexibility. Incorrect hose type could result in improper installation or incompatibility with the existing connections.

    Importance of Matching the New Hose to Existing Connections

    Matching the new hose to the existing connections is critical for successful replacement. This includes the fitting types on both the faucet and the water supply line. Mismatched connections can lead to leaks, improper water flow, and potentially damage to your plumbing system. Use a similar hose type to the old one, especially regarding the material and diameter.

    Incorrectly matching the new hose to the existing connections can result in improper installation or incompatibility, leading to issues with water flow and leaks.

    Common Problems with Faucet Hoses

    Several issues can affect faucet hoses. Leaking is the most common problem. It may originate from cracks, splits, or wear in the hose material. The connections can also cause leaks. These include loose fittings, damaged connections, or worn-out washers.

    Restricted water flow is another possibility. If the hose has kinks or bends, or if it’s significantly aged, water flow can be compromised.

    Table of Common Kitchen Sink Faucet and Hose Types

    Faucet Type Hose Type
    Standard Spout Standard Hose
    Pull-Down Spout Flexible Hose
    High-Arc Spout Long Hose

    Preparing the Workspace: Change The Faucet Hose In A Kitchen Sink

    A clean and organized workspace is crucial for a successful faucet hose replacement. This prevents accidental spills, injuries, and makes the entire process much smoother and safer. Proper preparation ensures that you can work efficiently and effectively, minimizing the risk of mistakes.A well-prepared workspace is more than just tidiness; it’s a safety precaution. Careful planning and execution are vital for completing the project smoothly.

    By following these steps, you can minimize potential hazards and ensure a successful and safe project.

    Creating a Safe Workspace

    Preparing the area around the sink is the first step. This involves clearing the immediate area of any unnecessary items. This will create more space for working comfortably and safely. Gather all necessary tools and supplies in a readily accessible location. This will reduce wasted time and prevent searching for misplaced tools during the procedure.

    Covering the countertop with a drop cloth or newspaper will protect the surface from water and potential damage from tools. This is essential for preventing scratches or stains on your countertop.

    Isolating the Water Supply

    Shutting off the water supply is a critical safety step. This prevents any water from flowing while you work on the faucet hose. Locate the shut-off valves for both the hot and cold water lines. Turn these valves completely clockwise to shut off the water supply. These valves are usually located near the water supply pipes beneath or beside the sink.

    Ensure the valves are fully closed to avoid any unexpected water flow during the project.

    Potential Hazards and Prevention Methods

    Proper preparation and safety measures are vital for a successful faucet replacement. Recognizing and addressing potential hazards can significantly reduce the risk of accidents. This is particularly important in the kitchen environment, where water and sharp objects are frequently present.

    Changing a kitchen faucet hose is surprisingly straightforward, but sometimes a bit messy. It’s a handy DIY job, similar to prepping a synthetic wig for a night out. Knowing how to properly wash a synthetic wig, as detailed in this helpful guide Wash a Synthetic Wig , can offer valuable tips for handling delicate materials. Ultimately, both tasks require patience and attention to detail, making them perfect for a relaxing weekend project.

    Just remember to turn off the water before starting either one!

    Hazard Prevention
    Water Spills Use a bucket or basin to catch any drips or spills during the process. This will prevent water from damaging the surrounding area.
    Sharp Objects Wrap tools like screwdrivers and pliers in soft cloth or towels to prevent accidental cuts or injuries. Be mindful of sharp edges on tools and parts of the faucet assembly.
    Slip Hazards Place a non-slip mat or towel on the floor near the sink to prevent slips and falls. This is particularly important if the floor is slippery or wet.

    Disconnecting the Old Hose

    Before you start disconnecting the old faucet hose, it’s crucial to shut off the water supply to the sink. This prevents water damage and ensures your safety during the replacement process. Improperly turning off the water supply can lead to significant water damage, and this step should be taken with the utmost care. Failing to do so can result in a flooded kitchen and substantial repair costs.The process of disconnecting the old hose involves several steps, each crucial for a successful replacement.

    Careful attention to detail throughout this process will prevent unnecessary damage to the faucet or water lines. The steps are Artikeld below.

    Turning Off the Water Supply

    To prevent water damage during the hose replacement, you must shut off the water supply to the sink. Locate the shut-off valves, usually located under the sink or near the water supply lines. Turn these valves clockwise to completely stop the water flow. Test the valves by running your tap to ensure the water is fully off. This step is crucial for the safety and success of the entire replacement process.

    Disconnecting the Hose from the Faucet

    This involves detaching the hose from the faucet’s connection points. First, visually inspect the connection type. Common types include compression fittings and quick-connects. Once identified, use the appropriate tool to carefully disconnect the hose. Care should be taken to avoid damaging the faucet or the connections.

    Disconnecting the Hose from the Water Supply Line

    After disconnecting the hose from the faucet, the next step is to detach it from the water supply line. Again, inspect the connection type. The most common connections are compression fittings or quick-connects. Apply the appropriate tool, such as an adjustable wrench or pliers, to carefully disconnect the hose. Gentle, controlled pressure is vital to prevent breakage or damage.

    Use a towel to protect the area from water spills.

    Identifying Connection Types and Tools

    Different faucet hoses use various connection types. Understanding these types and the correct tools is crucial for a smooth and damage-free replacement.

    Connection Type Tool
    Compression Fitting Adjustable Wrench
    Quick Connect Pliers

    Using the correct tool is essential to prevent damage to the faucet and water lines. An adjustable wrench is ideal for compression fittings, applying even pressure to loosen and tighten. Pliers are best for quick-connect fittings, enabling precise and controlled detachment.

    Avoiding Damage to Faucet and Water Lines

    During the entire disconnecting process, careful handling is paramount. Avoid applying excessive force, which can damage the faucet or water lines. If a fitting is particularly stubborn, consult a professional plumber to prevent further damage or complications. A professional can identify the issue and provide the best approach. Gentle, controlled movements are crucial.

    Using the appropriate tools for each connection type is vital.

    Installing the New Hose

    Getting that new faucet hose installed is a satisfying feeling, knowing you’ve tackled a home improvement project. This step involves connecting the new hose to the faucet and water supply, ensuring a leak-free setup. Proper installation is crucial for both the longevity of the hose and the prevention of water damage.Connecting the new hose to the faucet involves precise alignment and secure tightening.

    The correct technique for connecting the new hose to the water supply line is also essential, and avoiding over-tightening is critical to prevent leaks and potential damage.

    Connecting the New Hose to the Faucet

    Carefully align the new hose’s connections with the faucet’s corresponding openings. Ensure the hose’s connections are oriented correctly and securely fit into the faucet’s ports. Use a gentle, twisting motion to connect the hose, avoiding excessive force that could damage the faucet or the hose itself. Proper alignment ensures a tight seal, minimizing the risk of leaks.

    Connecting the New Hose to the Water Supply Line

    The water supply line connection requires attention to detail. Match the new hose’s fittings to the existing water supply line’s connections. A gentle twisting motion is usually sufficient to connect the hose to the water supply line. Ensure the connections are properly aligned to avoid leaks and ensure a secure seal. It’s vital to pay close attention to the type of fittings involved (e.g., compression, quick-connect) to ensure compatibility.

    Importance of Tightening Connections

    Properly tightening connections is paramount for preventing leaks. Over-tightening can damage the fittings or the hose, while under-tightening will lead to leaks. Use a wrench or pliers, if necessary, to achieve the appropriate tightness. The connections should feel firm and secure without excessive force. A good rule of thumb is to apply enough force to create a snug fit but not so much that you feel the threads are being stripped or the hose is being strained.

    Potential Issues with Improper Tightening

    Improper tightening can result in leaks, which can lead to water damage and wasted water. Over-tightening can damage the threads on the faucet or hose, causing them to strip or break. Under-tightening, on the other hand, creates an insecure seal, leading to dripping or running water. Regular inspections for leaks are important to prevent damage and ensure efficient water usage.

    Testing the New Hose for Leaks

    Thorough leak testing is crucial to confirm a successful installation. The following table Artikels the steps for checking for leaks after connecting the new hose.

    Step Action
    1 Turn on the water supply slightly.
    2 Check for leaks at all connections (faucet, water supply line, and hose).

    By carefully following these steps, you can ensure a leak-free installation and enjoy your newly replaced faucet hose for years to come. Pay attention to any signs of water leakage, and if any issues are observed, immediately turn off the water supply and address the problem before continuing with the project.

    Finishing Touches and Cleanup

    Bringing your kitchen faucet hose replacement project to a successful conclusion involves a few crucial final steps. These steps ensure a leak-free installation and a clean workspace, setting the stage for continued kitchen use. Properly turning the water back on, tidying up, and confirming the job’s completion are essential for a smooth transition.

    Returning Water Supply

    Before you can fully enjoy your newly installed faucet hose, you must restore the water supply. This involves carefully opening the water valves located beneath the sink. Failure to follow this step can lead to water damage.

    • Locate the water supply valves under the sink. These valves are typically shut-off valves, and often have a handle or lever to control the water flow.
    • Turn the valves slowly in the direction indicated to open the water supply. Avoid turning them too quickly, which can lead to water pressure fluctuations.
    • Check for leaks immediately. If water leaks are detected at the connections, tighten the fittings or connections.

    Cleaning Up the Workspace

    A clean workspace is a sign of a well-managed project. Cleaning up debris and tools after completing the faucet hose replacement will maintain a functional and organized kitchen.

    • Remove any tools, rags, or other materials used in the project.
    • Wipe down the sink area and surrounding surfaces to remove any remaining water or debris.
    • Dispose of any excess water or cleaning solutions safely, ensuring proper environmental protection.

    Leak Detection

    Thorough leak detection is paramount after any plumbing project. A single leak can lead to significant water waste and property damage over time.

    • Inspect all connections and fittings for any signs of leakage. Look for dripping water, damp spots, or puddles.
    • Turn on the water faucet and observe the connections for any indications of leaks.
    • Check under the sink and in the area around the sink for any water accumulation. A small leak can often be missed unless thoroughly inspected.

    Disposal of Old Materials

    Proper disposal of old materials is vital for environmental safety and to comply with local regulations. Hazardous materials, such as old plumbing parts or solvents, should be disposed of properly to avoid environmental damage.

    • Place the old faucet hose and any other disposable materials in a designated container for proper disposal.
    • If any solvents or cleaning agents were used, dispose of them according to the instructions on the product label. Check with local authorities for specific guidelines on disposing of plumbing waste.

    Completion Checklist

    A checklist ensures all critical steps are completed, leaving no loose ends.

    • Verify that the water supply is fully turned on.
    • Ensure the new faucet hose is properly connected and secure.
    • Confirm there are no leaks at any connections.
    • Confirm the workspace is clean and tidy.
    • Ensure that old materials have been disposed of safely.

    Potential Problems and Solutions

    Troubleshooting can resolve any issues encountered during the replacement process.

    Problem Solution
    Leak at connection Tighten connection using appropriate tools. If the leak persists, replace the damaged part.
    Hose won’t connect Check the type of hose and fitting to ensure compatibility. If mismatched, obtain the correct hose and fitting.

    Summary

    Change the Faucet Hose in a Kitchen Sink

    Replacing your kitchen faucet hose is a manageable project that can save you money and improve the functionality of your kitchen. By following this step-by-step guide, you’ll be able to confidently handle this task. Remember to prioritize safety, carefully follow the instructions, and if you’re uncertain about any step, consult a professional. A properly replaced faucet hose ensures a reliable water supply and a well-maintained kitchen.

  • Replace Sliding Glass Door Rollers A Comprehensive Guide

    Replace Sliding Glass Door Rollers A Comprehensive Guide

    Replace Sliding Glass Door Rollers is a comprehensive guide to fixing those troublesome sliding glass doors. From identifying the problem to replacement procedures and maintenance, this guide covers every aspect of getting your doors moving smoothly again. Whether your rollers are squeaking, sticking, or just plain broken, this article provides the information you need to tackle the task with confidence.

    This detailed guide will help you diagnose the issue, understand the different types of rollers, and learn how to safely and effectively replace them. You’ll discover the common causes of roller problems, learn troubleshooting techniques, and find out how to maintain your sliding glass doors for optimal performance.

    Identifying the Problem

    Sliding glass doors, while aesthetically pleasing, can become frustratingly difficult to operate if their rollers fail. Understanding the common issues and signs of roller problems is crucial for timely maintenance and preventing more significant damage. Proper diagnosis allows for efficient repairs and ensures the smooth, trouble-free function of your door.Roller problems often stem from a combination of wear and tear, improper installation, or environmental factors.

    Identifying these problems early can save you time and money in the long run.

    Replacing sliding glass door rollers can be a surprisingly satisfying DIY project. It’s a bit like catching a queen ant – Catch a Queen Ant – you need patience and a bit of finesse. But once you get those rollers humming smoothly, you’ll appreciate the quiet efficiency of a well-maintained sliding door system. Just make sure to choose the right rollers for your specific door type for the best results.

    Common Problems with Sliding Glass Door Rollers

    Roller issues often manifest as operational difficulties. These difficulties can range from minor inconveniences to complete inoperability, and the specific symptoms depend on the type and extent of the damage. Early detection is key to preventing costly repairs and potential damage to the door frame.

    • Squeaking or Grinding Sounds: A common indicator of worn-out rollers or misalignment. This sound often accompanies movement, particularly when the door is being pushed or pulled. This is often caused by the rollers rubbing against the track or each other.
    • Sticking or Binding: The door may struggle to slide smoothly or get stuck entirely. This is frequently due to worn-down rollers, debris buildup in the track, or misalignment of the rollers. The door may require significant force to move, and this could damage the door or the track.
    • Uneven Movement: The door may not slide evenly across the track. This can be caused by misaligned rollers or damaged rollers. If the door consistently pulls to one side, there’s a high probability of a roller problem. This can lead to uneven wear on the track.
    • Visible Damage: Look closely at the rollers for signs of rust, breakage, or deformation. Bent or broken rollers will likely cause uneven movement and significantly affect the door’s function. Corrosion and breakage can be caused by moisture and environmental exposure. For example, a door frequently exposed to rain or humidity may show significant rust.

    Signs of Worn-Out or Damaged Rollers

    Observing these symptoms can help pinpoint the source of the problem. A thorough inspection of the rollers, track, and door frame is essential for a correct diagnosis.

    • Uneven Wear on the Track: The track itself can show signs of excessive wear if the rollers are misaligned or damaged. This can be visually inspected by looking for grooves, dents, or other irregularities in the track.
    • Difficulty in Movement: The door may require considerable effort to open or close, indicating significant wear and tear on the rollers or the track. This can lead to stress on the door and track.
    • Excessive Noise During Operation: The sounds during operation provide valuable clues about the condition of the rollers. Grinding, screeching, or squeaking noises indicate a significant issue that needs immediate attention.

    Potential Causes of Roller Failure

    Several factors contribute to roller failure. Understanding these factors helps in preventative maintenance.

    • Environmental Factors: Exposure to moisture, extreme temperatures, and debris can accelerate rust, corrosion, and damage to the rollers. Weather conditions and humidity can have a significant impact.
    • Improper Installation: Incorrect installation can lead to misalignment and premature wear of the rollers. This can lead to the door getting stuck or not moving smoothly.
    • Overuse or Lack of Maintenance: Frequent use and a lack of regular maintenance contribute to wear and tear on the rollers. This can lead to the need for replacement over time.

    Types of Sliding Glass Door Rollers

    Different types of rollers offer varying levels of performance and durability.

    • Ball Bearing Rollers: These offer smooth operation and are generally more expensive. Ball bearing rollers are known for their durability and smooth operation, minimizing friction and maximizing the door’s lifespan.
    • Nylon Rollers: Nylon rollers are less expensive but may not be as durable as ball bearing rollers. Nylon rollers are less prone to rusting, which can be a major advantage in humid environments. They can still be damaged if not maintained.

    Types of Damage to Sliding Glass Door Rollers

    Various types of damage can occur to the rollers, affecting their functionality.

    • Rust and Corrosion: Moisture exposure can cause significant damage, making the rollers stiff and difficult to operate. Rust can also affect the track and the door frame itself.
    • Breakage: Physical impact or excessive wear can cause rollers to break, rendering the door inoperable. This can happen in several ways.
    • Misalignment: Misalignment of the rollers with the track is a common issue that can cause uneven movement and noise. This often stems from incorrect installation or improper maintenance.

    Troubleshooting and Diagnosis: Replace Sliding Glass Door Rollers

    Identifying the source of your sliding glass door woes is crucial for effective repair. A systematic approach to visual inspection, coupled with an understanding of common issues, can pinpoint the problem quickly and efficiently. This section details the steps for diagnosing various roller problems, from simple lubrication issues to more complex track misalignments.A well-maintained sliding glass door system translates to years of smooth operation.

    Troubleshooting involves inspecting the rollers, tracks, and other components for wear, damage, or obstructions. A thorough assessment will reveal the root cause, allowing for targeted repairs and preventing future problems.

    Visual Inspection of Rollers

    Thorough visual inspection is the first step in diagnosing sliding glass door roller problems. Inspect the rollers for any visible damage, such as cracks, dents, or missing parts. Look closely for signs of excessive wear, including flattened or worn-down wheels. Pay attention to the overall condition of the rollers’ mounting points and brackets. Ensure they are securely attached and free from corrosion or rust.

    Assess the roller’s alignment with the track. A misaligned roller may lead to uneven operation or jamming.

    Assessing Roller, Track, and Component Condition

    The condition of the rollers directly impacts the door’s smooth operation. Examine the rollers for signs of damage or excessive wear. Inspect the tracks for any warping, misalignment, or debris buildup. Check the track’s alignment with the rollers. Look for any signs of corrosion or rust, especially at the points where the rollers make contact with the tracks.

    Assess the condition of any other components, such as the door hardware or the frame itself, for any signs of damage or wear that might be contributing to the problem.

    Checking Roller Lubrication and Track Condition

    Proper lubrication of the rollers and maintenance of the tracks are crucial for preventing sticking and squeaking. Inspect the rollers for adequate lubrication. Apply a small amount of white lithium grease to the roller wheels if necessary. Ensure the grease is not excessive. Clean the tracks thoroughly to remove any debris, dust, or dirt.

    This can improve the rollers’ gliding action and prevent noise. Ensure the tracks are free from any obstructions that might be hindering the rollers’ movement.

    Identifying the Source of Sticking or Squeaking Sounds

    Sticking or squeaking noises are often the first signs of problems with sliding glass doors. Carefully identify the specific location and nature of the sound. A squeaking sound might indicate a lack of lubrication, while a sticking sound could point to a misaligned roller or a damaged track. If the sound is coming from a particular area, pinpoint the exact component responsible.

    Listen for the sound while moving the door slowly to identify the precise point of friction.

    Comparing Troubleshooting Methods for Different Roller Issues

    Different types of roller issues necessitate different troubleshooting approaches. For example, if the rollers are sticking, the first step is to check the lubrication and clean the tracks. If the issue persists, consider inspecting the rollers for damage or misalignment. If the rollers are squeaking, focus on lubricating the affected areas. A misaligned track requires adjustments to the track or frame.

    Consider the severity and nature of the problem when choosing the appropriate troubleshooting method.

    Table of Common Roller Problems and Solutions

    Problem Potential Solution
    Sticking Rollers Check lubrication, clean tracks, adjust rollers, replace damaged parts
    Squeaking Rollers Apply lubrication, clean tracks, inspect for obstructions
    Misaligned Rollers Adjust rollers, check track alignment, replace damaged parts
    Damaged Rollers Replace damaged rollers
    Obstructions in Track Remove obstructions, clean tracks, inspect for misalignment

    Replacement Procedures

    Replacing sliding glass door rollers can seem daunting, but with the right steps and safety precautions, it’s a manageable DIY project. Proper replacement ensures smooth operation, extending the life of your door system and preventing future problems. This section provides a comprehensive guide on the replacement procedures, from initial disassembly to final reassembly.Understanding the intricacies of your door system is crucial for a successful replacement.

    This includes identifying the specific roller types and their locations on the door and track. Following these steps carefully minimizes the risk of damage to the door and frame.

    Safety Precautions

    Before starting any replacement work, prioritize safety. Wear appropriate safety glasses to protect your eyes from flying debris. Consider using gloves to prevent cuts and abrasions. Ensure the door is securely supported to prevent it from falling. If working alone, have someone assist with holding the door.

    Always disconnect power to the door system, if applicable, to avoid any electrical hazards. Work in a well-lit area to improve visibility and reduce the risk of accidents.

    Tools Required

    A well-stocked toolbox is essential for a smooth replacement. These tools are necessary for safe and efficient work.

    Replacing sliding glass door rollers can be a real pain, but it’s totally worth it for a smooth operation. Speaking of smooth, I’ve been digging the new music from fever ray alvvays oso oso this week, which Pitchfork just highlighted in their latest selects. fever ray alvvays oso oso this week pitchfork selects It’s got that perfect blend of dreamy vibes, making the whole process of fixing those rollers a little less tedious.

    Hopefully, my new playlist will inspire you to tackle those rollers with renewed vigor!

    • Screwdrivers (Phillips and flathead): Essential for removing and installing screws.
    • Measuring tape: For accurate measurements.
    • Adjustable wrench or pliers: For adjusting nuts and bolts.
    • Hammer (optional): For certain types of roller removal.
    • Lubricant (e.g., white lithium grease): For proper lubrication after replacement.
    • Safety Glasses: Protect your eyes from flying debris.
    • Gloves: Protect your hands from cuts or abrasions.

    Disassembling the Sliding Glass Door System

    Disassembly involves carefully removing components to access the rollers. The exact steps may vary depending on the specific door system. Carefully document the order of components and their positions for reassembly.

    1. Support the door: Securely support the door using a sturdy platform or helper to prevent it from falling during the removal process.
    2. Remove hardware: Carefully detach the hardware, such as screws, bolts, and brackets, holding the door and track together. Note the placement of each part.
    3. Detach the door: Carefully remove the door from the track. Take your time, and ensure the door is adequately supported.
    4. Inspect the track: Inspect the track for any obstructions or damage. Repair or replace as needed.

    Removing and Installing New Rollers, Replace Sliding Glass Door Rollers

    Carefully remove the old rollers and install the new ones. This is a crucial step to ensure smooth operation. Pay close attention to the type of roller and how it fits into the track and door.

    1. Remove old rollers: Carefully remove the old rollers from their respective brackets.
    2. Inspect rollers and tracks: Ensure there are no damage or debris. Repair or replace damaged components.
    3. Install new rollers: Carefully align and insert the new rollers into their brackets.
    4. Secure new rollers: Ensure the rollers are securely fastened using the correct screws or fasteners.

    Alignment and Lubrication

    Precise alignment and lubrication are critical for smooth and efficient operation of the sliding glass door. This ensures longevity and prevents squeaking.

    • Alignment: Verify that the rollers are properly aligned with the track. Ensure the door glides smoothly in both directions.
    • Lubrication: Apply a small amount of lubricant (white lithium grease) to the rollers and track. This will reduce friction and prevent squeaking.

    Reassembling the Sliding Glass Door System

    Reassembly is the reverse of the disassembly process. Carefully follow the documented steps to reassemble the components in their original positions. This ensures the door operates correctly.

    1. Reattach the door: Carefully reattach the door to the track.
    2. Reinstall hardware: Reinstall all hardware, ensuring that screws and bolts are securely fastened.
    3. Final inspection: Check for smooth operation of the door. Ensure the door glides smoothly in both directions.

    Maintenance and Prevention

    Keeping your sliding glass door rollers in tip-top shape is crucial for smooth operation and longevity. Regular maintenance is far less expensive than replacing entire systems, and it prevents small problems from escalating into major repairs. This section Artikels essential maintenance practices and preventive measures to extend the life of your sliding glass door system.

    Importance of Regular Maintenance

    Regular maintenance is key to preventing costly repairs down the line. By addressing minor issues early, you can avoid more significant problems, such as binding, sticking, or complete failure of the rollers. This proactive approach not only saves money but also ensures the smooth and safe operation of your sliding glass door.

    Methods for Preventing Future Roller Problems

    Proactive measures are far more effective than reactive fixes. Preventing future roller problems hinges on consistent maintenance and understanding the factors that contribute to roller wear and tear. Addressing issues promptly can extend the lifespan of your sliding glass door system and avoid costly replacements.

    Common Maintenance Tasks and Frequency

    | Task | Frequency | Description ||—————————————–|———————————————————————————–|————————————————————————————————————————————————————————————————————————————————————————————————————————————————————————————————-|| Inspect rollers for damage or wear | Monthly | Visually check for cracks, dents, or excessive wear on the rollers.

    Look for signs of corrosion or rust. Examine the wheels and axles for damage. || Lubricate rollers | Quarterly | Apply a suitable lubricant (e.g., white lithium grease) to the roller axles and wheels.

    Ensure even distribution, but avoid over-lubrication, which can attract dirt and grime. Follow the manufacturer’s recommendations for specific lubricant types. || Clean the track and rollers | Monthly | Remove debris, dirt, and grime from the track and rollers using a soft brush or cloth.

    Pay close attention to the areas where the rollers make contact with the track. Avoid harsh chemicals that could damage the track or rollers. || Check for proper alignment | Bi-annually | Ensure the door slides smoothly in the track without any binding or sticking.

    Adjust the rollers as needed to maintain proper alignment. If significant misalignment is detected, seek professional assistance to avoid further damage. || Check the door balance | Monthly | Ensure the door remains balanced while sliding.

    Replacing sliding glass door rollers can be a real pain, but it’s definitely doable. Thinking about the smooth, rhythmic movement of those rollers, it got me thinking about the rhythmic energy of music. Learning more about the evolution of urban music genres like hip-hop, funk, and reggaeton, especially from a historical perspective, can be quite insightful, as you can see in this helpful introduction introduccion a la musica urbana.

    Getting those rollers replaced will feel like a victory after that deep dive into musical history. I’m going to tackle this project this weekend!

    A properly balanced door reduces strain on the rollers and track, preventing premature wear. Adjust the door balance weights or counterweights as needed. || Inspect for signs of rust or corrosion | Monthly | Rust and corrosion can weaken rollers and damage the track.

    Early detection is crucial to prevent further damage. If any rust is observed, address the issue promptly to prevent its spread. |

    Impact of Environmental Factors

    Environmental factors play a crucial role in the longevity of sliding glass door rollers. Exposure to extreme temperatures, moisture, and excessive dust can accelerate wear and tear, potentially leading to premature failure. Understanding the local climate and taking preventive measures is essential.

    Preventive Measures

    Implementing preventive measures can significantly extend the lifespan of sliding glass door rollers. Regular maintenance, proper lubrication, and protection from environmental elements are essential. For example, in humid climates, consider using corrosion-resistant lubricants. In areas with heavy dust, consider installing covers or using dust-repelling materials.

    Lubrication Techniques

    Proper lubrication techniques are essential for smooth operation and long-term performance. Apply lubricant sparingly to the designated areas on the rollers. Avoid over-lubrication, as this can attract dirt and grime. Use a suitable lubricant specifically recommended for sliding glass doors. Ensure the lubricant is compatible with the material of the rollers and track.

    Types of Replacement Rollers

    Replace Sliding Glass Door Rollers

    Choosing the right replacement rollers for your sliding glass door is crucial for smooth operation and longevity. Different roller types offer varying levels of performance, depending on factors like the door’s weight, usage frequency, and the overall design of your door system. Understanding the strengths and weaknesses of each type will help you make an informed decision for a successful replacement.The selection of replacement rollers significantly impacts the overall functionality and lifespan of your sliding glass door system.

    Different materials and designs influence the door’s ability to glide effortlessly, withstand wear and tear, and maintain its aesthetic appeal. A poor choice can lead to squeaking, sticking, or even damage to the door frame.

    Metal Rollers

    Metal rollers, typically made of steel or aluminum, are known for their durability and strength. They are often a popular choice for heavier doors or high-traffic areas. The robust construction can handle significant wear and tear.Metal rollers are generally quite strong and long-lasting. They are capable of supporting heavier doors and more frequent use. However, they can be susceptible to rust or corrosion if not properly maintained, and the metallic nature may contribute to more noise compared to some other materials.

    Plastic Rollers

    Plastic rollers, often made from nylon or similar polymers, are known for their smooth operation and quiet performance. They are typically lighter than metal rollers, making them a good option for lighter doors. Their smooth surface reduces friction, contributing to a quieter and more effortless gliding experience.Plastic rollers are excellent for minimizing noise and offering a smooth gliding experience.

    However, they might not be as durable as metal rollers and may not be suitable for heavy-duty applications or high-frequency use. Furthermore, the material can degrade or crack over time if exposed to extreme temperatures or excessive pressure.

    Comparing Roller Types

    Roller Type Pros Cons
    Metal Durable, strong, capable of handling heavier doors, resistant to minor impacts Can be noisy, prone to rust or corrosion, heavier
    Plastic Quiet operation, smooth gliding, relatively light weight Less durable than metal, may not be suitable for heavy doors, can degrade over time

    Impact on Door Performance

    The type of roller directly affects the overall performance of the sliding glass door. Metal rollers, while durable, can create more noise. Plastic rollers, on the other hand, deliver a smoother, quieter operation but may not be as long-lasting. The weight of the door and the frequency of use are crucial factors in determining the best roller type.For instance, a light-weight sliding door used occasionally might benefit from plastic rollers.

    Conversely, a heavy-duty commercial door requiring constant use would likely benefit from the greater durability and load-bearing capacity of metal rollers. Careful consideration of the specific application is essential for selecting the appropriate roller type.

    Roller Selection Guide

    The ideal roller type depends on the specific door’s weight and usage pattern. For heavier doors used frequently, metal rollers are likely the best choice. For lighter doors or doors used less frequently, plastic rollers offer a balance of quiet operation and cost-effectiveness. Always consult the manufacturer’s recommendations for the specific door model to ensure compatibility and optimal performance.

    Cost Considerations

    Replacing sliding glass door rollers can range from a budget-friendly DIY project to a more involved professional job. Understanding the associated costs, influencing factors, and potential long-term savings is crucial for making an informed decision. Careful planning and consideration of various factors will ensure you’re making the best choice for your needs and budget.

    Factors Influencing Roller Replacement Costs

    Several factors influence the price of replacing sliding glass door rollers. The type of roller, the complexity of the installation, the labor rates in your area, and any additional repairs needed all contribute to the overall cost. Furthermore, the size and condition of the door system play a significant role in the overall price.

    Roller Type Cost Breakdown

    Different roller types offer varying levels of durability and performance, which directly impact their cost. Selecting the appropriate roller type for your specific needs is essential to ensure optimal performance and longevity.

    • Basic Plastic Rollers: These are typically the most affordable option, but they may not offer the same level of durability as other types. They are suitable for light-use doors and may require more frequent replacements.
    • Metal Rollers: Metal rollers are more durable and long-lasting compared to plastic ones, resulting in a higher upfront cost. They are a better choice for heavy-use doors or those in high-traffic areas.
    • Heavy-Duty Rollers: These rollers are designed for extremely heavy doors or applications with significant weight and frequent use. They come with a higher price tag but offer the best long-term value.
    • Ball Bearing Rollers: Featuring ball bearings, these rollers provide smooth operation and reduced friction. They offer superior performance but have a higher price point compared to basic plastic or metal rollers.

    Replacement Service Pricing Models

    Pricing models for roller replacements vary depending on the service provider. Some companies offer fixed-price packages, while others base their pricing on an hourly rate. It’s essential to inquire about the specific pricing model before committing to any service.

    • Fixed-Price Packages: These packages offer a pre-determined price for a specific service, including parts and labor. This can be a convenient option, as you know the exact cost upfront.
    • Hourly Rate: Some service providers charge based on the amount of time spent on the job. This model can be unpredictable, as the actual cost depends on the complexity of the installation and potential unforeseen issues.
    • Parts-Only Pricing: In some cases, a service provider may offer parts only, requiring you to handle the installation yourself. This can lead to cost savings, but you must factor in the time and effort needed for the installation.

    Estimated Roller Replacement Costs

    The cost of replacement rollers and associated services can vary considerably. Here’s a table estimating the cost of different roller types and replacement services. Note that these are estimates and actual costs may vary based on the specifics of your door and location.

    Roller Type Estimated Cost (Parts) Estimated Cost (Labor) Estimated Total Cost
    Basic Plastic $10-$30 per roller $50-$150 per hour $60-$200
    Metal $20-$50 per roller $50-$150 per hour $80-$300
    Heavy-Duty $30-$80 per roller $50-$150 per hour $100-$400
    Ball Bearing $40-$100 per roller $50-$150 per hour $120-$500

    Long-Term Cost Savings

    Proper maintenance, including regular lubrication and inspection of your sliding glass door rollers, can significantly reduce the need for costly replacements in the future. Preventing problems early can lead to considerable long-term cost savings. Regular maintenance can extend the lifespan of your door system and prevent more extensive and expensive repairs down the road.

    Quality and Cost Relationship

    Generally, higher-quality rollers tend to have a higher price tag. However, the superior durability and longevity of these rollers often outweigh the higher initial cost. High-quality rollers will last longer and require less frequent replacements, leading to substantial long-term cost savings compared to cheaper, lower-quality options. Investing in quality parts is often a better long-term financial decision, preventing costly repairs and replacements down the line.

    Conclusive Thoughts

    Replace Sliding Glass Door Rollers

    In conclusion, replacing sliding glass door rollers is a task that can be accomplished with the right knowledge and tools. This guide has provided a comprehensive overview of the entire process, from identifying the problem to performing the replacement and maintenance. By following the steps Artikeld, you can ensure your sliding glass doors operate smoothly and reliably for years to come.

  • Cover Up a Bad Wall  A Complete Guide

    Cover Up a Bad Wall A Complete Guide

    Cover Up a Bad Wall: This comprehensive guide delves into the art of transforming unsightly walls into beautiful focal points. Whether your wall suffers from cracks, uneven surfaces, or plumbing nightmares, we’ll equip you with the knowledge and tools to tackle any issue head-on.

    From identifying the problem’s root cause to choosing the perfect cover-up method, we’ll explore the entire process, emphasizing proper preparation, execution, and long-term maintenance. Discover how to create a visually appealing and functional space, even with a challenging starting point.

    Identifying the Problem

    A poorly finished wall can significantly detract from a room’s overall aesthetic appeal and even compromise its structural integrity. Understanding the various types of “bad” walls and the potential consequences of simply covering them up is crucial before embarking on any cosmetic repair project. Ignoring underlying issues can lead to costly and time-consuming problems down the line.Addressing the root cause of a wall’s imperfections is always the best approach, even if it requires more upfront effort.

    A superficial fix will only mask the problem, potentially leading to more extensive repairs later. This section explores different types of problematic walls, the reasons behind their flaws, and the long-term implications of overlooking them.

    Types of Bad Walls

    Various factors can contribute to a wall’s undesirable appearance. These imperfections range from minor cosmetic issues to more significant structural problems.

    • Cracked Plaster: Cracked plaster is a common issue, often caused by settling, temperature fluctuations, or improper application. These cracks can range from hairline fractures to wider fissures, significantly impacting the wall’s aesthetic appeal. If left unaddressed, cracks can widen, allowing moisture penetration and potentially causing further damage.
    • Uneven Surfaces: Uneven surfaces are often a result of inconsistent application of materials like drywall or plaster. The resulting bumps, dips, or irregularities create an unprofessional and unappealing look. Such imperfections can affect the way paint or other finishes are applied, further compromising the wall’s appearance.
    • Visible Plumbing Issues: Exposed pipes, leaks, or poorly installed plumbing fixtures can create significant aesthetic problems. These issues not only detract from the wall’s visual appeal but can also lead to moisture damage and mold growth, posing health risks. In such cases, immediate repairs are necessary to prevent further complications.
    • Poorly Finished Drywall: Drywall imperfections, including visible seams, gaps, or uneven textures, can make a wall appear unfinished and unprofessional. These issues can be corrected with proper techniques, but ignoring them can create a significant visual concern.

    Reasons for Wall Imperfections

    Several factors can contribute to the poor quality of a wall, from simple oversight to more significant issues.

    • Budget Constraints: Limited budgets can sometimes result in the use of inferior materials or rushed workmanship, leading to visible imperfections. However, investing in quality materials and skilled labor can prevent many of these issues from arising in the first place.
    • Rushed Construction: Construction projects that are rushed often lead to corners being cut, resulting in poor quality and visible imperfections in the walls. Prioritizing thorough work processes can minimize these problems.
    • Design Flaws: Sometimes, the design itself might not account for potential issues, leading to problems with the wall’s structure or finish. Careful planning and consideration of construction methods can help mitigate these problems.

    Long-Term Problems of Covering Up Bad Walls

    Ignoring underlying issues can lead to more significant problems down the line.

    • Moisture Damage: Cracked plaster or poorly finished drywall can allow moisture to penetrate the wall, leading to mold growth, rot, and structural damage. This can be a costly and time-consuming issue to resolve.
    • Structural Instability: Uneven surfaces or cracked plaster can compromise the wall’s structural integrity, making it more prone to further damage. Ignoring these problems can result in the wall becoming unstable over time.
    • Increased Repair Costs: Addressing the problem later will likely involve more extensive and costly repairs than a simple fix early on. Early identification and remediation is key to minimizing future expenses.

    Importance of Addressing the Underlying Issue

    Ignoring the underlying issue can lead to a multitude of problems. This is crucial for ensuring a structurally sound and aesthetically pleasing wall.

    • Prevention of Further Damage: Addressing the root cause of the problem is essential to prevent further damage to the wall and the surrounding areas.
    • Maintaining Structural Integrity: Repairing the underlying issue ensures that the wall maintains its structural integrity, preventing future problems and maintenance costs.
    • Long-Term Value: A properly repaired wall contributes to the long-term value of a property by ensuring its structural soundness and visual appeal.

    Choosing the Right Cover-Up Method

    Deciding how to conceal a damaged wall depends heavily on the extent of the damage, your budget, and your aesthetic preferences. A thorough assessment of the problem is crucial, as different materials will handle varying degrees of damage and imperfections differently. The choice isn’t just about covering up the issue, but about creating a lasting and visually appealing solution.Different materials offer varying degrees of practicality, visual appeal, and cost-effectiveness.

    Understanding the strengths and weaknesses of each option is essential to making an informed decision. This section explores the diverse range of cover-up methods, analyzing their suitability for different situations.

    Paint

    Paint is a common and often cost-effective solution for minor imperfections. Its versatility allows for a quick and relatively easy application, making it a popular choice for concealing minor cracks, stains, or uneven textures. The wide variety of colors and finishes available ensures that paint can be used to match existing décor or create a completely new look.

    However, paint’s effectiveness is limited by the severity of the underlying damage. If the damage is significant, multiple coats may be necessary, which can impact the overall cost.

    Wallpaper

    Wallpaper provides a more substantial cover-up than paint, offering a wide range of patterns and textures to create a more dramatic effect. Its ability to mask significant flaws and imperfections makes it an excellent choice for covering more substantial damage. However, wallpaper can be more expensive than paint, and the installation process can be more complex, potentially requiring specialized tools and labor.

    The longevity of wallpaper depends on the quality of the paper and the care taken in its application.

    Paneling

    Paneling is a more substantial cover-up method, providing a more durable and potentially longer-lasting solution. It can effectively conceal significant structural issues, providing a more permanent solution. However, paneling often comes with a higher price tag, both in material and labor costs. The installation process can be more time-consuming than other methods. Paneling can create a more sophisticated and visually appealing effect, adding depth and character to a room.

    Decorative Wall Coverings

    Decorative wall coverings, such as vinyl or fabric, offer a balance between the cost-effectiveness of paint and the visual impact of wallpaper. These coverings come in a wide variety of styles and textures, providing a more dynamic and interesting alternative to standard paint or wallpaper. The cost of decorative wall coverings typically falls between paint and wallpaper, while the installation process is often similar to wallpapering.

    Durability depends heavily on the specific type of material used and the care it receives.

    Comparison Table

    Material Pros Cons Cost Durability
    Paint Cost-effective, versatile, quick application, wide range of colors Limited concealing power for major flaws, may require multiple coats Low Moderate
    Wallpaper Conceals significant flaws, wide range of patterns/textures More expensive than paint, more complex installation, potentially less durable than paneling Medium Moderate
    Paneling Durable, masks substantial structural issues, adds depth and character High cost, complex installation, more time-consuming High High
    Decorative Wall Coverings Good balance of cost and visual impact, wide variety of styles Durability depends on material type, installation similar to wallpaper Medium Moderate-High

    Preparation and Planning

    Cover Up a Bad Wall

    Getting a bad wall looking good again involves more than just slapping on a fresh coat of paint. Thorough preparation is key to a successful cover-up, ensuring a smooth, durable finish that lasts. This crucial step often determines the longevity and quality of the final result. Proper surface preparation prevents issues like peeling paint, uneven surfaces, and premature failure of the cover-up material.A well-prepared surface is a happy surface, and a happy surface is a surface that accepts the cover-up material with enthusiasm.

    This section delves into the essential preparation steps, from cleaning and patching to priming, to help you achieve a flawless transformation.

    Covering up a bad wall can be tricky, requiring careful planning and often a lot of elbow grease. But sometimes, the best way to handle a less-than-stellar wall is to make a bold statement, like the artist Mias, whose album cover, as discussed in this insightful article on mias album cover is not subtle , is anything but subtle.

    It’s a vibrant, attention-grabbing design that certainly makes a statement, which could be a great inspiration for dealing with a less-than-perfect wall, too.

    Cleaning the Wall

    Thorough cleaning is the first step in preparing a wall for a cover-up. Dirt, dust, loose paint, and debris can hinder the adhesion of the new cover-up material, leading to an uneven or short-lived finish. Use a damp sponge or cloth to remove loose debris. For tougher grime, a mild detergent solution can be effective, but avoid harsh chemicals that could damage the wall’s existing surface.

    Patching Wall Damage

    Wall damage, from cracks to holes, needs careful attention to prevent future problems. Imperfections can compromise the integrity of the cover-up, leading to visible flaws or even the failure of the entire project. Appropriate patching is crucial. Different patching techniques are suitable for various types of damage.

    Covering up a bad wall can be tricky, but sometimes a fresh coat of paint is just the ticket. Speaking of creative solutions, did you hear that Jonny Greenwood, the incredible composer known for his haunting scores (like Jonny Greenwood to score Tilda Swinton film ), is working on a new project? Hopefully, his unique musical talents can inspire a similar transformative effect on a dull wall in my house! Maybe I’ll tackle it this weekend.

    Patching Techniques

    • For small holes or cracks, a patching compound is ideal. Apply the compound to the damaged area, smoothing it out with a putty knife. Allow the compound to dry completely before moving on to the next step.
    • For larger holes, use a patching compound mixed with fiberglass mesh or similar reinforcement. This creates a strong, durable patch that can withstand future stress. Ensure the patch is properly embedded and level with the surrounding wall.
    • For significant damage or large gaps, a drywall patch is the recommended approach. Cut a piece of drywall that matches the damaged area, reinforce it with supporting materials, and secure it to the wall with screws or adhesive.

    Priming the Wall

    Priming the wall is a crucial step that often gets overlooked. A primer creates a uniform surface for the cover-up material to adhere to, ensuring a more even finish and preventing the cover-up material from absorbing too much of the paint. It also helps seal any imperfections, preventing them from showing through the cover-up.

    Choosing the Right Tools

    Selecting the right tools is essential for efficient and effective preparation. A good quality putty knife, a variety of brushes, a primer sprayer (if appropriate), and appropriate sandpaper are all necessary. The correct tools will make the process smoother, faster, and produce a better result.

    Step-by-Step Preparation Guide, Cover Up a Bad Wall

    1. Clean the Wall: Remove loose debris, dirt, and dust with a damp cloth or sponge.
    2. Assess the Damage: Identify and assess the extent of wall damage (holes, cracks, etc.).
    3. Patch Wall Damage: Apply appropriate patching compounds or drywall patches as needed. Allow to dry completely.
    4. Prime the Wall: Apply a coat of primer to the entire wall, ensuring complete coverage. Allow to dry according to the primer instructions.
    5. Sand (Optional): If necessary, lightly sand the primed wall to create a smooth surface for the cover-up material.

    Execution and Application

    Transforming a problematic wall into a stunning feature requires careful execution. This phase involves applying the chosen cover-up material with precision and attention to detail. The right techniques can significantly impact the final outcome, ensuring a seamless and professional result. Following a step-by-step approach, combined with understanding the unique characteristics of each material, will lead to a successful and satisfying outcome.Proper execution and application of the chosen material is crucial for a successful wall cover-up project.

    This phase is about transforming a less-than-ideal wall into a stunning feature. Careful consideration of the chosen material’s properties and characteristics, along with meticulous execution, are key to achieving a flawless result.

    Applying Paint

    Applying paint effectively is a fundamental skill for a successful wall cover-up. A smooth and even finish requires preparation, precise application, and attention to detail.

    • Preparation is key. Ensure the surface is clean, free of dust, debris, and imperfections. Patch any holes or cracks before painting. Primer is essential to ensure proper adhesion and a smooth finish. A properly prepped surface will yield superior results.

    • Select the right tools. High-quality brushes, rollers, and sprayers are essential. Choosing the appropriate tool for the paint type and desired coverage is important.
    • Apply the paint in thin, even coats. Avoid applying too much paint in one go, as this can lead to drips and runs. Work in sections, allowing each coat to dry completely before applying the next.
    • Use techniques like feathering and blending for smooth transitions. This helps to eliminate visible brushstrokes and creates a seamless finish. Understanding these techniques is crucial for achieving a professional-looking outcome.
    • Addressing imperfections is vital. If you encounter imperfections or uneven surfaces, use putty or filler to correct them before applying the final coat. Be patient and meticulous in your approach.

    Applying Wallpaper

    Wallpaper application demands precision and patience. Choosing the right adhesive and following the manufacturer’s instructions is paramount.

    • Thorough preparation is crucial. Clean the wall, ensuring it’s free of dirt, dust, and any loose paint. Smooth out any imperfections. Ensure the surface is clean and ready to accept the wallpaper.
    • Prepare the wallpaper according to the manufacturer’s instructions. Unroll the wallpaper and let it acclimate to the room’s temperature and humidity. This prevents wrinkles and ensures even adhesion.
    • Apply the adhesive carefully. Following the manufacturer’s instructions is crucial for successful application. Apply the adhesive evenly to both the wall and the wallpaper.
    • Position the wallpaper carefully. Start at a corner and work your way across the wall, ensuring the wallpaper is aligned and smooth. Avoid stretching or tearing the wallpaper.
    • Use a wallpaper smoother or a damp sponge to remove any air bubbles or wrinkles. Thorough smoothing and removal of bubbles is key to a professional look.

    Applying Paneling

    Paneling adds a distinct visual element to a room. Precision and careful alignment are vital for a successful application.

    • Accurate measurements are essential. Ensure the paneling fits the wall’s dimensions correctly. Carefully measure and cut the panels to fit.
    • Apply adhesive according to the manufacturer’s directions. Proper application of the adhesive is critical for secure and lasting installation.
    • Carefully align the panels. Use a level to ensure the panels are straight and even. Ensure proper alignment for a seamless look.
    • Secure the panels firmly to the wall. Use the appropriate tools and techniques to secure the panels. Pay attention to detail and follow the manufacturer’s instructions.
    • Seal any gaps or seams properly. Use caulk or similar materials to fill any gaps and create a smooth transition between panels. This step is important to maintain the integrity of the paneling.

    Applying Decorative Wall Coverings

    Decorative wall coverings offer diverse styles and textures. Each material requires specific application techniques.

    Covering up a bad wall can feel like a temporary fix, a band-aid on a deeper problem. It’s like trying to mask the underlying feelings of isolation and disconnect, much like the themes explored in the new zine, the presents void emas new zine tackles modern alienation. Ultimately, though, a good paint job or wallpaper can’t truly erase the issue.

    Maybe a new perspective or a fresh approach, like a new zine, is what’s really needed to fix that bad wall for good.

    • Understand the material’s properties. Different materials, such as textured wall coverings or self-adhesive tiles, require different approaches. Knowing the material’s characteristics is important.
    • Follow the manufacturer’s instructions. Each material has specific instructions for preparation and application. Adhering to these guidelines is critical.
    • Apply the material according to the manufacturer’s guidelines. Carefully adhere the covering to the wall. Pay attention to detail.
    • Address any imperfections or irregularities. Correct any irregularities during the application process. This is vital to ensure a smooth finish.
    • Use appropriate tools for different materials. Using the right tools can significantly impact the quality of the finish. Different materials require different tools.

    Maintaining the Cover-Up: Cover Up A Bad Wall

    Cover Up a Bad Wall

    Keeping your wall cover-up looking its best over time requires a proactive approach. Proper maintenance is key to preventing damage and extending the life of your investment. This involves understanding the specific needs of the material you’ve chosen, from paint to wallpaper. A little preventative care goes a long way in ensuring a beautiful, long-lasting result.

    Material-Specific Maintenance Strategies

    Different materials require different maintenance strategies. Understanding these nuances is crucial for preserving the integrity of your cover-up. Paint, wallpaper, and other materials each react to environmental factors differently, demanding specific care. Consistency in care is vital for preventing premature degradation.

    • Paints: Regular cleaning and touch-ups are essential for maintaining the finish of paint-based cover-ups. Avoid harsh chemicals and abrasive cleaners. A gentle soap and water solution is typically sufficient. For minor imperfections, touch-up paint can restore the wall’s uniformity. In cases of larger damage, a complete repaint may be necessary.

      Remember that the quality of the initial paint job significantly impacts the ease of maintenance and long-term appearance.

    • Wallpapers: Wallpaper cleaning methods vary significantly depending on the type of wallpaper. Some wallpapers can be gently wiped down with a damp cloth, while others require specialized cleaning solutions. Always test any cleaning solution in an inconspicuous area first to prevent damage to the wallpaper’s design or texture. Frequent dusting helps to maintain the overall aesthetic and prevent dirt buildup.

    • Other Cover-Ups: Decorative panels, murals, and other unique cover-up materials require specific cleaning and maintenance routines. Manufacturers’ instructions should always be consulted for proper handling and care. Understanding the material’s susceptibility to moisture, UV exposure, or other environmental factors is key to preventing long-term damage.

    Preventative Measures for Damage

    Implementing preventative measures is crucial to maintain the integrity of your cover-up. Proactive strategies will minimize the need for extensive repairs or replacements in the future.

    • Environmental Control: Controlling humidity and temperature fluctuations can significantly reduce the risk of mold growth or warping. Maintaining a stable environment is crucial, especially for wallpaper and other materials sensitive to moisture.
    • Protective Coatings: Applying a protective sealant or varnish to certain cover-ups, like wood panels or painted surfaces, can help to shield them from environmental elements and wear and tear. This is particularly helpful for areas that are frequently exposed to moisture or direct sunlight.
    • Regular Inspections: Routine inspections are crucial for early detection of potential problems. This involves checking for any signs of damage, such as peeling paint, discoloration, or loose wallpaper. Addressing issues promptly can prevent them from escalating into more significant problems.

    Addressing Common Problems

    Recognizing and resolving common issues can help to maintain the aesthetic appeal and integrity of your wall cover-up.

    • Peeling Paint: Peeling paint is often caused by inadequate preparation, poor quality paint, or environmental factors like humidity fluctuations. Removing the loose paint, repairing the surface, and applying a fresh coat of paint is the usual solution.
    • Damaged Wallpaper: Damaged wallpaper can be caused by physical damage, moisture, or improper handling. The appropriate repair strategy depends on the type of damage. Minor tears can often be mended with specialized wallpaper repair kits. More extensive damage may necessitate a complete replacement.
    • Mold and Mildew: Mold and mildew growth is often a result of high humidity. Addressing the moisture issue is critical. Cleaning the affected area with a solution of bleach and water, then addressing the underlying humidity issue, is often the best course of action.

    Cleaning and Repairing Techniques

    Implementing proper cleaning and repair techniques is crucial for preserving the beauty and longevity of your cover-up. Specific cleaning and repair methods vary depending on the type of cover-up.

    • General Cleaning: Use a soft cloth or sponge with a mild soap and water solution for most paint or wallpaper cover-ups. Avoid harsh chemicals or abrasive materials, which could damage the surface. Regular dusting helps prevent buildup and maintain cleanliness.
    • Repairing Tears and Holes: The method for repairing tears and holes depends on the material. For paint, touch-up paint or patching compound can be used. For wallpaper, specialized repair kits or a similar color patch are often effective. Always follow the manufacturer’s instructions for best results.

    Aesthetic Considerations

    Transforming a flawed wall into a captivating focal point hinges on thoughtful aesthetic choices. The right design approach, color palette, and lighting can dramatically enhance the overall ambiance of a room. Careful consideration of the existing room design is essential for a seamless integration of the cover-up.Choosing the right style and color for the cover-up is not merely about aesthetics; it’s about creating a space that feels cohesive and harmonious.

    The selected method must complement the existing furniture, fixtures, and decor, fostering a unified and inviting atmosphere. This is achieved by understanding the interplay between different design elements and how they contribute to the overall visual narrative.

    Different Design Styles

    A variety of design styles can effectively mask imperfections while simultaneously adding character to a room. Modern, traditional, rustic, and eclectic designs each offer unique opportunities for creative expression. A modern approach might involve clean lines, geometric patterns, and a muted color palette. A traditional style could embrace floral patterns, rich colors, and intricate details. Rustic designs often feature natural materials, earthy tones, and textures inspired by nature.

    Eclectic styles, in contrast, blend elements from diverse sources to create a dynamic and personalized look.

    Color and Pattern Selection

    The color and pattern choices play a crucial role in creating a visually appealing and harmonious space. The goal is to select hues and patterns that complement the existing color scheme of the room. For example, if the room is predominantly neutral, incorporating accent colors and patterns into the cover-up can add depth and interest. Conversely, if the room features bold colors, a more subdued cover-up with subtle patterns might be more appropriate.

    The selection of patterns should also be mindful of the scale of the room. Large-scale patterns might overwhelm a small room, while subtle patterns can appear lost in a large space.

    Lighting and Decorative Elements

    Proper lighting can dramatically enhance the aesthetics of a covered wall. Strategically placed lighting fixtures can highlight the texture and patterns of the cover-up. For instance, recessed lighting can subtly illuminate the design, while pendant lights can add a touch of elegance. The addition of mirrors or decorative artwork can further enhance the visual appeal of the wall.

    Incorporating elements that reflect light and draw attention to the cover-up will elevate the overall ambiance of the room.

    Considering the Overall Room Design

    The chosen cover-up method should seamlessly integrate with the existing room design. A traditional-style cover-up would be less suitable in a modern room, as it would disrupt the overall aesthetic. Therefore, carefully analyze the existing room design to select a cover-up method that complements it. Consider factors like the furniture style, existing color scheme, and overall architectural style.

    Table of Design Style Suggestions

    Style Color Palette Material Pattern
    Modern Neutral (greys, whites, blacks), accented with pops of color Smooth, matte paints, textured wallpaper, panels Geometric, stripes, abstract
    Traditional Rich, warm tones (reds, blues, greens), gold accents Paints, wallpapers with floral or damask patterns, wooden paneling Floral, damask, toile
    Rustic Earthy tones (browns, greens, grays), natural wood accents Wood paneling, textured paints, natural fibers Natural elements, stripes, checks
    Eclectic Combination of colors and patterns from various styles Various materials (fabric, wallpaper, wood) Mix-and-match patterns, bold colors

    Closing Summary

    In conclusion, covering up a bad wall isn’t just about masking imperfections; it’s about transforming a space. By understanding the problem, selecting the right materials, and meticulously preparing the surface, you can achieve a beautiful and durable result. Remember, proper preparation is key to a successful outcome. With the right approach, any wall can be transformed into a stunning feature of your home.

    So, dive into the detailed guide, arm yourself with knowledge, and get ready to tackle that bad wall!

  • Repair a Lawn Mower A Comprehensive Guide

    Repair a Lawn Mower A Comprehensive Guide

    Repair a Lawn Mower: This guide dives deep into the world of lawn mower maintenance and repair, covering everything from identifying problems to performing repairs and crucial safety precautions. We’ll explore common issues, troubleshoot malfunctions, and provide step-by-step instructions for various repair tasks. From replacing blades to adjusting carburetors, this comprehensive guide equips you with the knowledge to keep your mower running smoothly all season long.

    We’ll cover everything from the initial diagnosis of the problem to the proper procedures for replacing parts, including a crucial safety section. Expect detailed explanations, helpful visuals, and actionable advice to help you tackle any lawn mower issue with confidence.

    Identifying the Problem

    Repair a Lawn Mower

    A well-maintained lawn mower is a reliable tool for a healthy lawn. However, even the best machines can experience problems. Understanding the common issues, their sounds, and visual indicators is crucial for timely repairs and preventing further damage. This section will provide a comprehensive guide to help you pinpoint the source of your lawn mower’s trouble.

    Common Lawn Mower Issues

    Lawn mowers can experience a variety of problems, from minor inconveniences to serious malfunctions. Common issues include engine problems, transmission issues, blade assembly problems, and electrical malfunctions. These can range from simple adjustments to complete replacements.

    • Engine Problems: These are often the most frequent cause of mower malfunctions. Issues include starting problems, uneven running, overheating, and lack of power. These can stem from fuel delivery problems, spark plug misfires, or issues with the air filter.
    • Transmission Problems: Problems with the transmission often manifest as difficulty shifting gears, grinding noises, or a complete lack of movement. Worn gears or damaged shafts are common culprits.
    • Blade Assembly Problems: Problems with the blade assembly can lead to a variety of issues, including a loud grinding noise, blade vibration, or difficulty in cutting the grass. A dull blade or a loose blade mount can cause these problems.
    • Electrical Problems: Electrical problems in a lawn mower can cause a range of issues. These include a failure to start, malfunctioning lights, or no response to controls. Faulty wiring or a dead battery are common causes.

    Sounds and Their Potential Causes

    Understanding the sounds your mower makes can significantly aid in diagnosing the problem. A methodical approach, paying attention to the specifics of the noise, is crucial.

    • Grinding or Screeching Sounds: These often indicate issues with the blade assembly, transmission, or bearings. A loose or damaged blade, worn bearings, or a broken gear can all produce these sounds.
    • Whining or Squealing Sounds: These noises typically point to worn or loose belts or pulleys. A worn drive belt or a loose belt tensioner are frequent causes.
    • Knocking or Tapping Sounds: These sounds often originate from the engine and can indicate issues with the engine components, such as the pistons or connecting rods.
    • Clicking or Popping Sounds: These noises usually originate from the electrical system, indicating a problem with the spark plugs or ignition system.

    Visual Indicators of Mower Problems

    Visual inspection is essential in identifying mower problems. Look for obvious signs of damage or leaks.

    • Leaks: Check for leaks of fuel, oil, or coolant. These can be small or large and may indicate problems with seals, gaskets, or other components.
    • Damage to Parts: Examine all visible parts for signs of wear, cracks, or damage. A bent shaft, a damaged housing, or a cracked handle are clear indicators of potential issues.
    • Missing or Damaged Components: Inspect for missing or damaged components like spark plugs, air filters, or belts. Replacement is often needed if these are missing or damaged.

    Systematic Checks for Loose Connections and Worn Components

    Systematic checks are crucial to prevent bigger problems. Begin with simple checks to identify potential issues.

    • Loose Connections: Verify that all electrical connections, fuel lines, and oil lines are secure. Loose connections can cause malfunctions or lead to leaks.
    • Worn Components: Examine belts, pulleys, and other moving parts for signs of wear and tear. Replacement of worn parts is often necessary to maintain the mower’s functionality.

    Identifying the Source of the Problem

    To determine the source of the problem, focus on the specific system involved. This will help direct your repair efforts.

    • Engine: If the problem is with the engine, symptoms like stalling, overheating, or lack of power are common indicators.
    • Transmission: Problems with the transmission usually involve shifting issues, grinding noises, or a lack of movement.
    • Blade Assembly: Problems with the blade assembly manifest as loud noises, blade vibration, or difficulty cutting grass.

    Symptom and Possible Cause Comparison

    This table provides a quick reference guide for identifying possible causes based on observed symptoms.

    Symptom Possible Cause
    Loud noise Worn bearings, loose belts, damaged blades, or improper blade alignment
    Stalling Low fuel, clogged carburetor, air leaks, faulty spark plugs, or electrical issues
    Overheating Insufficient cooling, blocked air vents, or a faulty thermostat
    Lack of power Low fuel, clogged air filter, faulty spark plugs, or worn engine components

    Tools and Materials

    Getting your lawn mower back in tip-top shape often hinges on the right tools and materials. Proper preparation minimizes the risk of injury and maximizes your chances of a successful repair. Choosing the right tools and materials is crucial for a smooth and efficient repair process.A well-stocked toolbox and a clear understanding of safety precautions are essential for any repair project.

    Knowing which parts to replace and how to apply lubricants correctly are also vital for effective repairs. This section will Artikel the necessary tools, safety gear, replacement parts, and lubricants needed for a successful lawn mower repair.

    Essential Tools

    A comprehensive set of tools is vital for effective lawn mower repair. This includes items like screwdrivers (Phillips and flathead), wrenches (various sizes), pliers, a socket set, a hammer, and a file. These tools will be used for disassembly, component inspection, and reassembly. A torque wrench, while not always essential, is beneficial for ensuring components are tightened to the manufacturer’s specifications.

    Safety Equipment

    Safety should always be a top priority during any repair project. Eye protection, such as safety glasses or goggles, is crucial to protect your eyes from flying debris or potential splashes. Hearing protection, such as earplugs or earmuffs, is recommended to protect your ears from loud noises produced by the mower’s engine. Work gloves provide protection for your hands, while long sleeves and pants help prevent cuts or scrapes.

    Common Replacement Parts

    Lawn mower repairs often involve replacing worn or damaged components. Some common replacement parts include spark plugs, air filters, belts, blades, and fuel lines. Careful inspection and replacement of these parts can often restore the mower to optimal function.

    Replacement Parts Table

    Part Name Description Model Number
    Spark Plug Ignites the engine 12345
    Air Filter Filters air entering the engine 67890
    Blade Cuts the grass 98765
    Fuel Line Delivers fuel to the engine 43210
    Belt Transfers power to the blade 56789

    Lubricants and Their Applications

    Using the correct lubricants is essential for optimal mower performance and longevity. Engine oil, transmission oil, and grease are commonly used. Engine oil lubricates the engine’s internal components, ensuring smooth operation and preventing overheating. Transmission oil lubricates the transmission system, allowing for efficient gear shifting. Grease is used to lubricate moving parts, such as bearings, ensuring smooth rotation.

    Always consult the owner’s manual for the correct type and amount of lubricant to use.

    Troubleshooting Procedures

    Getting your lawn mower back in tip-top shape often involves a systematic approach to identifying and fixing the problem. This section provides a structured troubleshooting guide, from diagnosing a faulty engine to replacing a worn blade, ensuring you can maintain your mower’s optimal performance. Understanding these procedures empowers you to tackle common issues yourself, saving time and money.

    Basic Troubleshooting Steps for a Lawn Mower

    A systematic approach to troubleshooting is key to quickly pinpointing the source of a problem. Start with the simplest checks and progressively move to more complex ones. This ensures you don’t waste time on unnecessary procedures.

    • Check the fuel supply. Ensure the fuel tank is not empty and that the fuel line is clear of any blockages. A clogged fuel filter can also restrict fuel flow. Inspect the fuel cap for proper sealing.
    • Verify the spark plug. A faulty spark plug can prevent the engine from igniting. Visually inspect the spark plug for damage and replace it if necessary. Using a spark tester can help confirm the spark plug is functioning correctly.
    • Examine the air filter. A clogged air filter restricts airflow to the engine, hindering its ability to run smoothly. Replace the filter with a new one for optimal performance.

    Diagnosing a Lawn Mower with a Faulty Engine

    A lawn mower with a malfunctioning engine can be a frustrating experience. Understanding the symptoms can help pinpoint the issue quickly.

    1. Identify the Symptoms: Does the engine sputter, stall, or run erratically? Does it fail to start at all? Note these details for accurate diagnosis.
    2. Check Fuel Delivery: Ensure fuel is flowing to the engine. If the engine is not receiving fuel, it won’t start. Verify the fuel line, fuel pump, and carburetor for any blockages or malfunctions.
    3. Inspect Spark: A lack of spark is another common reason for engine failure. Check the spark plug, spark plug wire, and ignition coil for any damage or wear. Using a spark tester is helpful here.
    4. Examine Air Intake: A clogged air filter can cause the engine to run poorly or not at all. Inspect and clean the air filter if necessary.

    Replacing a Worn-Out Blade

    A dull or worn-out blade can significantly impact the mower’s performance and safety. Following the correct procedure ensures a safe and effective replacement.

    1. Safety First: Always disconnect the spark plug wire to prevent accidental starting while working on the mower.
    2. Detach the Blade: Use the appropriate wrench or tool to remove the blade mounting bolts. Be cautious when handling sharp objects.
    3. Inspect the Blade: Assess the blade for signs of damage or wear. Replace it if necessary. A dull blade will lead to uneven cutting and a poor lawn.
    4. Install the New Blade: Carefully align the new blade with the mounting bolts. Tighten the bolts in a secure manner, ensuring even tension.

    Checking and Adjusting the Carburetor

    A properly adjusted carburetor ensures efficient fuel-air mixture for optimal engine performance.

    1. Inspect the Carburetor: Visually inspect the carburetor for any obvious blockages or damage. Clean the carburetor if necessary to ensure smooth operation.
    2. Adjust the Idle Speed: Adjust the idle speed screws to set the engine’s idle speed. This helps maintain a consistent and stable engine operation.
    3. Check Fuel Mixture: Verify the fuel mixture is properly balanced. An incorrect mixture can result in engine problems.

    Cleaning and Maintaining a Lawn Mower

    Regular cleaning and maintenance are crucial for optimal mower performance and longevity.

    • Regular Cleaning: Regularly clean the mower to remove debris, grass clippings, and dirt. This prevents clogging and improves performance.
    • Storage Practices: Properly store the mower when not in use. This prevents rust and corrosion.
    • Lubrication: Maintain adequate lubrication of moving parts. This ensures smooth operation and reduces wear.

    Diagnosing a Mower That Won’t Start – Flowchart

    This flowchart guides you through diagnosing a mower that won’t start.

    Step Action Result
    1 Check fuel supply Fuel present?
    (Yes) Check spark Spark present?
    (Yes) Check air filter Clear air filter?
    (No) Clean or replace air filter Start mower?
    (Yes) Start mower
    (No) Check spark plug
    (No) Replace or repair

    Repair Procedures

    Fixing a lawnmower can seem daunting, but with the right approach and a methodical process, you can tackle many common issues yourself. This section details the steps for replacing a blade, spark plug, lubricating parts, adjusting height, fixing a clogged air filter, and troubleshooting overheating. Remember safety is paramount; always disconnect the mower’s power source before performing any repairs.

    Replacing a Lawn Mower Blade

    Replacing a dull or damaged blade is crucial for safety and optimal cutting performance. First, ensure the mower is turned off and the blade has stopped spinning. Use the appropriate blade wrench, firmly grasping the blade’s mounting bolts. Carefully remove the blade, placing it on a safe surface. Inspect the blade for damage.

    Fixing a balky lawnmower can be a real pain, but hey, at least you can use the downtime to brainstorm some unique names for your little one. Maybe you’re looking for inspiration for a girl’s name, and you’re thinking about those special deals during Black Friday, specifically checking out some interesting girls’ names popular on Black Saturday. girls names black saturday might give you some ideas.

    Regardless, getting that mower running smoothly is the ultimate goal, so let’s dive into the repair process!

    If the blade is damaged or dull, replace it with a new one of the correct size and type. Ensure the new blade is properly aligned with the mounting holes and tighten the bolts firmly, but do not overtighten. Check the blade alignment before using the mower.

    Fixing a balky lawnmower can be a real drag, but sometimes a little elbow grease is all it takes. While I was meticulously adjusting the blade alignment, I found myself unexpectedly drawn to the news of the Spoon Extend World Tour. It’s amazing how a little mechanical tinkering can lead you to global musical adventures, like checking out Spoon extend world tour and then right back to sharpening that mower blade again.

    Now, back to the nuts and bolts – gotta get this lawnmower running smoothly!

    Replacing a Spark Plug

    A faulty spark plug can prevent the engine from igniting. First, locate the spark plug and disconnect the spark plug wire. Use a spark plug socket and wrench to remove the old spark plug. Inspect the spark plug for damage, such as cracks or excessive wear. If necessary, replace the spark plug with a new one that is the correct type and size for your mower.

    Install the new spark plug and tighten it to the manufacturer’s recommended torque specification. Reconnect the spark plug wire and test the mower.

    Lubricating Moving Parts

    Proper lubrication of moving parts ensures smooth operation and extends the life of your mower. Using the correct lubricant for each component is essential. Begin by lubricating the blade shaft and the mower’s drive shaft. Apply a small amount of engine oil or a specialized mower lubricant to these areas. Next, lubricate the mower’s transmission and any other moving parts.

    Be mindful of the lubricant type for each component and use the recommended amount. Follow the manufacturer’s guidelines for specific lubrication points and frequency.

    Adjusting Mower Height

    Adjusting the mower’s height is crucial for optimal cutting and to prevent damage to the lawn. Locate the height adjustment lever or knob on the mower. Refer to your mower’s manual for specific instructions and diagrams on how to adjust the height. Adjust the lever or knob to the desired cutting height, ensuring it’s in the correct position.

    Test the mower on a small area to ensure the cut height is suitable.

    Fixing a balky lawnmower can be a real pain, but sometimes the frustration is just like listening to the heavy, almost apocalyptic sounds of david kilgour and the heavy eights end times undone. Thankfully, a little patience and the right tools can get you back to cutting grass like a pro. Once you get that mower humming again, you can finally enjoy a nice, neat lawn without any more frustrating sounds.

    Fixing a Clogged Air Filter

    A clogged air filter can restrict airflow to the engine, leading to poor performance and potential engine damage. First, locate the air filter housing and carefully remove the filter. Inspect the filter for dirt, debris, or excessive buildup. Clean the filter with compressed air, ensuring no dirt is left behind. If the filter is excessively damaged, replace it with a new one.

    Replace the clean filter back into the housing.

    Troubleshooting an Overheating Mower

    An overheating mower can indicate several issues, from a lack of coolant to a problem with the engine’s cooling system. First, check the coolant level in the mower’s reservoir. If the coolant is low, add more coolant according to the manufacturer’s specifications. Next, inspect the mower’s cooling fins for any obstructions or debris. Clean the cooling fins if necessary.

    Ensure the mower is not being overworked or used in excessively hot conditions. If the issue persists, consult a qualified technician.

    Common Repair Steps and Images

    Step Description Image
    1 Remove the blade by loosening the mounting bolts with a blade wrench. [Image description: A hand using a blade wrench to loosen the mounting bolts of a lawn mower blade. The blade is partially removed.]
    2 Inspect the blade for damage, such as cracks or dullness. [Image description: A close-up view of a lawn mower blade showing signs of wear and tear. Visible signs of dullness and potential cracks are apparent.]
    3 Replace the spark plug with a new one of the correct type. [Image description: A spark plug socket wrench is used to unscrew the old spark plug. A new spark plug is shown ready to be installed.]
    4 Check the coolant level in the reservoir and add more coolant if necessary. [Image description: An image of a lawn mower’s coolant reservoir with a dipstick and the coolant level indicator. The dipstick shows the coolant level is low, indicating the need to add more.]

    Maintenance Tips

    Keeping your lawn mower in tip-top shape is crucial for its longevity and performance. Regular maintenance not only prevents costly repairs down the line but also ensures your machine runs smoothly and efficiently, saving you time and effort in the long run. Proper care extends the life of your mower, allowing you to enjoy years of reliable service.Regular maintenance is more than just keeping things clean; it’s about proactively preventing potential issues.

    By following a consistent schedule of checks and cleaning, you can catch small problems before they escalate into major repairs. Proper storage and preparation for the off-season are equally important to maintain peak performance and extend the life of your investment.

    Importance of Regular Maintenance

    Regular maintenance is essential for the continued smooth operation and extended life of your lawn mower. Ignoring routine checks and cleaning can lead to premature wear and tear, costly repairs, and potentially dangerous malfunctions. A well-maintained mower runs efficiently, saving you time and energy.

    Routine Checks and Cleaning Schedule

    A consistent schedule for routine checks and cleaning is crucial for maintaining your lawn mower. This schedule should be tailored to your mowing frequency and the type of terrain you mow.

    • Weekly Checks: Inspect the blade for damage, check the fuel level, and ensure the engine is running smoothly. Clean any debris from the deck and the underside of the mower.
    • Monthly Checks: Inspect the spark plug for wear, check the oil level and condition, and examine the drive belts for fraying or damage. Thoroughly clean the air filter.
    • Seasonal Checks (Spring/Fall): Change the oil and filter, inspect the entire machine for wear and tear, and lubricate moving parts.

    Correct Storage Procedures

    Proper storage procedures are vital for protecting your lawn mower from the elements and ensuring it’s ready to use next season.

    • Cleaning: Thoroughly clean the mower, removing all grass clippings, dirt, and debris. Clean the underside of the mower to prevent rust.
    • Fuel Management: Drain the fuel tank and add a fuel stabilizer to prevent fuel deterioration. This is critical to preventing varnish build-up in the fuel lines and engine.
    • Lubrication: Apply a light coat of oil to all moving parts, including the chain and drive belts. This prevents corrosion and wear.
    • Storage Location: Store the mower in a dry, covered area to protect it from the elements. Avoid storing it near extreme temperature fluctuations.

    Preparing the Mower for the Off-Season

    Preparing your lawn mower for the off-season is an important step in ensuring its longevity. This involves a comprehensive cleaning and maintenance procedure to prevent rust, corrosion, and damage.

    • Thorough Cleaning: Remove all grass clippings and debris from the mower deck, cutting blades, and engine compartment. Wash the mower with a garden hose to remove loose dirt and debris.
    • Fuel System Treatment: Drain the fuel tank completely and add a fuel stabilizer to the tank. This prevents fuel from becoming gummy and damaging the fuel system.
    • Blade Sharpening or Replacement: Check the mower blade for sharpness and wear. Sharpen dull blades or replace them if necessary.
    • Storage Considerations: Store the mower in a cool, dry, and covered area to protect it from moisture and extreme temperatures.

    Benefits of Proper Lubrication

    Proper lubrication significantly extends the life of your lawn mower. It reduces friction, prevents wear and tear, and ensures smooth operation.

    Lubrication helps maintain the efficiency and longevity of your lawn mower’s components.

    Common Causes of Lawn Mower Damage

    Several factors contribute to lawn mower damage.

    • Overloading: Cutting too much grass at once can strain the engine and components, leading to damage.
    • Improper Blade Maintenance: Dull or damaged blades can cause uneven cuts and put stress on the engine and other parts.
    • Lack of Maintenance: Neglecting regular checks and cleaning can lead to premature wear and tear.
    • Incorrect Use: Using the mower on uneven surfaces or for tasks beyond its intended use can damage the machine.

    Tips for Extending the Life of a Lawn Mower

    Following these tips can extend the life of your lawn mower.

    • Regular Maintenance: Adhering to a consistent maintenance schedule is key to preventing damage.
    • Proper Fuel Management: Use fuel stabilizers to maintain fuel quality and prevent varnish build-up.
    • Sharp Blades: Ensure blades are sharp to prevent uneven cuts and strain on the engine.
    • Avoid Overloading: Cut grass in manageable sections to avoid straining the machine.

    Safety Precautions

    Repair a Lawn Mower

    Repairing a lawn mower can be a rewarding experience, but it’s crucial to prioritize safety. Ignoring safety precautions can lead to serious injuries. This section Artikels essential safety procedures to ensure a safe and successful repair process.Proper safety measures are paramount when working on any power equipment, especially a lawn mower. Knowing the potential hazards and taking proactive steps to mitigate them will protect you from harm.

    Following these safety guidelines will contribute to a safer and more enjoyable experience with your lawn care routine.

    Safety Gear

    Safeguarding yourself is paramount. Wearing appropriate safety gear significantly reduces the risk of injuries during repairs. This includes protective eyewear, sturdy work gloves, and appropriate clothing. Heavy-duty work gloves protect your hands from cuts, abrasions, and potential contact with sharp objects. Safety glasses or a face shield will shield your eyes from flying debris, while durable clothing prevents accidental contact with moving parts or sharp edges.

    Gasoline Safety, Repair a Lawn Mower

    Gasoline is highly flammable and poses significant safety risks. Proper handling and storage are crucial. Always store gasoline in approved containers, keeping them securely closed and away from heat sources. Never fill a fuel tank indoors or near an open flame. If a spill occurs, immediately clean up the area thoroughly.

    If a significant spill happens, notify the local fire department for proper handling.

    Accident Procedures

    Accidents can happen despite the best precautions. Knowing what to do in case of an accident is critical. First, stop the equipment immediately. If someone is injured, seek immediate medical attention. Report any incidents to the relevant authorities, and document the event thoroughly.

    Keep records of any injuries or damages.

    Step-by-Step Safety Procedures

    1. Inspect the lawn mower for any potential hazards before starting work. Check for loose parts, frayed cords, or damaged components.
    2. Disconnect the spark plug wire to prevent accidental starting.
    3. Wear appropriate safety gear, including safety glasses, gloves, and long sleeves.
    4. Ensure the work area is clear of obstructions and people.
    5. Store gasoline in approved containers and away from ignition sources.
    6. Use caution when handling sharp objects and moving parts.
    7. If a spill occurs, clean it up immediately with appropriate cleaning materials.
    8. Be aware of your surroundings and take breaks when needed.
    9. Never work alone; have a helper available for support.
    10. Report any incidents or injuries immediately.

    Potential Hazards and Preventive Measures

    Knowing potential hazards and taking proactive steps to mitigate them will protect you from harm. Understanding the potential dangers allows you to implement preventive measures for a safer repair experience.

    Hazard Preventive Measure
    Blade injuries Wear safety glasses, gloves, and long sleeves. Ensure the blade is completely stopped before working on it.
    Fuel spills Store fuel in approved containers, away from ignition sources. Clean up spills immediately.
    Electrical shock Disconnect the spark plug wire before working on electrical components.
    Falling objects Work on a stable surface, clear the area of obstructions, and secure any loose items.
    Exposure to chemicals Wear appropriate respiratory protection if working with chemicals.

    Summary: Repair A Lawn Mower

    In conclusion, repairing a lawn mower can seem daunting, but with a methodical approach and a little know-how, it’s entirely manageable. This comprehensive guide has equipped you with the necessary knowledge and practical steps to diagnose and resolve various lawn mower problems. Remember to prioritize safety throughout the entire process. By following the maintenance tips, you’ll ensure your mower lasts for years to come.

    Happy mowing!

  • Fix a Hole in Your Desk A Comprehensive Guide

    Fix a Hole in Your Desk A Comprehensive Guide

    Fix a Hole in Your Desk: This comprehensive guide will walk you through the process of repairing various types of holes in your desk, from small dents to large gouges. We’ll cover different desk materials, the best repair methods, and even preventative measures to keep your workspace looking its best. Whether your desk is made of wood, metal, or laminate, we’ve got you covered!

    Understanding the cause and type of damage is key to successful repair. We’ll delve into common causes like impacts and wear and tear, and explain how the size and location of the hole affect the repair process. The guide includes a helpful table comparing different materials and their ideal repair methods. This ensures you’re choosing the right approach for your specific desk and situation.

    Understanding the Issue

    Fix a Hole in Your Desk

    Fixing a hole in your desk is more than just a cosmetic fix; it’s about understanding the root cause and choosing the right repair method. A small dent can quickly escalate into a major problem if not addressed promptly. Different desk materials react differently to damage, impacting the repair process and cost. Proper identification of the damage type and the desk’s construction is key to a successful repair.A desk hole, regardless of its size, can be traced back to a combination of factors: material properties, the type and force of impact, and the desk’s overall usage history.

    Understanding these factors allows for a more informed approach to repair. For instance, a heavy object dropped on a laminate desk might create a significantly different hole than a small, persistent scratch from a frequently used drawer.

    Types of Desk Holes

    Various types of damage can lead to holes in a desk. Small dents, caused by minor impacts, can be easily overlooked but still require attention to prevent further damage. Gouges, resulting from more forceful impacts or prolonged friction, will require more extensive repair. Cracks, appearing as lines of weakness, might be subtle but indicate underlying structural issues that need careful evaluation.

    Identifying the precise type of hole is crucial for selecting the right repair strategy.

    Fixing a hole in your desk can be surprisingly satisfying. It’s a small project that can make a big difference to your workspace, and a little DIY can really boost your confidence. Plus, think about how your perfectly repaired desk might relate to the manicured perfection of suburban lawns, a fascinating study of aesthetics and design, particularly when you see how they’re meticulously maintained.

    suburban lawns suburban lawns offer a great comparison to the precision of a repaired desk, in the end, both demonstrate the satisfaction of fixing something that’s broken. Ultimately, a fixed desk is a symbol of your commitment to a neat and tidy environment.

    Desk Materials and Their Impact on Repair

    The material from which a desk is constructed significantly affects the repair process. Wood, a common desk material, is relatively easy to repair with wood filler or patching. Metal desks, often featuring sturdy construction, may require welding or patching, which can be more complex and costly. Laminate desks, a popular choice for their durability and aesthetic appeal, can often be repaired using epoxy or patching, offering a balance between ease and effectiveness.

    Common Causes of Desk Holes

    Impacts from objects, like books, stationery, or even a misplaced laptop, are a frequent culprit for desk damage. Wear and tear, caused by constant use and friction, can lead to small holes or gouges, especially on the edges of the desk. Misuse, including placing heavy objects on unstable surfaces or using sharp objects that scratch the surface, can quickly create damage.

    Preventing misuse is crucial in minimizing the need for repairs.

    Significance of Hole Size and Location

    The size and location of the hole directly impact the repair process. Small holes might be easily concealed with filler or patching, while larger gouges require more substantial repairs. Holes near critical areas, such as joints or support structures, require extra attention to ensure the desk’s structural integrity. Understanding the implications of location is vital in preventing future issues.

    Comparison of Repair Methods for Different Desk Materials

    Material Repair Method Difficulty Cost
    Wood Wood filler, patching Medium Low
    Metal Welding, patching High Medium
    Laminate Epoxy, patching Medium Low

    This table provides a general overview of repair methods for common desk materials. The difficulty and cost associated with each repair method can vary based on the specific damage and the expertise of the repair professional. Factors such as the extent of the damage and the availability of specialized tools can influence the overall cost and time required.

    Repair Methods and Tools

    Fixing a hole in your desk is often a DIY project that requires careful consideration of the material and the size of the damage. A well-chosen repair method, along with appropriate tools, can effectively restore the desk’s aesthetic appeal and structural integrity. Understanding the nature of the damage and the desk’s composition is crucial for selecting the right approach.Various methods are available for addressing desk holes, each with its own advantages and disadvantages.

    Careful assessment of the damage is key to determining the most suitable repair strategy.

    Patching

    Patching is a common method for repairing small to medium-sized holes in wooden desks. It involves covering the hole with a patch of matching material. This technique is often preferred for its simplicity and aesthetic appeal.

    • Pros: Relatively straightforward to implement, preserves the original aesthetic of the desk, and is often cost-effective for smaller holes.
    • Cons: May not be suitable for larger holes, and the patch may not perfectly match the surrounding wood if not carefully chosen.

    Filling

    Filling involves using a suitable material to fill the hole, effectively concealing the damage. This method is particularly useful for deeper holes or those that affect the desk’s structural integrity.

    • Pros: Can be used for larger holes and often restores the desk’s structural integrity. A variety of materials are available for filling, accommodating different wood types and finishes.
    • Cons: Requires careful selection of filler material to match the desk’s color and texture. The filling process may require multiple applications to achieve a smooth finish, and may take longer than patching.

    Reinforcing

    Reinforcing is necessary when the hole compromises the desk’s structural integrity. This method involves adding support to the area surrounding the hole to prevent further damage.

    • Pros: Provides long-term structural support for the desk. It is often crucial when the hole is large or located in a high-stress area.
    • Cons: Can be more complex than patching or filling, requiring specialized tools and potentially altering the desk’s original appearance.

    Tools and Materials

    The appropriate tools and materials depend on the chosen repair method and the desk’s material.

    Repair Method Necessary Tools Materials
    Patching Wood glue, wood filler, sandpaper, utility knife, matching wood patch Matching wood, wood glue, filler
    Filling Wood filler, putty knife, sandpaper, wood stain (if necessary) Wood filler, wood stain (if needed)
    Reinforcing Screws, wood glue, wood blocks, clamps Wood blocks, screws, glue

    Choosing the Right Tools and Materials

    The size and depth of the hole, along with the desk’s material (wood type, finish, and construction), significantly influence the selection of repair tools and materials. A small, superficial hole in a solid-wood desk may require a simple patch, whereas a larger, deeper hole in a particleboard desk might need reinforcing with wood blocks.

    Patching a Small Hole in a Wooden Desk – Step-by-Step

    This procedure demonstrates patching a small hole in a wooden desk.

    1. Preparation: Clean the area around the hole with a damp cloth. Ensure the wood is completely dry before proceeding.
    2. Patch Selection: Choose a patch of wood that matches the desk’s color and grain as closely as possible. Cut the patch slightly larger than the hole to allow for shaping.
    3. Patch Application: Apply wood glue to the edges of the hole and the back of the patch. Press the patch firmly into the hole, ensuring it’s flush with the surrounding wood.
    4. Clamping: Use clamps to hold the patch in place for at least 24 hours to allow the glue to dry completely.
    5. Finishing: Once the glue is dry, use sandpaper to smooth any imperfections. Apply wood filler to any remaining gaps. Sand the area smooth, and then finish with wood stain if necessary.

    Materials and Supplies

    Fixing a hole in your desk requires careful selection of materials. Choosing the right material is crucial to ensure a durable and aesthetically pleasing repair. Mismatched materials can lead to a visible repair or a weak spot that fails over time. Understanding the desk’s material and the properties of different filling materials is key to a successful repair.

    Fixing a hole in my desk has been a bit of a project lately. Turns out, finding the right wood filler and avoiding a dust cloud is more challenging than I anticipated. Fortunately, while I was browsing online for tips on the perfect repair, I stumbled across some interesting news in brief about Bruce Springsteen, The Feelies, Saint Etienne, and Deadmau5.

    This article was pretty cool, and I’m already picturing my new, improved desk with its patched-up hole! Now, back to the task at hand – getting this desk repair completed.

    Common Repair Materials

    A variety of materials can be used to repair desk holes. The most common options include wood filler, epoxy putty, and plastic Bondo. Selecting the appropriate material depends heavily on the desk’s construction and the type of hole.

    Matching Repair Material to Desk Material

    A critical aspect of desk repair is matching the repair material to the desk’s material. Using an unsuitable material can lead to a noticeable repair, or worse, a weak spot that may lead to further damage. For instance, using wood filler on a metal desk will not adhere properly and may not fill the hole effectively.

    Properties of Filling Materials

    Different filling materials possess unique properties that influence their suitability for various repair tasks. Wood filler, commonly used for wood desks, is known for its ability to blend seamlessly with the surrounding wood. Epoxy putty, on the other hand, offers excellent adhesion to a wide range of materials, including wood, metal, and laminate. Plastic Bondo is often a good option for laminate surfaces, although it might not provide the same strength as epoxy putty.

    Preparing the Hole for Repair

    Proper preparation of the hole is essential for a successful repair. First, thoroughly clean the hole of any dust, debris, or loose particles. This ensures good adhesion of the repair material. Next, fill the hole with the selected repair material, ensuring a smooth, even surface. Finally, allow the repair material to dry and cure completely, following the manufacturer’s instructions.

    Material Suitability Table

    This table Artikels the suitability of different materials for various desk types:

    Material Desk Type Suitability
    Wood Filler Wood Excellent
    Epoxy Putty Wood, Metal, Laminate Good
    Plastic Bondo Laminate Fair

    Preventative Measures

    A pristine desk is not just aesthetically pleasing; it’s a testament to efficient workflow. Preventing holes in your desk is far more economical and time-saving than repairing them. This section dives into proactive strategies for maintaining your desk’s integrity and avoiding future damage.Proper desk care involves more than just occasional cleaning. It necessitates a mindful approach to usage and placement, coupled with preventative measures to mitigate potential hazards.

    Fixing a hole in my desk is proving surprisingly tricky. It’s definitely a project that deserves a bit of focus, but honestly, I’m more excited about Steely Dan announcing a tour with the Doobie Brothers! This tour is going to be epic. Back to the desk, though – hopefully, some wood glue and patience will solve this problem soon.

    By understanding the common causes of desk damage, you can proactively implement strategies to maintain a functional and attractive workspace.

    Strategies for Maintaining Desk Integrity

    Preventing damage requires a proactive approach. Understanding the potential stressors on your desk is crucial. Heavy objects, sharp objects, or even repeated impacts from items dropped can create weaknesses over time.

    • Strategic Desk Placement: Choosing the right location for your desk can significantly impact its longevity. Avoid placing the desk in high-traffic areas or near sources of potential impact, such as doorways or areas with heavy foot traffic. A well-considered placement minimizes the risk of accidental knocks and bumps. Positioning the desk away from direct sunlight, especially if it’s made of wood, can also reduce the risk of warping or damage.

    • Protective Measures for High-Risk Areas: Certain parts of the desk are more susceptible to damage. A laptop tray, for instance, often bears the brunt of dropped items. Protecting these vulnerable areas with a non-slip mat or a dedicated tray cover can significantly reduce the risk of punctures or dents. Likewise, using desk organizers to manage clutter can reduce the risk of items shifting and potentially impacting other surfaces.

    • Proper Desk Usage: The way you use your desk significantly influences its lifespan. Avoid placing excessively heavy items directly on the desk’s surface, especially in areas not designed for such weight distribution. Distributing weight evenly is crucial to preventing stress on specific points and potential cracking. Using a monitor riser or adjustable keyboard tray can also reduce strain on the desk and promote proper posture.

    • Impact Protection: Consider the possibility of items falling onto the desk. Protecting the surface with a desk pad or cover can significantly reduce the impact of accidental drops or knocks. For instance, a felt or rubber desk mat can cushion the blow and prevent scratches and dents. Similarly, placing protective coverings on frequently used areas of the desk (e.g., the area under the keyboard) can help prevent scratches and spills.

    Dos and Don’ts for Desk Usage

    Consistent, responsible desk usage can significantly extend its lifespan. This section Artikels key dos and don’ts to minimize the risk of future damage.

    • Do: Use desk organizers to keep items in their designated areas. Avoid placing items that could potentially fall and cause damage on the desk’s surface.
    • Do: Utilize desk pads or mats in areas that are frequently subjected to high-impact activities or potential spills.
    • Do: Regularly inspect the desk for signs of wear and tear, such as cracks, warping, or loose parts. Address these issues promptly to prevent further damage.
    • Do: Keep the desk clean and free from debris. Dust and dirt accumulation can contribute to damage over time. Dust buildup can also interfere with the proper function of electronic devices.
    • Don’t: Place extremely heavy objects directly on the desk’s surface, especially in a concentrated area.
    • Don’t: Use the desk as a surface for placing extremely hot or cold items, as these could cause thermal damage.
    • Don’t: Place sharp or pointed objects directly on the desk’s surface without proper protection.
    • Don’t: Drop heavy or sharp items onto the desk’s surface, which can easily cause damage.

    Advanced Techniques: Fix A Hole In Your Desk

    Fix a Hole in Your Desk

    Fixing a complex hole in your desk requires more than just a quick patch. Advanced techniques address the structural integrity and aesthetic appeal of the repair, ensuring the desk retains its functionality and looks its best. These techniques often involve reinforcement, meticulous surface restoration, and specialized materials to achieve a lasting solution.

    Reinforcement Methods for Larger Holes, Fix a Hole in Your Desk

    Reinforcement is crucial for large holes that compromise the desk’s structural integrity. This involves adding support to the weakened area, preventing future damage and ensuring stability. Various methods can be employed, depending on the size and location of the hole. Using wood plugs, strategically placed screws, or even reinforcing strips, will bolster the weakened section. For instance, a large hole near the desk’s edge might require a supplementary support beam or a thicker piece of plywood affixed underneath.

    Careful consideration of the underlying wood structure is essential to prevent further damage.

    Repairing Damaged Edges and Corners

    Damaged edges or corners of a desk often require specialized attention. These areas are prone to chipping and splintering, and restoring them necessitates a nuanced approach. Wood filler or epoxy resin can effectively fill minor cracks and gaps. For more significant damage, veneer repair may be necessary. Veneer, a thin layer of wood, can be carefully applied over the damaged area, matching the existing grain for a seamless repair.

    The application of veneer often requires specific tools and expertise to ensure a smooth, natural-looking finish. A crucial step is shaping and sanding the repair to match the surrounding edges.

    Restoring Aesthetic Appeal

    The final step in any desk repair is restoring its aesthetic appeal. This involves meticulously sanding the repaired area to match the existing surface, ensuring no noticeable difference. Matching the wood grain is critical for a seamless look. A final coat of stain or varnish, carefully applied, will protect the repaired area and enhance its appearance. Professional-grade finishing materials often provide superior results.

    For instance, carefully selecting a matching stain or varnish can help blend the repair seamlessly with the original desk surface.

    Advanced Repair Techniques Comparison

    Technique Description Suitability
    Reinforcement Adding support to the hole area using wood plugs, screws, or strips. Large holes compromising structural integrity, especially near edges.
    Sanding and Refinishing Smoothing and restoring the surface to match the existing finish using sandpaper and appropriate wood fillers. Various hole types, including small to medium-sized holes and surface imperfections.
    Veneer Repair Replacing damaged surface areas with a thin layer of wood (veneer) that matches the existing grain. Significant damage, extensive surface area damage, and holes requiring substantial replacement of the top layer.

    Final Conclusion

    In conclusion, fixing a hole in your desk is a manageable task with the right knowledge and tools. By understanding the different materials, repair methods, and preventative measures, you can effectively restore your desk to its former glory. Whether you opt for simple patching or more advanced techniques, this guide provides a solid foundation for a successful repair.

    Now go forth and fix those holes!