Divide and Transplant Peonies: A comprehensive guide to rejuvenating your peony patch and expanding your beautiful blooms. This in-depth look covers everything from preparing your plants to post-transplant care, ensuring a thriving peony garden for years to come. We’ll explore the ideal time for division, the tools you need, and the critical steps for successfully propagating your beloved peonies.
From carefully excavating the plant to dividing the rootstock and transplanting the new sections, this guide provides clear, step-by-step instructions for each stage. We’ll delve into the best soil conditions and amendments, plus the importance of proper aftercare to help your new peonies flourish. Furthermore, we will discuss potential issues and troubleshooting methods, and even provide insights on choosing the right peony varieties for your garden.
Introduction to Peony Division and Transplanting: Divide And Transplant Peonies
Peonies, with their magnificent blooms, are a beloved addition to any garden. However, these beauties, while long-lived, can become overcrowded in their original planting location. Dividing and transplanting peonies is a vital gardening practice that promotes healthy growth, extends their lifespan, and allows you to multiply your beautiful blooms. This process involves carefully separating established plants into smaller sections, each capable of developing into a new, independent peony.Dividing peonies is not just about making more plants; it’s about maintaining the health and vibrancy of your existing ones.
Overcrowding can lead to reduced flowering, susceptibility to diseases, and ultimately, a decline in the overall health of the plant. By strategically dividing and transplanting your peonies, you are creating an environment conducive to optimal growth and longevity for your prized flowers.
Ideal Time for Division and Transplanting
The optimal time for dividing and transplanting peonies is during the dormant season, typically in late winter or early spring, before new growth emerges. This allows the plants to recover from the procedure and establish themselves before the onset of the growing season. Choosing the right time is critical for successful transplanting, as the plant has ample time to recover and establish roots before the demands of active growth.
Tools and Materials Needed
To successfully divide and transplant peonies, you’ll need a few essential tools and materials. A sharp spade or shovel is crucial for digging around the plant without damaging the roots. A sharp knife or pruning shears are needed for carefully separating the divisions. A garden trowel will be useful for digging the planting holes and handling the divisions.
A bucket or container for holding the divisions is also beneficial.
Preparing the Peony Plant
Before you begin, locate a suitable spot for your new peony plants. Consider factors like sunlight exposure, soil type, and drainage. Ensure the chosen location provides the optimal conditions for the plant’s growth. Assess the existing plant for any signs of disease or damage. Inspect the roots for any signs of rot or pests.
Dividing the Peony Plant
Carefully dig around the base of the peony plant, using a spade or shovel. Lift the plant from the ground. Gently loosen the clump of roots, separating them into divisions. Each division should have at least 3-4 healthy buds or “eyes” to ensure it can develop into a new plant.
Planting the Divisions
Prepare planting holes that are slightly larger than the root ball of the divisions. Place the divisions in the holes, ensuring the buds are at or just slightly below the soil level. Backfill the holes with soil, firming it gently around the roots. Water thoroughly to settle the soil and encourage root establishment.
Post-Transplant Care
Water regularly after transplanting to keep the soil consistently moist. Avoid overwatering, which can lead to root rot. Apply a layer of mulch around the base of the plant to retain moisture and suppress weeds. Regular monitoring of the plant’s health is crucial.
Preparing the Peony Plant for Division
Dividing peonies is a rewarding process that allows you to expand your peony collection or share these beautiful blooms with others. A crucial step in this process is carefully excavating and preparing the plant for division. This involves understanding the root structure and ensuring minimal damage to the plant, setting the stage for healthy regrowth.Preparing the peony plant for division is critical for its long-term health and successful replanting.
This meticulous process involves careful excavation, identification of the root system, and careful separation of the divisions. The goal is to minimize stress on the plant and ensure each division has a healthy root system for optimal growth.
Excavating the Peony Plant
Proper excavation is fundamental to successful division. Carefully dig around the plant’s perimeter, extending the trench several inches beyond the visible roots. Use a shovel or spade, ensuring you don’t damage the roots while digging. Avoid disturbing the soil too deeply, as this can expose the roots to drying out.
Identifying the Root System and Crown
The peony’s root system consists of a main rootstock and smaller feeder roots. The crown, the area where the stems emerge from the roots, is essential to the plant’s survival. Carefully separate the crown from the main rootstock. This separation allows for division of the plant into smaller sections, ensuring each has a viable crown and root system.
The crown is typically easily distinguished by its plump, swollen appearance and the presence of emerging buds.
Separating the Divisions
Once the plant is carefully excavated, use sharp, clean pruning shears or a sharp knife to divide the crown and rootstock into separate sections. Each division should have its own healthy crown with several healthy roots. Carefully remove any damaged or diseased sections. Avoid tearing the roots, which can lead to rot and fungal diseases.
Handling and Storing the Divided Sections
The divided sections of the peony plant should be handled carefully. Place the divisions in a container of dampened peat moss or a similar rooting medium. Wrap the roots loosely to retain moisture. This method protects the roots from drying out during storage. The sections can also be placed in a bucket of water until replanted.
Important Considerations
Proper handling of the roots is crucial to avoid damaging them. Any damage can hinder the plant’s ability to recover and grow.
Always ensure the roots are not exposed to direct sunlight or excessive heat. Maintaining moisture is essential. Store the divisions in a cool, shaded area until ready to replant. If storing for an extended period, consider using a cold frame or a refrigerator to maintain moisture. A well-ventilated area will prevent rot and fungus.
These factors can influence the plant’s recovery and growth after division.
Dividing the Peony Root

Successfully dividing a peony involves careful handling of the rootstock to ensure the health and vigor of each new plant. Proper division techniques are crucial for maximizing the chances of successful transplantation and subsequent blooming. The key is to create smaller sections, each with a healthy balance of roots, stems, and buds. This step is often the most critical to the overall success of your peony propagation.
Dividing and transplanting peonies is a rewarding gardening chore, but lately I’ve been thinking about the delicate balance between artistic expression and ethical considerations. It got me thinking about how the Israeli dance company’s use of Brian Eno’s music, as detailed in this article , really highlights the importance of respecting the creator’s intent. Hopefully, this doesn’t dissuade me from dividing and transplanting my peonies, but it does make me appreciate the thoughtful consideration involved in both art and horticulture.
Methods for Dividing the Root
Several approaches exist for dividing peony roots, each with its own advantages and disadvantages. Understanding these methods allows you to choose the most appropriate technique for your specific peony and your goals. Ultimately, the goal is to create divisions with enough healthy root structure to support new growth.
- The Wedge Method: This method involves carefully splitting the rootstock into sections using a sharp, clean tool, much like slicing a wedge from a cake. This approach often results in divisions that have a good balance of roots and buds. The wedge method is effective for creating multiple divisions from a single rootstock. It’s important to ensure each section has a viable portion of the root crown and a few healthy buds.
- The Slice Method: This method focuses on creating clean cuts along the rootstock. This can be particularly useful when dividing a rootstock that has a more complex or uneven shape. Each section needs a substantial portion of the root system and several healthy buds. By slicing the root, you create even sections that allow for optimal growth.
Ensuring Healthy Divisions
Creating healthy divisions depends on the proper selection of sections from the rootstock. Each division must include an adequate portion of the root crown and several healthy buds. These elements are essential for the new plant’s establishment and future blooming.
- Root Structure: Each division should have a good amount of healthy roots. The roots should be firm and free of rot or disease. Healthy roots are critical for the plant to absorb water and nutrients, enabling it to establish itself quickly after transplanting. Avoid sections with damaged or decaying roots.
- Buds: Look for strong, healthy buds. These buds are the future flowers. Ensure each division has at least a few buds to ensure future blooming. Sections with several healthy buds are more likely to produce flowers in the following seasons.
- Stems: Assess the stems of the divisions for health and vigor. Healthy stems are strong and free of diseases or damage. Stems are crucial for the transport of water and nutrients throughout the plant. Avoid sections with dead or decaying stems.
Importance of Sharp Tools
Using sharp tools is essential when dividing peony roots. Sharp tools minimize damage to the rootstock, preventing the entry of harmful pathogens that can cause disease. This will greatly improve the overall health of the divisions. The use of dull tools will likely damage the rootstock, potentially leading to infection and hindering the plant’s ability to recover.
Dividing and transplanting peonies is a rewarding gardening task, but it can feel overwhelming if you don’t know where to start. To keep your peonies thriving, you need to understand the process. Knowing how to effectively divide and transplant your peonies is key, and once you get the hang of it, you can even share your tips with others.
Consider signing up for an account on Roblox Sign Up for an Account on Roblox to find some great online resources about plant care and find fellow gardening enthusiasts. You can then use these resources to make your peony dividing and transplanting project a success!
A sharp tool prevents the tearing of tissues and promotes clean cuts, minimizing the chance of disease.
Transplanting the Divided Peonies
")
Giving your divided peony sections the best possible start in their new homes is crucial for their future health and vibrant blooms. Proper transplanting ensures the plant establishes itself quickly and minimizes stress. This step involves more than just digging a hole; it encompasses meticulous preparation, ideal planting conditions, and appropriate soil choices. Follow these steps to ensure a successful transplant.
Preparing the Planting Hole
Successfully transplanting divided peonies starts with a well-prepared planting hole. The hole should be significantly larger than the root ball of the divided section to accommodate the root spread and allow for healthy growth. Dig a hole at least twice the width of the root ball and as deep as the original planting depth. This generous hole will ensure adequate space for the roots to expand.
Careful digging prevents damaging the delicate root structure, crucial for the peony’s survival.
Optimal Planting Depth and Spacing
The optimal planting depth for peony divisions is crucial for their establishment. Plant the peony at the same depth it was originally grown. This ensures the crown (the point where the stem meets the root) remains at or slightly above the soil line. Maintaining the correct planting depth prevents rot and promotes healthy growth. Spacing is also vital.
Plant the divided sections at least 2-3 feet apart to allow for adequate space for the mature plants to grow and develop. This spacing is crucial to avoid overcrowding and ensure sufficient sunlight and nutrients for each plant. Too close, and competition for resources could stunt their growth.
Soil Types and Conditions for Peony Growth
Peonies thrive in well-drained soil that retains some moisture. A neutral to slightly alkaline pH (6.0-7.0) is ideal. Heavy clay soils can lead to waterlogging, while sandy soils can dry out too quickly. The ideal soil structure balances these characteristics. Amendments to the soil are essential to improve its quality and ensure optimal growth conditions.
Consider adding organic matter to improve drainage, aeration, and water retention. This will create a favorable environment for the roots to flourish.
Soil Amendment Options for Transplanting
The following table Artikels different soil amendment options for transplanting your divided peony sections, along with their benefits and application rates.
| Soil Amendment | Benefits | Application Rate |
|---|---|---|
| Compost | Improves drainage, adds nutrients | 2-3 inches |
| Peat Moss | Retains moisture, improves aeration | 1-2 inches |
| Sand | Improves drainage | 1-2 inches |
Mixing these amendments into the soil around the planting hole creates a well-balanced environment for the peony roots to develop. This will contribute to the plant’s overall health and future blooms.
Aftercare and Maintenance
Congratulations on successfully dividing and transplanting your peonies! Now comes the crucial part: ensuring your new divisions thrive. Proper aftercare is essential for establishing strong, healthy plants that will reward you with beautiful blooms for years to come. This phase involves attentive watering, appropriate fertilization, and vigilant pest and disease management.The key to success lies in providing the right environment for your newly transplanted peonies to recover and establish strong root systems.
Consistent care, particularly in the first growing season, will significantly impact the long-term health and productivity of your peony plants.
Watering Techniques and Frequency
Consistent moisture is vital for newly transplanted peonies to establish their root systems. Overwatering can lead to root rot, while underwatering can cause stress and inhibit growth. The frequency and amount of watering will depend on your specific soil type and local weather conditions. Observe the soil moisture regularly; water deeply when the top inch or two of soil feels dry to the touch.
Avoid overhead watering, as this can promote fungal diseases. Instead, water at the base of the plant to ensure moisture reaches the roots directly.
Drainage Importance
Adequate drainage is crucial to prevent waterlogging. Poor drainage can lead to root rot, a serious issue that can kill your peony plants. If your soil doesn’t drain well, consider amending it with organic matter like compost or peat moss to improve its structure. Creating raised beds or using containers with drainage holes can also help. Ensure that the soil in the planting area is well-drained to prevent water from accumulating around the roots.
Fertilizing and Feeding
Fertilizing your peonies, especially in the first growing season, will support their development. Peonies are not heavy feeders, so avoid over-fertilizing. Use a balanced, slow-release fertilizer specifically formulated for perennials in early spring or during the growing season. Apply the fertilizer according to the manufacturer’s instructions, avoiding contact with the stems or leaves. A light dusting around the base of the plant is usually sufficient.
Excessive fertilization can lead to foliage growth at the expense of flowering.
Pest and Disease Prevention and Management
Maintaining good plant health is crucial for preventing pest and disease issues. Inspect your peonies regularly for signs of pests like aphids, slugs, or snails, and diseases such as powdery mildew or fungal leaf spots. If pests or diseases are present, address them promptly. Consider using organic pest control methods, like neem oil or insecticidal soap, to minimize environmental impact.
Thorough pruning and removing diseased foliage can also help prevent the spread of infections.
| Pest/Disease | Symptoms | Control Measures |
|---|---|---|
| Aphids | Small, sap-sucking insects, often clustered on leaves and stems. | Insecticidal soap or neem oil sprays. |
| Powdery Mildew | White powdery coating on leaves and stems. | Fungicide sprays or removing affected foliage. |
| Fungal Leaf Spots | Brown or black spots on leaves. | Removing infected leaves, improving air circulation. |
Proper aftercare and maintenance will ensure your newly transplanted peony divisions flourish and provide years of enjoyment. Be patient, observe your plants closely, and adjust your care routine as needed. With the right attention, your peonies will thrive and reward you with beautiful blooms.
Common Issues and Troubleshooting
Dividing and transplanting peonies can sometimes lead to unexpected challenges. Understanding potential problems and their solutions is key to successful propagation and healthy growth. This section will cover common issues, their causes, and effective troubleshooting strategies, ensuring your peonies thrive after the division process.
Dividing and transplanting peonies is a rewarding gardening task, but sometimes, like understanding a complex astrological chart, it can feel a bit overwhelming. Just like figuring out the harmonious relationships between planets in a composite chart, you need to carefully assess the root structure and surrounding soil conditions before moving these beautiful blooms. A deeper understanding of the interplay of these elements, like learning about What Is a Composite Chart in Astrology , can be crucial to ensuring the peonies thrive in their new home.
Careful planning and execution are key to a successful transplant.
Root Rot
Root rot is a significant concern for divided peonies, often stemming from improper soil conditions or excessive moisture. Recognizing the symptoms is crucial for timely intervention. Symptoms may include mushy, dark-colored roots, wilting foliage, and a general decline in the plant’s vigor. If left untreated, root rot can quickly lead to the death of the peony.
- Diagnosis: Carefully examine the roots for signs of rot. Look for discoloration, softness, and the presence of fungal growth. Observe the soil moisture levels around the plant. Excessive or consistently wet soil is a major contributing factor.
- Treatment: Remove the affected roots completely, ensuring no diseased tissue remains. Treat the remaining roots with a fungicide specifically designed for plants. Amend the soil with well-draining materials like perlite or sand. Adjust watering practices to ensure proper drainage and avoid overwatering. Improved drainage is crucial for preventing future root rot.
Fungal Diseases
Various fungal diseases can affect peonies, leading to leaf spots, blights, and other unsightly issues. Early detection and prompt action are vital for preventing the spread of the disease. Recognizing specific patterns and symptoms is critical for effective treatment.
- Diagnosis: Examine the leaves for unusual spots, discoloration, or wilting. Observe for fungal growth or powdery residue on the plant’s foliage. Determine if the symptoms appear in clusters or are scattered throughout the plant. These observations will guide the diagnosis process.
- Treatment: Remove any affected leaves or stems promptly. Apply a suitable fungicide, following the product instructions carefully. Improve air circulation around the plant to prevent fungal growth. Proper spacing between plants is vital for good air circulation. Avoid overhead watering, which can increase humidity levels, contributing to fungal issues.
Pests
Peonies, like other garden plants, are susceptible to various pests. Early detection and targeted control methods are essential for preventing significant damage. Knowing the signs of common pests will allow for quick intervention.
- Diagnosis: Inspect the foliage, stems, and flowers for signs of chewing, sucking, or other pest activity. Look for insects, eggs, or webs. Identifying the type of pest will determine the best control method. Common peony pests include aphids, slugs, and snails.
- Treatment: Use appropriate pest control methods. For example, handpicking pests can be effective for small infestations. Introduce beneficial insects, like ladybugs, to control aphids. Use insecticidal soaps or horticultural oils, ensuring proper application and safety precautions. Organic pest control methods are preferred for environmentally friendly practices.
Preventing Issues
Proactive measures are essential for minimizing problems during peony division and transplanting. Maintaining good garden hygiene is key to overall plant health.
- Soil Health: Ensure the soil is well-draining. Adding organic matter, such as compost, improves soil structure and drainage, reducing the risk of root rot. Well-draining soil is vital for preventing root issues.
- Proper Spacing: Maintain adequate spacing between peony plants to allow for proper air circulation. Sufficient space will deter fungal diseases.
- Watering Practices: Water deeply and less frequently to encourage deep root growth. Avoid overhead watering to minimize humidity and prevent fungal diseases. Consistent watering practices, avoiding waterlogging, is essential.
Choosing the Right Peony Varieties for Division
Choosing the right peony variety for division is crucial for successful propagation and long-term enjoyment. Different peony types have varying characteristics, from bloom time and flower size to overall plant habit. Understanding these differences allows you to select peonies that will thrive in your garden and complement your existing landscaping. Knowing the specific needs of each type will ensure a more successful division and planting process.
Understanding Peony Types
Peonies are broadly categorized into three main types: Itoh, Tree, and Herbaceous. Each type offers unique visual appeal and characteristics, impacting the overall aesthetic and care requirements of your garden. Careful consideration of these differences will contribute to a more satisfying gardening experience.
Itoh Peonies
Itoh peonies, also known as hybrid peonies, are a cross between herbaceous and tree peonies. This unique combination results in plants that exhibit a blend of the best qualities from both parent types. They generally feature large, showy flowers in a wide array of colors, often with a more refined and vibrant appearance than their herbaceous counterparts. They also typically display a longer bloom time, extending the flowering season.
These are particularly well-suited for division due to their robust nature and ability to quickly re-establish themselves.
Tree Peonies
Tree peonies are known for their distinct upright growth habit, forming a shrub-like structure. They produce large, fragrant flowers in a variety of colors, often with a deeper, more intense hue compared to other types. They bloom earlier in the spring than herbaceous varieties and tend to have a longer flowering season. Their larger size makes them excellent focal points in a garden, but also require more space for their spreading root system.
Their mature size and branching pattern make them particularly suitable for division when they become crowded.
Herbaceous Peonies
Herbaceous peonies are the most common type, known for their elegant, upright stems that support large, showy flowers. These flowers come in a range of colors and shapes. They bloom later in the spring, and their flowering period is generally shorter than that of Itoh or tree peonies. Herbaceous peonies are adaptable to various garden conditions, making them a versatile choice for many gardeners.
Their adaptability and more compact nature make them ideal for division and replanting.
Comparing Peony Varieties, Divide and Transplant Peonies
| Peony Type | Bloom Time | Flower Size | Color |
|---|---|---|---|
| Itoh | Late spring | Large | Various |
| Tree Peony | Spring | Large | Various |
| Herbaceous Peony | Spring | Medium to large | Various |
This table summarizes the key characteristics of the three major peony types. It highlights the differences in bloom time, flower size, and the variety of colors each type offers. This data is helpful in making informed decisions about which type of peony is best suited for your garden.
Visual Representation
Peony division and transplanting, while seemingly complex, becomes significantly easier with a visual guide. Clear illustrations and detailed explanations will make the process straightforward and less daunting. Understanding the various stages, from initial preparation to final aftercare, is crucial for successful peony propagation.Visual aids, particularly diagrams, are invaluable in showcasing the intricate steps involved. These visual representations aid in grasping the precise techniques required, enabling gardeners to replicate the process effectively.
This section will provide a comprehensive visual guide to peony division and transplanting, emphasizing the importance of using the correct tools and techniques.
Identifying Peony Plant Parts
A thorough understanding of the peony plant’s anatomy is essential before division. Different parts play specific roles in the plant’s health and function. Identifying these components allows for a more targeted and effective division process. 
This illustration depicts a peony plant with its crown, roots, and stems highlighted. The crown, located at the base of the plant, is the central hub where the roots and stems emerge.
Healthy roots are crucial for nutrient absorption, while stems support the growth of foliage and flowers.
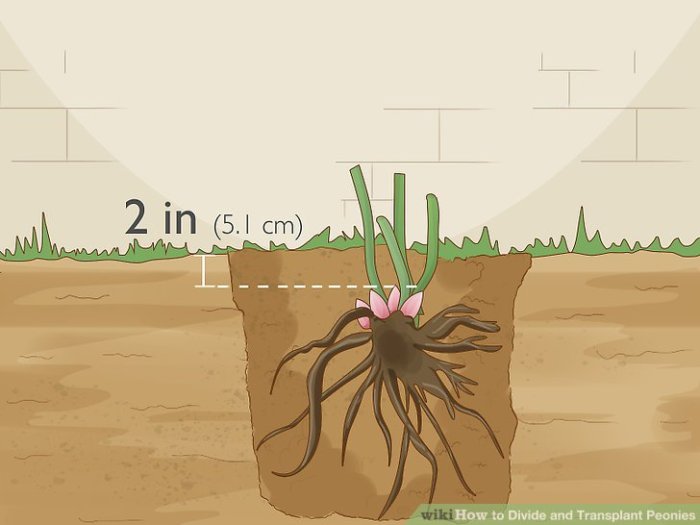
Preparing the Peony Plant for Division
Proper preparation is the cornerstone of a successful peony division. The illustration below demonstrates the necessary steps for ensuring the plant is ready for the division process.
The illustration depicts the careful removal of the peony plant from the ground, emphasizing the importance of minimizing root damage. A sharp shovel and careful digging technique are vital for preserving the root system’s integrity.
Gentle handling and removal of the surrounding soil are essential to avoid tearing or breaking the delicate roots.
Dividing the Peony Root
Precise division of the peony root is crucial for ensuring each division receives adequate growing potential. The illustration below showcases the techniques for successful division.
This illustration demonstrates the process of dividing the peony root into sections. A sharp, clean knife is used to cut through the root crown. Each division should contain at least two or three healthy buds or eyes.
This is crucial for promoting healthy growth and flowering in the future. Avoiding tearing or crushing the roots is critical to successful propagation.
Transplanting the Divided Peonies
Proper transplanting is essential for the survival and growth of the divided peony plants. The illustration below shows the process.
This illustration depicts the transplanting process. Each division is carefully planted in a new hole, ensuring adequate spacing between plants. The planting depth should be similar to the original depth.
Covering the roots with soil and gently firming it around the base is essential for proper root establishment.
Using Proper Tools and Techniques
Using appropriate tools and employing correct techniques are vital for minimizing damage and maximizing success.
- Sharp tools: A sharp shovel and knife prevent tearing or damaging the delicate roots, crucial for healthy plant growth.
- Proper digging depth: Digging deep enough to unearth the entire root system is important for complete division.
- Correct spacing: Maintaining appropriate spacing between the divided plants ensures adequate air circulation and prevents overcrowding, leading to healthy growth.
- Gentle handling: Carefully handling the plant and roots throughout the division and transplanting process minimizes damage, which is key for successful propagation.
Final Conclusion
In conclusion, dividing and transplanting peonies is a rewarding process that can revitalize your garden and increase your peony collection. By following these steps, you can successfully propagate your beloved peonies and enjoy a bountiful display of beautiful blooms for years to come. Remember to prioritize proper care and attention to detail for optimal results. Happy gardening!