Wrap Text in InDesign is crucial for creating visually appealing and functional layouts. This guide dives deep into the various text wrapping options, techniques, and considerations. From basic character wrapping to complex scenarios involving multiple objects, we’ll cover it all, ensuring your InDesign documents are masterpieces of design.
This comprehensive guide provides detailed explanations, practical examples, and troubleshooting tips to help you master text wrapping in InDesign. Whether you’re a beginner or an experienced designer, you’ll find valuable insights and techniques to enhance your design workflow.
Introduction to Wrap Text in InDesign
Wrap text in InDesign is a crucial aspect of page layout, enabling the precise positioning of text relative to other elements on a page. It allows for flexibility and control over how text interacts with graphics, shapes, and other text boxes, creating visually appealing and functional documents. Mastering wrap text techniques is essential for achieving professional-quality designs in InDesign.Understanding text wrapping is fundamental to effective page layout design.
It allows for dynamic adaptation of text flow, ensuring that text conforms to specific boundaries and avoids overlapping other elements. This adaptability is particularly useful when dealing with varying content lengths and different page elements, enabling a more sophisticated and user-friendly design.
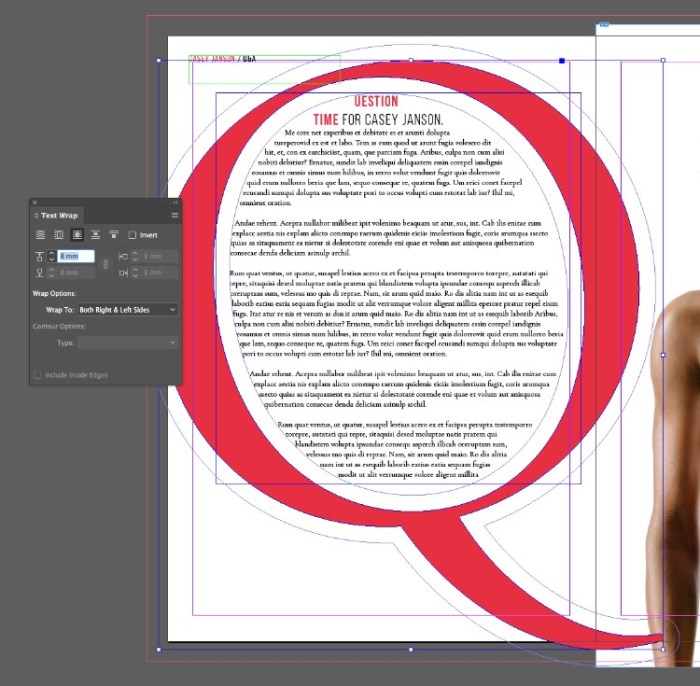
Text Wrapping Options in InDesign
InDesign provides a range of options for controlling how text wraps around other objects. These options offer precise control over the text’s behavior, allowing for diverse visual effects and customized layouts.
Figuring out wrap text in InDesign can be tricky, but mastering it unlocks a world of design possibilities. While I’m currently wrestling with some particularly tricky text wrapping issues, I’ve also been enjoying Ice Cube’s new song, “Arrest the President.” You can listen to it here: ice cubes new song is called arrest the president listen.
Hopefully, once I’ve figured out these wrap text challenges, I’ll be able to create some stunning layouts!
| Wrap Type | Description | Example | Application |
|---|---|---|---|
| Character | Text wraps around each character of the object. | Text snugly follows the Artikel of a shape. | Precise control, especially for intricate shapes or graphic elements. |
| Object | Text wraps around the entire object. | Text flows around a graphic or shape as a single entity. | Common approach for wrapping around images, shapes, and other objects. |
| Path | Text follows a specific path, such as a curve or line. | Text wraps along the Artikel of a custom shape. | Unique visual effects and creative text placement. |
| Square | Text wraps around the object in a square/rectangular fashion. | Text wraps around a rectangle or box, respecting its boundaries. | Common use for creating text boxes that align precisely with other elements. |
Practical Considerations for Choosing Wrap Options
The choice of wrap type significantly impacts the visual appearance and functionality of the document. Careful consideration of the desired aesthetic and the relationship between text and other elements is crucial. For instance, wrapping text around a complex illustration might require the “Character” option for precise control, while wrapping around a simple graphic may utilize the “Object” option.
Understanding these distinctions will allow for optimal text flow and a well-structured document.
Understanding Wrap Text Options
InDesign’s wrap text options provide crucial control over how text interacts with other elements on the page. Mastering these options allows for precise and aesthetically pleasing layouts, ensuring that text flows seamlessly around images, shapes, or other objects. Understanding the nuances of these options is essential for achieving a professional and polished design.The different wrap text options in InDesign—character, word, paragraph, and more—dictate how text behaves relative to its surrounding objects.
Each choice yields a distinct visual outcome, affecting the overall flow and appearance of the text. Knowing when to use each option is key to efficient and effective page design.
Wrap Text Options and Their Visual Impact
InDesign offers a range of wrap text options, each influencing the text’s placement and appearance around an object. Understanding these options allows for precise control over the visual layout of text. Choosing the appropriate option ensures the text flows seamlessly and aesthetically around the surrounding objects.
Character Wrap
Character wrap is the most granular option, affecting each individual character. This allows for precise control of text positioning, making it particularly useful for situations requiring highly customized text placement around objects with complex shapes. In this mode, text will wrap around each character of an object, which can be very intricate for precise placement. For instance, a complex graphic with irregular curves or shapes would benefit from this approach to create a more tailored look.
Word Wrap
Word wrap, the default option, allows text to wrap at the end of each word. This is a practical choice for most situations, offering a balanced and generally aesthetically pleasing outcome. Text will wrap around the object at the end of each word, resulting in a natural flow. This is suitable for many design scenarios where a straightforward text wrapping is sufficient.
Paragraph Wrap
Paragraph wrap is a slightly more flexible option. It wraps entire paragraphs, which is helpful for maintaining the visual integrity of paragraphs, such as preserving the alignment or formatting of entire blocks of text. This mode aligns entire paragraphs rather than each word, which is useful for preserving the formatting of the entire text block. For instance, if a block quote or a paragraph needs to wrap around an image, paragraph wrap is more appropriate to ensure the overall formatting remains consistent.
Table Demonstrating Visual Differences
| Wrap Text Option | Description | Visual Outcome | Best Use Case |
|---|---|---|---|
| Character | Wraps text around each character. | Precise text placement, especially around complex shapes. | Highly customized text placement, around irregular shapes. |
| Word | Wraps text at the end of each word. | Natural text flow around objects. | Most general design scenarios. |
| Paragraph | Wraps entire paragraphs. | Preserves paragraph formatting. | Maintaining paragraph alignment, formatting around objects. |
Mastering Text Wrapping Techniques: Wrap Text In Indesign
 - wikiHow")
InDesign’s text wrapping options go beyond simple placement. Mastering these techniques unlocks precise control over how text interacts with other elements, enabling you to create complex layouts and dynamic visual hierarchies. Understanding advanced wrapping methods empowers designers to achieve unique aesthetic effects and ensure seamless integration of text within a design.Effective text wrapping isn’t just about getting text to fit; it’s about crafting a visual narrative that flows naturally and aesthetically within the overall composition.
Different layout needs require varying degrees of control over text placement. Knowing how to utilize the various wrapping options will allow you to create a compelling visual language within your designs.
Advanced Wrap Options
InDesign offers a diverse range of text wrap options beyond basic settings. These allow for complex interactions between text and other objects, providing greater flexibility in layout design. These include options for wrapping text around shapes, paths, or other text boxes, allowing for innovative and unique visual arrangements.
Wrapping Around Shapes
Precise control over text flow is critical for many layout designs. Wrapping text around shapes enables you to create visually engaging compositions. To wrap text around a shape, select the text frame and the shape. Then, in the Text Frame Options panel, select the appropriate wrap option, specifying whether you want the text to wrap around the shape, flow along it, or behave differently based on the specific shape’s characteristics.
Customizing Wrap Behavior
Customizing text wrap behavior is a crucial step in complex layouts. Adjusting the wrap settings allows you to influence how text interacts with other objects, enhancing the design’s visual appeal. This includes setting parameters such as the distance between the text and the shape, the alignment of the text with the shape, and the amount of space occupied by the text around the shape.
Wrapping Text Around Paths
Wrapping text around paths provides an opportunity to create unique and visually dynamic layouts. This technique allows you to manipulate the text’s path to match intricate curves and shapes, creating a more compelling and aesthetically pleasing design. Select the text frame, the path object, and in the Text Frame Options panel, select the appropriate wrap option for text flow.
Multiple Text Frames and Wrapping
When working with multiple text frames, the wrapping options become even more important. By strategically using these settings, you can achieve intricate text flow and organization, and a sense of visual unity. For instance, you might wrap text around a specific shape in one frame, while another text frame flows along a different shape or path, all within the same document.
This requires careful planning and understanding of how the wrap settings will interact with the different text frames in the overall layout.
Creating Complex Wrapping Scenarios
Achieving intricate text wrapping effects involves careful consideration of various layout elements and their interactions. For example, you might need to wrap text around multiple shapes or paths with varying wrap settings, to ensure the text flow aligns with the overall design aesthetic. Experimentation and practice are crucial in mastering complex wrapping techniques.
Handling Specific Text Wrapping Situations
Mastering text wrapping in InDesign goes beyond the basics. This section dives deeper into advanced techniques for handling complex scenarios, such as wrapping text around diverse shapes and objects, controlling spacing and alignment, and managing margins and indentations. These advanced techniques allow for greater design flexibility and precision in your layouts.This section will explore how to precisely control text flow around images, irregular shapes, and varying layout elements.
Understanding these techniques will empower you to create visually appealing and functionally sound documents. We’ll explore strategies for achieving a harmonious balance between text and graphics within your InDesign layouts.
Wrapping Text Around Images or Other Objects
Properly wrapping text around images or other objects is crucial for a professional and aesthetically pleasing design. InDesign offers several options for achieving this. The “Around” option within the text wrapping controls allows you to position the text to flow around an object in various ways, providing different effects.
- Using the “Around” option, you can specify whether the text wraps around the object on the inside or outside, which greatly affects the visual appeal of your design. This flexibility is essential for creating well-balanced layouts.
- The “Tight” option provides a closer wrap, pushing the text more closely against the object, which is useful for creating more compact layouts or for highlighting the object.
- The “Through” option allows the text to pass through the object, which is useful for designs where the object is intended to be visually prominent, like placing text over an image or graphic.
Wrapping Text Around Irregular Shapes
Complex shapes often require unique wrapping strategies. InDesign offers a powerful approach to handle text wrapping around irregular objects.
- To wrap text around irregular shapes, the “Around” option in the text wrapping controls can be utilized. The flexibility in this approach is crucial for creating designs with unique shapes and text arrangements.
- The “Tight” option in the text wrapping controls is a critical element for achieving close wrapping around irregular shapes. This option allows for a close fit around the shape, while still allowing for text flow around the shape.
- If the shape is highly irregular, using the “Around” and “Tight” options in combination, or adjusting the object’s size and position to control the text flow is essential.
Controlling Spacing and Alignment of Wrapped Text
Controlling the spacing and alignment of wrapped text is vital for achieving a harmonious balance in your layouts.
- Adjusting the “Space Before” and “Space After” options within the paragraph styles, can be used to control the spacing between the text and the surrounding objects.
- Alignment options, such as “Left,” “Center,” and “Right,” affect the placement of the wrapped text relative to the object or shape.
- Experimentation with different settings is often required to achieve the desired visual effect, considering the overall layout design and the text’s positioning within the document.
Wrapping Text with Different Margins and Indentations
Margins and indentations play a significant role in shaping the text’s placement and visual hierarchy within the document.
- Adjusting margins and indentations can significantly alter the visual hierarchy of your document. Different margins and indentations can be used to visually separate different sections of text, highlighting important information.
- Modifying margins and indentations in InDesign is a fundamental aspect of document design. These adjustments can visually separate text blocks and control the text’s flow around objects.
- Controlling these aspects within InDesign ensures that your documents have a clean and organized look.
Troubleshooting Text Wrapping Issues
Mastering InDesign’s text wrapping features is crucial for professional-looking documents. However, occasional issues can arise. This section delves into common text wrapping problems and their effective solutions, providing a practical guide for diagnosing and resolving these errors, as well as methods to prevent them from occurring in the first place.Troubleshooting text wrapping in InDesign often involves understanding the interplay between text, frames, and the various wrap options available.
Identifying the root cause is key to implementing the correct fix.
Common Text Wrapping Problems
Understanding the root causes of text wrapping problems is essential for effective solutions. Common issues include misaligned text, text overflowing frames, or unexpected text flow.
Solutions to Text Wrapping Problems
Several methods can rectify text wrapping issues in InDesign. A thorough understanding of the underlying cause is critical for choosing the appropriate solution.
Diagnosing Text Wrapping Errors
Diagnosing text wrapping errors often involves examining the text frames, paragraph styles, and any applied character styles. Carefully review the wrap options and settings to ensure they align with the desired text flow. Consider these steps:
- Verify Frame Settings: Double-check the frame’s wrap options, specifically the ‘Wrap’ settings and the ‘Use Margins’ options. Ensure the frame size accommodates the text and the wrap style is correct for the layout.
- Inspect Paragraph Styles: Examine paragraph styles applied to the text. Incorrect settings within these styles can cause unexpected text wrapping behaviors. Confirm that the text is using the intended paragraph style.
- Review Character Styles: If using character styles, ensure they aren’t interfering with text wrapping. Check for any properties within the character styles that could impact how the text flows.
- Check for Hidden Characters: Sometimes, invisible characters (e.g., tabs, non-breaking spaces) can disrupt text flow. Use the “Show Hidden Characters” feature in InDesign to identify and remove any extraneous characters that might be causing problems.
- Examine Font Properties: Examine the font’s characteristics and ensure the font is properly installed and accessible to InDesign. Unusual font characteristics might sometimes affect text wrapping.
Preventing Text Wrapping Issues
Proactive measures can significantly reduce the likelihood of text wrapping problems. By following these guidelines, you can minimize potential errors and streamline the text wrapping process.
- Accurate Frame Sizing: Ensure the text frames are appropriately sized to accommodate the expected text length and desired formatting. Oversized frames can lead to issues as well.
- Consistent Paragraph Styles: Maintain consistent paragraph styles throughout the document. This prevents inconsistencies in text wrapping behaviors across different sections.
- Regular Checks: Periodically review the text wrapping behavior as the document is developed. Early identification and resolution of issues can save significant time and effort.
- Testing and Proofreading: Thoroughly test the text wrapping in various view modes (e.g., page view, document view) to ensure consistency across different perspectives. Proofreading the layout will help catch inconsistencies early.
Working with Text Frames and Wrapping
Text frames are the containers for your text in InDesign. Understanding their relationship with text wrapping is crucial for precise layout control. A well-structured text frame not only dictates where text appears but also how it flows around other elements on the page. Mastering this interaction unlocks your ability to create complex and visually appealing documents.Text frames act as boundaries for text, defining the area where it can be placed and how it will wrap.
Controlling the size and shape of the frame directly influences the text’s layout and appearance. By understanding the interplay between text frames and wrapping options, you can create precisely positioned and formatted text elements.
Mastering wrap text in InDesign is crucial for professional-looking layouts. It’s a fundamental skill, especially when you’re working with complex designs. Thinking about how Sufjan Stevens is going to perform the live film score for a new project sufjan to perform live film score , it makes me think about the careful consideration needed for visual elements like text wrapping in a project like that.
Getting the text to flow seamlessly around images or other elements in your InDesign document is key to a professional finish.
Relationship Between Text Frames and Wrapping
Text frames are fundamental to text wrapping in InDesign. They determine the boundaries within which the text flows. The shape and size of the frame directly influence the wrapping behavior, whether it’s wrapping around a graphic, following a specific path, or adjusting to the page margins.
Creating and Modifying Text Frames
Creating a text frame involves selecting the “Type” tool and drawing a rectangular area on the page. This area becomes the container for your text. Modifying text frames allows you to control the exact dimensions and position of the text block. Tools like the Direct Selection tool enable precise adjustments to the frame’s corners and edges, enabling precise control over the text’s layout.
Using the Control Panel, you can modify parameters such as the width, height, and alignment of the frame.
Using Text Frames for Specific Text Wrapping Needs
Text frames enable you to precisely control the flow of text around various elements. For example, creating a text frame that follows the Artikel of a graphic will ensure that the text wraps smoothly around the image’s contour. Similarly, text frames can be used to wrap text around a curved path, providing unique visual effects. The ability to adjust text wrapping precisely depends on the shape and size of the text frame, enabling you to achieve a wide range of layout effects.
Resizing Text Frames to Adjust Text Wrapping
Resizing text frames directly affects how the text wraps. Enlarging a text frame allows more text to be displayed without wrapping, while shrinking it forces the text to wrap more frequently. Adjusting the frame’s dimensions allows you to control the text’s appearance and ensure it integrates seamlessly with the surrounding elements on the page. Careful resizing is critical for maintaining a cohesive and visually appealing layout.
This allows for dynamic adjustment of the text layout, ensuring a perfect fit in various situations.
Advanced Wrap Text Applications

InDesign’s wrap text options extend far beyond simple paragraph alignment. Mastering these advanced techniques unlocks powerful design capabilities, allowing for complex layouts and unique visual effects. This exploration dives into sophisticated applications, demonstrating how to control text flow around multiple objects, specific shapes, and even creating dynamic design elements.Understanding these advanced techniques empowers designers to craft visually compelling documents, websites, and presentations with a high degree of precision and control over text placement.
The ability to wrap text around intricate shapes or multiple elements elevates the aesthetic appeal and functionality of your designs.
Multiple Object Wrapping
Mastering text wrapping around multiple objects is crucial for complex layouts. This technique allows text to flow seamlessly around diverse elements, from illustrations to decorative shapes. The careful arrangement of these objects determines the text’s path and flow. Accurate placement is essential for a balanced and visually appealing result.
- Precise Object Positioning: Precise positioning of objects is critical for smooth text wrapping. Ensure objects are placed strategically to prevent awkward or unintended text paths.
- Object Order: The order in which objects appear in the document determines the wrapping order. Text will generally wrap around the objects in the order they are placed in the document.
- Object Size and Shape: The size and shape of the objects significantly impact how text wraps around them. A large, complex shape will consume more space than a smaller, simpler one. This affects the available space for text wrapping.
Shape-Based Wrapping
InDesign provides powerful tools for wrapping text around various shapes, going beyond simple rectangles. These tools offer creative possibilities for unique visual effects. Text wrapping around custom shapes or vector graphics allows for greater design flexibility.
- Custom Shapes: Creating your own shapes in InDesign opens up unlimited possibilities for wrapping text. You can use vector graphics or create complex shapes to generate unique text flow.
- Graphics Integration: Text wrapping around graphics and images is common. This enhances design and adds visual interest by seamlessly integrating text into the design. This often involves adjusting the text wrap options to ensure the text interacts well with the graphics.
- Creating Visual Interest: By wrapping text around shapes, you can create striking visual interest. This technique can be used to draw attention to specific elements or to highlight information in a more engaging manner.
Creating Unique Design Elements
Advanced wrap text techniques are invaluable for producing intricate and visually engaging design elements. You can create text-based patterns, complex layouts, and interactive elements with these techniques. The key lies in understanding how to manipulate text wrap to create desired effects.
- Dynamic Text Layouts: By strategically positioning text frames and using shape-based wrapping, you can create dynamic text layouts that adjust to the shape and size of other elements.
- Interactive Elements: Text wrapped around dynamic objects can create interactive elements in your designs. This technique can be used to highlight important information, add visual appeal, and add functionality to your designs.
- Unique Visual Effects: Experimenting with different shape combinations and text wrap options can lead to unexpected and striking visual effects. By combining these elements, you can generate a visually compelling design.
Best Practices and Tips
Mastering InDesign’s wrap text options goes beyond simply getting the text to fit. It’s about creating a visually appealing and readable document. By understanding best practices, you can ensure your layouts are not only functional but also aesthetically pleasing. This section explores practical strategies for optimizing your text wrapping for maximum impact.Applying consistent styles and utilizing shortcuts can significantly streamline your workflow, saving you valuable time and effort.
This section offers a practical approach to improving your text wrapping skills in InDesign, making your designs both professional and efficient.
Best Practices for Using Wrap Text Options
Implementing consistent text wrapping styles throughout a document is crucial for maintaining a cohesive visual aesthetic. This includes choosing appropriate wrap options for different elements, such as justified text for headings and ragged right text for body copy. Understanding the purpose of each option helps in selecting the most suitable choice for the specific content. This consistency ensures a harmonious flow between elements and prevents visual distractions.
Optimizing Text Wrapping for Readability
Readability is paramount in any document. To optimize text wrapping for readability, consider the following: Ensure adequate leading (line spacing) to prevent cramped text. Adjust paragraph spacing to maintain visual separation between blocks of text. Avoid overly tight margins that make the text feel cramped. The goal is to create a comfortable reading experience for the viewer.
Useful Shortcuts for Controlling Text Wrapping
Knowing shortcuts for controlling text wrapping significantly speeds up your workflow. InDesign provides various keyboard shortcuts for common tasks like adjusting text wrapping options, selecting text frames, and applying styles. These shortcuts not only save time but also enhance your efficiency in working with text. Understanding and utilizing these shortcuts is an essential aspect of efficient design.
Mastering wrap text in InDesign is crucial for creating professional-looking layouts. It’s all about controlling how text flows around images and other elements. Think of it like a dance, where the text gracefully navigates the page, like the energetic rhythms of the music in the song “hands the soul is quick” hands the soul is quick.
Understanding these techniques allows for a fluid and engaging visual experience, ultimately making your InDesign documents stand out.
- Ctrl+Shift+L (Windows) or Cmd+Shift+L (Mac): Aligns text to the left margin.
- Ctrl+Shift+R (Windows) or Cmd+Shift+R (Mac): Aligns text to the right margin.
- Ctrl+Shift+J (Windows) or Cmd+Shift+J (Mac): Justifies text to both margins.
- Ctrl+Shift+K (Windows) or Cmd+Shift+K (Mac): Aligns text to both margins and distributes space evenly between words.
- Ctrl+Shift+Enter (Windows) or Cmd+Shift+Enter (Mac): Inserts a paragraph return without adding extra spacing.
Setting Up Consistent Text Wrapping Styles
Establishing consistent text wrapping styles is vital for maintaining a uniform look and feel across a document. This involves defining specific text wrap settings for different text types, such as headings, subheadings, and body text. Applying these styles ensures that the layout maintains a consistent appearance.
- Create a new paragraph style: Select the text you want to style, and choose “Create Paragraph Style.” Assign the new style the name “Heading 1.”
- Set the wrap options for the heading style: In the Paragraph Styles panel, select the “Heading 1” style. Adjust the wrap options (such as left alignment) in the “Wrap” section.
- Apply the style to other headings: Select the headings you want to format, and choose the “Heading 1” style from the Paragraph Styles panel.
Wrap Text and Typography Considerations
Typography and text wrapping are intrinsically linked. A well-executed text wrap enhances the readability and aesthetic appeal of the design, while a poorly implemented one can detract from the overall impression. Understanding how font choices and language affect the wrapping process is crucial for achieving a polished and effective layout.Font selection significantly influences how text wraps around objects.
Different fonts have varying widths and heights, leading to different spacing requirements. For instance, a condensed font might require more adjustments to achieve smooth wrapping compared to a wider font. Furthermore, the character set and stylistic features of the chosen font can also impact the wrapping process, impacting how the text interacts with surrounding elements.
Font Choices and Text Wrapping
Font choices directly affect the appearance and behavior of wrapped text. Fonts with a wide character width can wrap more smoothly than narrow or condensed fonts. A wider font will have more space to wrap, thus leading to fewer issues with the wrapping process. Consider the font’s x-height, ascenders, and descenders when choosing fonts for wrapping. These elements impact the visual balance and the text’s interaction with the surrounding design.
Visual Appeal and Font Pairing
Creating visually appealing text wrapping requires careful consideration of font pairing. Contrasting fonts can draw attention to specific text elements while maintaining a harmonious overall design. Pairing a bold, sans-serif font with a delicate, serif font can achieve a striking effect, but this choice must align with the overall design concept.
Language Considerations and Text Wrapping, Wrap Text in Indesign
Different languages have varying text wrapping implications. Languages like Arabic and Hebrew are written right-to-left, which requires specific wrapping settings to avoid text flowing in the wrong direction. For instance, text wrapping in these languages needs to accommodate the directional flow. Additionally, languages with different character sets, such as East Asian languages, can present unique challenges due to the presence of ideographs and their varying widths.
Summary
In conclusion, mastering Wrap Text in InDesign empowers you to craft compelling and visually engaging documents. By understanding the different options, techniques, and considerations, you can create professional-looking layouts tailored to your specific needs. Remember to practice and experiment to solidify your skills and unlock the full potential of InDesign’s text wrapping capabilities.