Category: Cooking

  • Tell if Pork Chops Are Done A Complete Guide

    Tell if Pork Chops Are Done A Complete Guide

    Tell if Pork Chops Are Done is your ultimate resource for achieving perfectly cooked pork chops every time. From the subtle shifts in color to the precise internal temperature, we’ll explore multiple methods for determining doneness, ensuring you master the art of cooking these delicious cuts.

    This comprehensive guide covers everything from visual cues to using a meat thermometer, and even how to use a fork to assess tenderness. We’ll also look at the influence of cooking methods and pork chop thickness on the cooking process, providing actionable advice to avoid overcooked or undercooked results. Plus, we’ll delve into the crucial aspects of food safety, highlighting the importance of proper internal temperatures to prevent health risks.

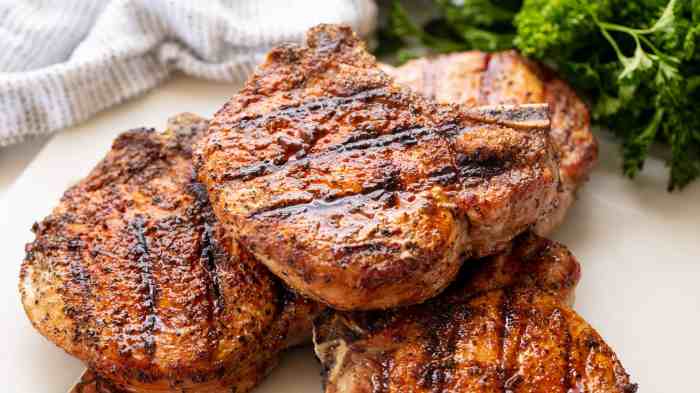
    Identifying Doneness by Appearance: Tell If Pork Chops Are Done

    Tell if Pork Chops Are Done

    Knowing how to tell if your pork chops are perfectly cooked is key to enjoying a delicious meal. Visual cues can be surprisingly reliable indicators of doneness, allowing you to gauge the internal temperature without needing a thermometer. This guide will help you understand the subtle shifts in appearance that signal various stages of doneness, from rare to well-done.

    Exterior Changes During Cooking, Tell if Pork Chops Are Done

    Understanding the changes in the pork chop’s exterior is essential for achieving the desired level of doneness. The surface color, texture, and even the way the meat looks will shift as it cooks. These changes are due to the proteins in the pork tightening and denaturing as the temperature increases.

    Figuring out if those pork chops are cooked just right can be tricky, but it’s a piece of cake compared to navigating social situations. Sometimes, you just have to put on a different face, especially when dealing with someone you don’t enjoy being around. Like, pretending to be enthusiastic about their terrible jokes or feigning interest in their latest pet project, it’s a whole different ball game than, say, checking for the perfect pinkness of a pork chop.

    Learning to manage those interactions, as tricky as it can be, is a skill that’s far more useful than knowing how to tell if pork chops are done perfectly. Just like you can check the internal temperature, you can also master the art of social etiquette, like avoiding awkward situations. It’s all about finding a balance, and understanding the right cues, like a perfectly seared pork chop, to know when something is done.

    To learn more about acting around someone you dislike, check out this post: Act Around Someone You Do Not Like. Then, you can get back to enjoying those delicious, perfectly cooked pork chops!

    Visual Cues for Different Doneness Levels

    The following table provides a visual guide to identifying pork chop doneness by appearance. Note that these are general guidelines, and individual pork chops may vary slightly. Factors like thickness and cooking method can affect the final result.

    Doneness Level Color Texture Surface Appearance Description/Example
    Raw Pale pink/white Firm, slightly glossy Smooth, unblemished The raw pork chop is a uniform pale pink or white color, and the surface is smooth and glistening.
    Rare Light pink Firm, slightly moist A few light pink juices may be visible; some slight browning on the surface A slight pink hue emerges on the exterior. The surface shows a light amount of browning, with the center still exhibiting a pink color.
    Medium-Rare Medium-pink Firm, moist More browning, with pink showing in the center The pink color intensifies, and some noticeable browning is visible. The interior will likely retain a light pink color.
    Medium Light brownish-pink Firm, slightly tender More significant browning; pink is mostly gone from the exterior. The pink hue fades to a light brownish-pink, indicating that the interior has reached a more cooked state.
    Medium-Well Darker brownish-pink Firm, but slightly more tender Darker browning, little or no pink The exterior is significantly browned, with minimal pink showing.
    Well-Done Dark brown/gray Firm, dry Deeply browned, no pink visible. The exterior is a dark brown or gray, showing no pink. The surface may have some slight shrinkage or drying.

    Determining Doneness Through Internal Temperature

    Knowing the internal temperature of your pork chop is the most accurate way to ensure it’s cooked to perfection. This method provides a precise measurement, eliminating guesswork and preventing undercooked or overcooked results. It’s a crucial skill for anyone who wants to consistently prepare delicious and safe pork chops.Using a meat thermometer is a simple and effective technique to achieve consistent doneness.

    Figuring out if pork chops are cooked perfectly is crucial, but sometimes a little inspiration from unexpected places can help. Just like knowing how to tell if pork chops are done to your liking, learning about Morrissey’s memoir, which has found a publisher, morrissey gets us publisher for memoir , can provide a unique perspective. Ultimately, both involve a certain level of careful observation and attention to detail, a key element in getting the perfect sear and a satisfying read.

    The key is to insert the thermometer into the thickest part of the chop, avoiding the bone. This ensures a true reading of the internal temperature. This method is important for safety, as the internal temperature of the meat determines if harmful bacteria have been eliminated.

    Using a Meat Thermometer

    Properly using a meat thermometer ensures accurate readings and delicious results every time. First, select a meat thermometer designed for food safety. Choose one with a digital display for easy reading. Ensure the thermometer is clean and ready for use. Next, locate the thickest part of the pork chop, avoiding the bone.

    Carefully insert the thermometer into the center of this thickest part. Avoid touching the bone or any visible fat as these will skew the reading. Hold the thermometer in place until the reading stabilizes.

    Recommended Internal Temperatures for Pork Chops

    The internal temperature of a pork chop directly correlates with its doneness. Different levels of doneness correspond to different internal temperatures. Consistent monitoring and understanding of these temperatures ensure a perfect result.

    Doneness Level Internal Temperature (°F) Estimated Time (for 1-inch thick chop)
    Rare 140-145 10-12 minutes
    Medium-Rare 145-150 12-14 minutes
    Medium 150-155 14-16 minutes
    Medium-Well 155-160 16-18 minutes
    Well-Done 160+ 18+ minutes

    Note: Cooking times are estimates and can vary based on the thickness of the pork chop, the heat of your stovetop, and the specific cut of pork. A meat thermometer is essential for achieving precise results. Always use a food thermometer to verify doneness.

    Assessing Doneness Through the Use of a Fork

    Knowing how to properly assess the doneness of a pork chop is crucial for achieving a delicious and safe meal. Beyond visual cues and internal temperature readings, using a fork provides a tactile method for determining the tenderness and overall doneness. This approach allows you to experience the texture and resistance of the pork chop directly, offering a valuable addition to your cooking toolkit.Using a fork to check doneness goes beyond simply stabbing the meat.

    It’s about feeling the resistance and yielding nature of the pork chop. By understanding how the fork interacts with the meat, you can gain a better understanding of the level of doneness achieved, which is vital for both safety and flavor.

    Fork-Based Doneness Assessment

    Determining doneness with a fork involves observing how the fork penetrates the pork chop and the resulting resistance. This tactile method provides an intuitive sense of the meat’s tenderness.

    Step-by-Step Procedure

    • Insert the Fork: Gently insert a fork into the thickest part of the pork chop.
    • Assess Resistance: Note the resistance you feel as the fork penetrates. A crucial factor is the ease with which the fork passes through the meat. This directly correlates to the tenderness and doneness level.
    • Analyze Texture: Observe how the pork chop feels. This will complement the resistance and allow for a comprehensive judgment.

    Doneness Levels and Corresponding Fork Resistance

    Doneness Level Fork Resistance Texture Description
    Rare Fork slides through easily, with little to no resistance. The meat is very tender and juicy, with a slight pinkness throughout.
    Medium-Rare Fork meets moderate resistance, and it is not quite as easy to penetrate as rare. The interior is still quite pink, but the exterior is cooked through. The meat offers a balanced tenderness and juiciness.
    Medium Fork encounters noticeable resistance, but the meat yields slightly. The meat is evenly cooked throughout, with a subtle pink hue remaining in the center. The texture is tender but with a bit more firmness than medium-rare.
    Medium-Well Fork encounters significant resistance, and the meat offers substantial resistance. The meat is mostly cooked through with minimal pinkness. The texture is firm but still retains some tenderness.
    Well-Done Fork meets firm resistance, and the meat is very difficult to penetrate. The meat is fully cooked through, with no pinkness. The texture is firm and dense.

    Using a fork allows for a personal, tactile experience in determining the doneness of your pork chop. It complements the visual and temperature methods and enhances your overall cooking experience.

    Cooking Methods and Doneness Variations

    Tell if Pork Chops Are Done

    Pork chops, a beloved protein, offer a wide range of possibilities in the kitchen. Mastering the art of achieving perfect doneness hinges on understanding how various cooking methods, chop thickness, and cut types influence the cooking process. This exploration delves into the nuances of achieving that perfectly cooked pork chop every time.Different cooking methods significantly impact the final doneness of a pork chop.

    Factors like heat distribution, moisture retention, and the overall cooking environment contribute to varying levels of tenderness and internal temperature.

    Effects of Different Cooking Methods

    Understanding how different cooking methods affect pork chop doneness is crucial for achieving consistent results. Each method presents unique challenges and advantages.

    Figuring out if those pork chops are perfectly cooked can be tricky, right? Look for a nice golden brown exterior and a juicy interior. Knowing how to tell if your pork chops are done is key, but have you ever considered the deeper symbolism of a lion, like in What Does a Lion Symbolize ? Ultimately, the best way to know if your pork chops are done is by using a meat thermometer, ensuring they reach an internal temperature of 145°F for a safe and delicious meal.

    • Pan-frying: Pan-frying offers quick cooking times and a desirable sear. The controlled heat allows for even browning and a crispy exterior. However, it can be challenging to maintain even doneness across the entire chop, especially for thicker cuts, without actively flipping or adjusting heat.
    • Grilling: Grilling imparts a smoky flavor and a distinctive char. The high heat creates a rapid sear and cooks the exterior quickly. However, the variability in heat distribution across the grill surface may require careful monitoring to ensure even cooking and prevent burning.
    • Baking: Baking provides a gentler cooking method, allowing for even heat distribution and consistent doneness. This method is ideal for thicker chops, as the slower cooking time prevents overcooking. The downside is that the exterior may not achieve the same sear as other methods.

    Impact of Chop Thickness

    Chop thickness plays a critical role in determining cooking time and achieving the desired doneness. Thicker chops require longer cooking times to ensure the internal temperature reaches the safe and palatable range.

    • Thickness and Cooking Time: Thinner pork chops cook faster than thicker ones. A general guideline is to cook thinner chops for 3-5 minutes per side, while thicker chops may require 5-8 minutes per side, depending on the cooking method and desired doneness. Adjusting cooking times based on thickness is essential for achieving the desired doneness without overcooking or undercooking.
    • Even Cooking: To achieve even cooking of thicker chops, it is recommended to use a meat thermometer to monitor the internal temperature and ensure a consistent doneness throughout the chop.

    Importance of Adjusting Cooking Times

    Precisely adjusting cooking times is crucial for achieving the desired doneness, regardless of the chosen method. Variations in thickness and cooking methods necessitate modifications to the standard cooking times.

    • Precision in Timing: Carefully monitoring the cooking time ensures the pork chop reaches the desired internal temperature without overcooking. Use a meat thermometer to determine the internal temperature of the pork chop and adjust the cooking time accordingly.
    • Adjusting Based on Thickness: Thicker chops will require longer cooking times than thinner ones. The cooking method will also influence the cooking time. Experimentation and observation are key to determining appropriate cooking times for each specific situation.

    Influence of Pork Cut Types

    Different types of pork cuts, such as bone-in and boneless, influence the cooking process and the final doneness. Bone-in chops tend to cook slower due to the presence of bone, which retains heat differently than boneless chops.

    • Bone-in vs. Boneless: Bone-in chops often require longer cooking times to ensure the internal temperature reaches the safe range. This is due to the bone’s ability to retain heat and slow down the overall cooking process. Boneless chops, conversely, cook faster and may require less time.
    • Temperature Control: Bone-in chops are often more challenging to cook evenly because of the uneven distribution of heat around the bone. Maintaining a consistent temperature and closely monitoring the internal temperature is crucial.

    Avoiding Overcooked or Undercooked Pork Chops

    Perfectly cooked pork chops are a culinary delight, but achieving that delicate balance between juicy tenderness and satisfying crispiness can be tricky. Overcooked pork chops become dry and tough, while undercooked ones pose a food safety risk. Understanding common mistakes and implementing effective strategies is key to consistently achieving the ideal result.Overcooking and undercooking pork chops often stem from misjudgments in cooking time and temperature.

    A critical factor is ensuring even heat distribution across the chop, which can be influenced by the thickness and initial temperature of the meat. Precise control over these elements is crucial for avoiding those dreaded extremes.

    Common Cooking Mistakes

    Misjudging cooking times, neglecting the importance of proper heat distribution, and overlooking the impact of initial meat temperature are frequent pitfalls in pork chop preparation. These factors contribute to inconsistencies in doneness, leading to either dry, overcooked results or undercooked, potentially unsafe outcomes. Employing accurate methods for determining doneness and maintaining even cooking throughout the entire process is vital to avoid these problems.

    Preventing Overcooking and Undercooking

    Several strategies can help minimize the risk of overcooking or undercooking pork chops. Using a meat thermometer is the most reliable method for determining doneness, regardless of the cooking method. Maintaining a consistent cooking temperature and ensuring even heat distribution across the chop are equally important. Adjusting cooking times based on the thickness of the pork chop and the chosen cooking method will significantly contribute to preventing either over or undercooking.

    Ensuring Even Cooking

    Achieving even cooking is essential for a consistently delicious result. Sealing the pork chops in a hot pan or skillet before transferring to the oven, and flipping them regularly during cooking, especially when pan-frying, can promote even heat distribution. Using a heavy-bottomed pan or baking dish helps maintain a consistent temperature.

    Flowchart for Proper Cooking Time and Temperature

    This flowchart Artikels the steps to follow for achieving perfectly cooked pork chops, free from the pitfalls of over or undercooking:

     Start
       |
       V
     Choose Cooking Method (Pan-frying, Baking, etc.)
       |
       V
     Measure Chop Thickness (e.g., 1 inch, 1.5 inches)
       |
       V
     Determine Estimated Cooking Time (Using reference charts/cookbooks)
       |
       V
     Preheat Oven/Heat Pan to appropriate temperature (e.g., 375°F/190°C for oven, 400°F/200°C for pan)
       |
       V
     Cook Pork Chop(s) (Sealing, flipping, or rotating as needed)
       |
       V
     Use Meat Thermometer to check internal temperature (e.g., 145°F/63°C for medium-rare)
       |
       V
     Check Doneness (Adjust cooking time if needed)
       |
       V
     Remove from Heat
       |
       V
     Rest Pork Chops for 5-10 minutes
       |
       V
     Serve
       |
       V
     End
     

    Doneness and Safety

    Properly cooked pork chops are not only delicious but also crucial for food safety.

    Understanding the relationship between cooking temperature and food safety is paramount to preventing potential health risks. Ignoring safe cooking temperatures can lead to unpleasant, and potentially dangerous, consequences. This section delves into the importance of precise internal temperatures for pork chops and the risks associated with undercooked meat.

    Cooking temperatures are critical for food safety. Microorganisms, including bacteria, can thrive in food at certain temperatures, posing significant health risks if not eliminated. Achieving the correct internal temperature ensures that these harmful microorganisms are destroyed, preventing foodborne illnesses. This is particularly important for pork, as it can carry various pathogens.

    Importance of Safe Internal Temperatures

    The safe internal temperature for pork chops is crucial to prevent foodborne illnesses. Undercooked pork chops can harbor harmful bacteria like
    -Salmonella* and
    -E. coli*, leading to serious health complications. Consuming undercooked pork is a significant health risk. Symptoms of foodborne illness can range from mild discomfort to severe illness requiring medical attention.

    Safe Internal Temperature for Pork Chops

    The safe internal temperature for all cuts of pork, including pork chops, is 145°F (63°C).

    Reaching this temperature ensures that harmful bacteria are eliminated. Lower temperatures may not fully eliminate all harmful bacteria, increasing the risk of foodborne illness. Maintaining this temperature is essential to guarantee the safety of the meal.

    Recommended Internal Temperatures and Cooking Times

    The ideal internal temperature for pork chops varies based on desired doneness. This table Artikels the recommended internal temperatures and approximate cooking times for various doneness levels. Adjust cooking times based on your specific pork chop thickness and cooking method.

    Doneness Recommended Internal Temperature (°F) Approximate Cooking Time (for 1-inch thick pork chops) Food Safety Precautions
    Rare 130-135 10-12 minutes Carefully monitor the cooking process and avoid overcooking. Always use a food thermometer to ensure accurate temperature readings.
    Medium-Rare 140-145 12-15 minutes Maintaining a consistent cooking temperature is vital for achieving this level of doneness. Regular checks with a food thermometer are recommended.
    Medium 145 15-18 minutes The recommended temperature for medium-rare pork chops is a safe temperature for preventing foodborne illnesses. Use a food thermometer to ensure doneness.
    Medium-Well 150-155 18-20 minutes Cooking times can vary depending on the thickness of the pork chops. Always use a food thermometer to ensure accurate temperature readings.
    Well-Done 160+ 20+ minutes A well-done pork chop may be slightly drier than other levels of doneness. Use a food thermometer for optimal results.

    Remember, these are estimates, and cooking times may vary based on factors such as the thickness of the pork chop, the cooking method used (e.g., pan-frying, oven roasting), and the heat source. Always use a food thermometer to ensure the pork chop reaches a safe internal temperature.

    Final Thoughts

    So, whether you’re a seasoned chef or a kitchen novice, this guide provides a clear and actionable plan for perfectly cooked pork chops every time. By combining visual inspection, internal temperature checks, and fork tests, you can confidently determine the ideal doneness level for your taste and the safety of your meal. Remember, precision in cooking is key, and this guide empowers you to achieve delicious and safe results.

  • Cook Butternut Squash in the Microwave Quick & Easy

    Cook Butternut Squash in the Microwave Quick & Easy

    Cook Butternut Squash in the Microwave: This method offers a surprisingly quick and easy way to prepare this nutritious veggie. Forget the oven; the microwave delivers delicious results in a fraction of the time. We’ll explore the advantages and disadvantages, essential steps, nutritional benefits, and various cooking techniques to get the perfect texture, from tender to crispy.

    Plus, we’ll cover adding flavors, safety tips, troubleshooting, and even how to present your microwave-cooked masterpiece beautifully.

    From whole squash to cubed, we’ll dissect different methods, power settings, and cooking times. You’ll discover how to adjust for various sizes and desired textures, whether you want a soft side dish or a hearty soup base. We’ll also delve into the important safety considerations, ensuring your microwave-cooked butternut squash is not only delicious but also perfectly safe to eat.

    Introduction to Microwave Butternut Squash Cooking

    Cook Butternut Squash in the Microwave

    Microwave cooking of butternut squash offers a convenient and relatively quick alternative to traditional oven methods. This method, while not always preserving the same deep caramelization, can be ideal for busy schedules or when a smaller amount of squash is needed. Understanding the advantages and disadvantages, as well as the specific steps and nutritional considerations, can help you choose the best method for your needs.Microwave cooking of butternut squash is generally faster than other methods.

    This can be a significant advantage if you’re short on time or just want a quick meal. However, it may not achieve the same level of texture or deep color that oven-roasted squash can offer. The lack of browning can be a concern for some, but it doesn’t necessarily impact the nutritional value. The key is to understand the trade-offs and adjust your expectations accordingly.

    Advantages and Disadvantages of Microwave Cooking, Cook Butternut Squash in the Microwave

    Microwave cooking offers a quick and easy way to prepare butternut squash, especially when you don’t have a lot of time. It’s also often more energy-efficient than traditional oven roasting, particularly for small quantities. However, the cooking process can sometimes lead to uneven heating, and the squash may not develop the same deep color or caramelized texture. Also, the moisture content can sometimes be affected.

    Basic Steps and Equipment Needed

    The process is straightforward. First, you’ll need a microwave-safe dish, ideally one with a lid. Halve or quarter the butternut squash, removing the seeds. Place the squash in the dish, add a splash of water (around 1-2 tablespoons), and cover it. Cook in the microwave in 3-5 minute intervals, checking frequently and adding more water if needed.

    Quick and easy butternut squash in the microwave is a game-changer! I’ve been experimenting with different cooking methods lately, and this one is a real winner. While I’m exploring the latest in futuristic tech, like Sony’s VR plans at E3 sony showcases vr plans e3 , I’m also enjoying simple meals. The microwave method ensures tender, delicious squash, perfect for a weeknight side dish or a healthy snack.

    This method ensures the squash doesn’t dry out.

    Nutritional Value and Cooking Method

    Butternut squash is a good source of vitamins A and C, as well as fiber. Microwave cooking, while potentially affecting the texture and color, doesn’t drastically alter the nutritional content compared to other methods. The key is to cook it to a soft consistency, as this ensures maximum nutrient retention. Adding a little water during cooking also helps preserve the natural moisture and nutrients within the squash.

    Types of Butternut Squash and Microwave Cooking Responses

    Different varieties of butternut squash can have varying degrees of firmness and moisture content. Some varieties might be more prone to drying out in the microwave than others. It’s recommended to adjust cooking times and the amount of added water depending on the specific variety.

    • Kabocha Squash: Often sweeter and slightly denser than butternut squash, kabocha might need slightly longer cooking times in the microwave to achieve the desired softness.
    • Butternut Squash (Common): This is a versatile variety, and microwave cooking times can be adjusted based on the size of the squash halves or quarters.
    • Spaghetti Squash: While not typically cooked in the microwave due to its tendency to become mushy, this variety can be used if a very short cooking time is required for a specific application.

    Microwave Butternut Squash Cooking Techniques

    Microwave cooking offers a quick and convenient way to prepare butternut squash, but the method you choose significantly impacts the final texture. Understanding the variables like size, cut, and power setting is key to achieving the desired result. Whether you want a tender, roasted-like squash or a crispy, caramelized exterior, mastering microwave techniques can make a big difference in your kitchen.Different methods of preparing butternut squash in the microwave can lead to varied outcomes in terms of texture and cooking time.

    By understanding these techniques and their impact on the final product, you can effectively control the cooking process and optimize your results.

    Whole Butternut Squash Cooking

    Whole butternut squash, often used for soups or stews, requires longer cooking times compared to cubed or roasted methods. Larger sizes take significantly more time, especially at lower power settings. The uneven heat distribution in the microwave can cause some areas to be overcooked while others remain undercooked, leading to an uneven texture. Precise timing is critical for achieving a perfectly cooked, even-textured whole squash.

    Cubed Butternut Squash Cooking

    Cubing the squash before cooking dramatically shortens the cooking time and ensures more even cooking. Smaller cubes cook faster, allowing for a more consistent texture. However, too small of cubes may release moisture quickly, leading to a mushy texture. The ideal cube size will depend on your desired final texture and the microwave’s power setting.

    Roasted Butternut Squash Cooking

    Microwave roasted butternut squash combines the speed of microwaving with the caramelized texture of roasting. This method often uses a combination of microwaving and broiling to achieve the desired crispness. It involves a few extra steps and requires monitoring for a balanced result. The best results typically come from placing the squash in a microwave-safe dish lined with parchment paper, which prevents sticking and helps with even cooking.

    Impact of Power Settings

    The microwave’s power setting significantly affects the cooking time and the final texture of the butternut squash. Lower power settings (e.g., 50%) increase the cooking time but often result in a softer, more tender texture. Higher power settings (e.g., 100%) reduce cooking time but might lead to a slightly firmer or crispier texture, depending on the cut and size.

    Experimenting with different power levels allows for tailoring the final outcome to your preference.

    Optimal Cooking Time

    The optimal cooking time for butternut squash varies considerably based on size, cut, and desired texture. Smaller, cubed squash will cook faster than larger, whole ones. A general guideline is to start with a shorter cooking time and add more time in increments if needed, monitoring the squash’s progress carefully. For example, a 1-pound cubed butternut squash might take 5-7 minutes at 100% power, while a 2-pound whole squash could require 10-15 minutes at 50% power.

    Precise timing ensures a perfectly cooked result.

    Microwave Butternut Squash Cooking Steps

    Texture Cut Power Setting Cooking Time (approx.) Steps
    Soft Cubed (small) 50% 5-7 minutes 1. Place cubed squash in a microwave-safe dish. 2. Microwave on 50% power. 3. Stir halfway through.
    Tender Cubed (medium) 75% 4-6 minutes 1. Place cubed squash in a microwave-safe dish. 2. Microwave on 75% power. 3. Stir halfway through.
    Crispy Cubed (medium), Roasted 100% 3-5 minutes + broiling 1. Place cubed squash in a microwave-safe dish lined with parchment paper. 2. Microwave on 100% power. 3. Broil for 1-2 minutes, monitoring closely.

    Variations and Additions

    Unlocking the full potential of butternut squash in the microwave goes beyond basic cooking. This section explores a world of flavor combinations, highlighting how to elevate your microwave-cooked butternut squash dishes with spices, herbs, and other exciting additions. From savory soups to creamy purees, we’ll show you how to adapt the method to create a variety of delicious meals.Adding complexity to the simple microwave method is surprisingly straightforward.

    By introducing a diverse range of flavors and textures, you can transform a basic side dish into a culinary masterpiece. This involves understanding how different ingredients react in the microwave environment, ensuring optimal results.

    Spice and Herb Enhancements

    A wide array of spices and herbs can transform plain butternut squash into something truly special. Experimenting with different combinations is key to discovering your favorites. Fresh herbs like rosemary, thyme, or sage complement the natural sweetness of butternut squash beautifully. Dried herbs like oregano, paprika, or cumin can add depth and complexity. Don’t be afraid to experiment with blends like Italian seasoning or curry powder to create unique flavor profiles.

    Consider incorporating warm spices like cinnamon or nutmeg for a touch of autumnal charm.

    Flavorful Recipes

    These recipes demonstrate how to incorporate these additions into various dishes.

    • Butternut Squash and Sage Risotto: Microwave-cooked butternut squash adds a subtle sweetness to this creamy risotto. Sautéed onions, garlic, and sage form the base, with the cooked squash incorporated into the creamy risotto. A sprinkle of parmesan cheese elevates the flavor profile.
    • Creamy Microwave Butternut Squash Soup: This recipe showcases how easily you can prepare a smooth, flavorful soup in the microwave. Roasted garlic, a touch of ginger, and coconut milk blend seamlessly with the squash, creating a comforting and decadent soup. A squeeze of lemon juice brightens the flavors.
    • Butternut Squash and Chickpea Curry: This recipe demonstrates the versatility of microwave-cooked butternut squash. The squash is cooked with spices such as turmeric, cumin, and coriander, and then blended with chickpeas and coconut milk to create a hearty and flavorful curry. Fresh cilantro adds a final touch of freshness.

    Adapting the Cooking Method

    Microwave cooking allows for a variety of dishes beyond simple side dishes. The method easily adapts to soups, purees, and even savory main courses.

    • Soups: For soups, add the butternut squash to the broth or liquid along with other ingredients. Ensure the squash is sufficiently cooked before blending for a smooth and creamy texture. Consider adding vegetables like carrots, celery, and onions to enhance the depth of flavor.
    • Purees: To make a puree, simply add the cooked butternut squash to a food processor or blender with other desired ingredients. This technique allows for a smooth, creamy texture that’s ideal for dips, sauces, or spreads. Dairy products like cream or milk can create a richer consistency.
    • Side Dishes: For side dishes, roast the butternut squash with herbs and spices until tender. Adding a drizzle of olive oil or balsamic glaze enhances the flavor and adds visual appeal. Roasted vegetables, such as Brussels sprouts or broccoli, pair wonderfully with the butternut squash.

    Complementary Ingredients

    Pairing microwave-cooked butternut squash with the right ingredients can elevate the dish to new heights.

    • Roasted Vegetables: Roasted vegetables such as Brussels sprouts, broccoli, or sweet potatoes complement the squash’s natural sweetness. They add a satisfying crunch and depth of flavor.
    • Legumes: Chickpeas, lentils, or black beans can add protein and texture to soups or curries. These ingredients work well with the earthy flavor of the squash.
    • Nuts and Seeds: Toasted nuts or seeds add a satisfying crunch and a burst of flavor. Walnuts, pecans, or pumpkin seeds can be sprinkled on top of roasted squash or incorporated into a puree.

    Safety and Efficiency Considerations

    Microwave cooking offers a convenient way to prepare butternut squash, but understanding safety and efficiency practices is crucial for optimal results. Proper techniques ensure even cooking, prevent potential hazards, and maximize the efficiency of your microwave. Following these guidelines will make your butternut squash experience both enjoyable and safe.Microwave cooking, while quick, requires specific attention to detail to avoid uneven cooking or potential safety issues.

    The high-frequency electromagnetic waves used in microwaves can heat food unevenly if not handled correctly. Choosing the right container and ensuring proper placement is paramount for successful and safe results.

    Microwave-Safe Containers and Placement

    Using microwave-safe containers is essential for even cooking and preventing potential hazards. These containers are designed to withstand the high temperatures and pressures generated during microwave cooking without breaking or leaching harmful chemicals into the food. Always check the container’s label to ensure it’s microwave-safe. Glass, ceramic, and some plastics are suitable choices. Avoid metal containers, as they can cause sparks or uneven heating.Proper placement of the butternut squash within the container is vital for uniform heating.

    Arrange the squash in a single layer, if possible, to allow the microwaves to penetrate the food evenly. Avoid overcrowding the container, as this can hinder proper heating and potentially cause hot spots. Rotating the container halfway through the cooking process will also help ensure even cooking. Use a turntable, if available, to facilitate even heating.

    Potential Risks and Precautions

    While microwave cooking is generally safe, certain precautions can mitigate potential risks. One potential concern is uneven heating, which can lead to areas of the squash being undercooked while others are overcooked. This uneven cooking can impact the overall texture and taste of the dish.Another potential risk is the potential for splattering. When microwaving liquids, such as squash that releases moisture, splattering can occur.

    Covering the container with a lid or using a microwave-safe cover can help minimize splattering. Ensure that the container is not overfilled with liquid to prevent excessive splattering.

    Checking for Doneness and Food Safety

    Checking for doneness is crucial for both taste and safety. Using a fork or a knife to pierce the squash is an effective way to determine doneness. The squash is cooked through when it is easily pierced and the flesh is tender. Ensure the squash reaches a safe internal temperature of 165°F (74°C) to eliminate any potential foodborne pathogens.

    Avoid consuming squash that is not fully cooked.

    Important: Always allow the squash to cool slightly before handling to prevent burns.

    Microwave vs. Other Cooking Methods

    | Method | Time Efficiency | Energy Efficiency | Even Cooking | Notes ||—————–|—————–|——————–|—————|———————————————————————————————————————————–|| Microwave | Very High | High | Moderate | Quick cooking, requires proper placement and container selection.

    || Oven | Moderate | Moderate | High | Typically slower than microwave, but provides even heating and allows for various cooking techniques.

    || Stovetop | Low | Low | Moderate | Requires constant attention and stirring, potential for uneven heating depending on the pot and burner.

    |

    Quick and easy butternut squash in the microwave is a game-changer! It’s surprisingly delicious, and perfect for a weeknight meal. Speaking of delicious sounds, did you hear about the new Martin Phillipps album? It features a compilation of his earliest recordings, showcasing his incredible musical talent. New Chills is a must-listen for fans and newcomers alike.

    Anyway, back to the squash – it’s super simple, and you’ll be amazed at how tender it gets!

    Troubleshooting and Tips: Cook Butternut Squash In The Microwave

    Microwaving butternut squash can be a quick and easy way to prepare this versatile vegetable, but sometimes things don’t go as planned. Understanding common issues and how to address them can significantly improve your microwave butternut squash cooking experience. This section will Artikel troubleshooting steps and provide practical tips to optimize your results.Uneven cooking and mushiness are frequent challenges when microwaving butternut squash.

    Factors like variations in the squash’s thickness and the microwave’s power output can lead to these issues. By understanding these variables, you can effectively address these problems and achieve consistently delicious results.

    Common Cooking Issues and Solutions

    Microwaving butternut squash, like any cooking method, has potential pitfalls. Uneven cooking, where some parts are overcooked while others remain raw, is a common issue. This often stems from inconsistent heat distribution within the squash itself or differences in the thickness of the squash pieces. Similarly, mushiness can result from overcooking or from using improper techniques.

    • Uneven Cooking: To minimize uneven cooking, ensure that the squash pieces are roughly the same size. This helps them cook uniformly. Rotating the squash halfway through the cooking process can also promote even heating. Adjusting the cooking time based on your microwave’s wattage is another key element in ensuring even cooking. If using a microwave with a variable power setting, consider using a lower power setting for longer periods to avoid scorching or uneven cooking.

      Quick and easy butternut squash in the microwave? Absolutely! This method is surprisingly delicious, and perfect for when you’re short on time. Plus, it’s a great way to bring back a sense of ease in the kitchen, especially if you’re feeling a bit intimidated by cooking. This comforting approach is perfect for tackling those seemingly daunting tasks, like bring back afraid dark , by providing a simple, satisfying culinary victory.

      The soft, tender squash is ready in minutes, leaving you with a nutritious and satisfying meal, ready for anything.

    • Mushiness: Overcooking is a primary cause of mushy butternut squash. Start with shorter cooking intervals and add time incrementally until the squash reaches the desired tenderness. Using damp paper towels can help to maintain moisture and prevent excessive drying during the cooking process, leading to a more tender result. If the squash is already mushy after cooking, try adding a little bit of butter or a splash of milk to the dish.

      The addition of liquids can help to rehydrate and soften the squash.

    Optimizing Microwave Cooking Results

    Employing the right techniques can significantly enhance the outcome of your microwave butternut squash cooking.

    • Using Damp Paper Towels: Wrapping the squash in damp paper towels helps maintain moisture, preventing it from drying out and becoming tough. This technique is particularly effective for larger pieces of squash and for longer cooking times. It also helps to create a steamy environment that accelerates the cooking process, resulting in tender and flavorful butternut squash.
    • Adjusting Cooking Times: Every microwave operates differently, so adjust the cooking time based on your microwave’s power output. Start with a shorter cooking time and then add time in small increments to avoid overcooking. Check the squash frequently during the cooking process, especially if it is cut into smaller pieces.
    • Controlling Moisture: Maintaining the right amount of moisture is critical. Adding a little bit of water or broth to the dish can help prevent the squash from becoming dry. Ensure the liquid is not excessive; too much liquid can result in a soggy outcome.

    Common Mistakes to Avoid

    Certain practices can lead to less-than-ideal results when microwaving butternut squash.

    • Overcrowding the Microwave: Placing too many squash pieces in the microwave at once can hinder even cooking. Ensure that the squash pieces have enough space around them to allow for proper heat circulation.
    • Ignoring Microwave Wattage: Microwaves vary in wattage. Recipes often assume a standard wattage, so adjusting the cooking time based on your microwave’s wattage is essential. Using a lower power setting for longer periods can help prevent overcooking.
    • Skipping the Initial Check: Checking the squash’s doneness after the initial cooking time is crucial. This allows you to determine if additional cooking is needed, avoiding both undercooked and overcooked results. Using a fork to check for softness is a good way to determine doneness.

    Visual Aids and Presentation

    Transforming a simple butternut squash into a culinary masterpiece starts with a visually appealing presentation. A well-crafted dish not only tantalizes the eyes but also enhances the overall dining experience. The right visual cues can elevate the enjoyment of your microwave-cooked squash, making it a delightful addition to any meal.

    Image Description: Stages of Microwave Butternut Squash Cooking

    Imagine a captivating image showcasing the different stages of microwave butternut squash preparation. The initial shot depicts a whole, unpeeled butternut squash, vibrant orange in color, resting on a rustic wooden cutting board. The second image captures the squash halved and seeded, revealing the tender flesh within. A third image showcases the squash cubes arranged neatly on a microwave-safe dish, ready for cooking.

    The final image displays the perfectly cooked, slightly caramelized squash cubes, glistening with moisture, now transformed into a delectable side dish. This visual narrative clearly demonstrates the simple yet effective process.

    Visually Appealing Presentation

    For a visually appealing presentation, consider using a ceramic or glass dish with a textured surface. Arranging the cooked squash in a slightly elevated mound adds visual interest. A sprinkle of fresh herbs like parsley or thyme, or a drizzle of olive oil, further enhances the dish’s appeal and adds a pop of color. Garnishing with toasted pumpkin seeds or a sprinkle of cinnamon sugar can elevate the presentation and provide a subtle flavor contrast.

    Serving Suggestions

    A well-presented dish enhances the overall dining experience. Microwave-cooked butternut squash lends itself to various serving suggestions, each with its unique charm.

    • As a side dish: Serve the squash alongside roasted chicken or fish. Its delicate sweetness complements savory main courses beautifully. Arrange it alongside other roasted vegetables for a colorful and nutritious side dish. A simple drizzle of honey or maple syrup can add a touch of sweetness.
    • In a salad: Toss the cooked squash with mixed greens, crumbled feta cheese, and a lemon vinaigrette. This creates a light and flavorful salad with contrasting textures and tastes. The soft, cooked squash adds a satisfying creaminess to the salad, while the greens provide a refreshing crunch.
    • In a soup: Pureed microwave butternut squash adds a smooth and creamy texture to soups, making them richer and more flavorful. The mild sweetness of the squash blends harmoniously with other ingredients, creating a delicious and nutritious soup. Consider adding a hint of nutmeg or ginger for an extra layer of flavor.

    Nutritional Comparison

    The nutritional value of butternut squash can be affected by the cooking method. The following table compares the approximate nutritional information per 100 grams of raw and microwave-cooked butternut squash.

    Nutrient Raw Butternut Squash Microwave-Cooked Butternut Squash
    Calories 25-30 28-35
    Protein (g) 0.9-1.2 0.9-1.2
    Carbohydrates (g) 6-7 6-7
    Fiber (g) 2-2.5 2-2.5
    Vitamins & Minerals High in Vitamins A, C, and Potassium High in Vitamins A, C, and Potassium

    Note: Nutritional values are approximate and may vary based on specific varieties and preparation methods.

    Final Review

    Cook Butternut Squash in the Microwave

    In conclusion, microwaving butternut squash is a fantastic time-saving alternative to traditional methods. We’ve covered the entire process, from preparation to presentation, with tips and tricks to ensure you get the most out of this versatile vegetable. Experiment with different spices and flavors to create your own unique microwave butternut squash dish. Whether you’re a seasoned cook or a beginner, this guide will empower you to enjoy delicious and nutritious butternut squash in record time.