Clean a Map Sensor: Understanding and tackling a crucial automotive component. This guide delves into the intricate world of map sensors, explaining their role in vehicle performance, the signs of a failing sensor, and the vital steps to cleaning it effectively. We’ll cover everything from diagnosis to replacement, offering practical advice and insightful information to ensure your vehicle operates smoothly.
Map sensors, crucial for engine management, often face wear and tear. Dirt, debris, and environmental factors can lead to inaccurate readings, impacting performance. A dirty map sensor can cause a multitude of issues, from engine misfires to poor acceleration. This comprehensive guide will empower you with the knowledge to clean and maintain your map sensor, ensuring optimal vehicle performance.
Introduction to Map Sensors
Map sensors, also known as engine position sensors, play a crucial role in modern vehicles. They provide critical information about the vehicle’s position and movement, enabling the engine control unit (ECU) to precisely adjust fuel and air mixture, ignition timing, and other parameters. Accurate map sensor readings are essential for optimal engine performance, fuel efficiency, and emissions control.Properly functioning map sensors are vital for maintaining a vehicle’s overall performance and safety.
A malfunctioning sensor can lead to various issues, including poor acceleration, rough idling, erratic fuel consumption, and even engine damage. Early detection and repair of map sensor problems are essential to prevent these costly and potentially dangerous consequences.
Common Types of Map Sensors
Map sensors come in various types, each with its own operating principle and characteristics. Understanding these differences helps in diagnosing and troubleshooting potential problems.
- Resistance Type Map Sensors: These sensors rely on the principle of resistance change to measure the engine’s position. As the engine moves, the resistance within the sensor changes, providing data to the ECU. This type of sensor is relatively inexpensive and has been widely used in older vehicles.
- Capacitance Type Map Sensors: These sensors use the change in capacitance to measure the engine’s position. They are generally more accurate than resistance sensors and are often employed in modern vehicles requiring precise engine control. The variation in the sensor’s capacitance is directly proportional to the position of the engine.
Comparison of Map Sensor Types
The following table provides a comparison of resistance and capacitance map sensors, highlighting key differences.
| Feature | Resistance Type | Capacitance Type |
|---|---|---|
| Operating Principle | Measures change in resistance based on engine position. | Measures change in capacitance based on engine position. |
| Accuracy | Generally less accurate compared to capacitance type. | Generally more accurate, offering precise position data. |
| Cost | Typically lower cost due to simpler design. | Generally higher cost due to more complex circuitry. |
| Applications | Suitable for applications requiring basic engine control. | Suitable for modern vehicles demanding advanced engine management. |
| Response Time | May exhibit slower response to engine position changes. | Usually exhibits faster response to engine position changes. |
Symptoms of a Failing Map Sensor
A crucial component in your vehicle’s engine management system, the map sensor (manifold absolute pressure sensor) monitors the air pressure in the intake manifold. Its accurate readings are essential for the engine control unit (ECU) to adjust fuel and air mixture, optimizing performance and emissions. A malfunctioning map sensor can lead to a cascade of performance issues, ranging from minor inconveniences to significant engine problems.A failing map sensor often exhibits a range of symptoms that can be subtle at first, but can escalate into more noticeable issues.
These symptoms directly impact the vehicle’s performance, making it crucial to identify them early to avoid further damage and costly repairs. Understanding the specific ways a malfunctioning map sensor manifests is key to diagnosing the problem effectively.
Common Performance Issues
Diagnosing a failing map sensor can be challenging because the symptoms aren’t always straightforward. Early signs might be subtle, such as intermittent problems, only appearing under certain conditions. This often leads to delayed diagnosis.
- Engine Misfires: A failing map sensor can cause irregular fuel delivery, leading to the engine misfiring, especially noticeable during acceleration or under load. This is often characterized by a rough or jerky driving experience.
- Rough Idling: A faulty map sensor might disrupt the engine’s ability to maintain a stable idle speed. This manifests as a fluctuating idle speed, sometimes accompanied by a noticeable vibration.
- Poor Acceleration: Insufficient or inaccurate pressure readings from a failing map sensor can result in a lack of power during acceleration. The vehicle may feel sluggish or struggle to gain speed, even under light acceleration conditions.
- Hesitation or Stalling: Intermittent or inconsistent pressure readings can lead to a hesitation in the engine’s response to the accelerator pedal. In severe cases, the engine may stall or die completely.
- Check Engine Light Illumination: Many modern vehicles have an on-board diagnostic (OBD) system. A failing map sensor will frequently trigger the check engine light, alerting the driver to a potential issue. This is a critical symptom to address promptly.
Symptom-Cause Correlation Table
This table Artikels common symptoms of a failing map sensor and their potential causes, helping you identify the source of the problem.
| Symptom | Potential Causes (Including Map Sensor) |
|---|---|
| Engine Misfires | Faulty spark plugs, ignition coils, fuel injectors, oxygen sensor, or a failing map sensor. |
| Rough Idling | Air leaks in the intake manifold, a faulty idle air control valve (IACV), or a malfunctioning map sensor. |
| Poor Acceleration | Clogged fuel filter, low fuel pressure, a clogged air filter, or a failing map sensor. |
| Hesitation or Stalling | Problems with the fuel delivery system, vacuum leaks, or a malfunctioning map sensor. |
| Check Engine Light | Various issues, including a failing map sensor, oxygen sensor, or other components in the emission control system. |
Causes of Map Sensor Failure
Map sensors, crucial for engine performance and emissions control, are susceptible to various forms of failure. Understanding the root causes behind these failures is essential for effective diagnosis and repair. This section delves into the common reasons for map sensor malfunctions, including environmental factors, mechanical issues, and usage patterns. Knowing these causes allows for proactive maintenance and ensures optimal engine function.
Cleaning a map sensor can seem like a daunting task, but it’s actually pretty straightforward. This often involves a delicate process of removing debris and ensuring proper airflow. It’s a bit like preparing Link for a new adventure in Zelda Breath of the Wild, especially when you’re trying to unlock the full potential of the Epona Link in the green suit! This helpful guide will give you some ideas for that too.
Ultimately, a clean map sensor ensures your system runs smoothly and accurately.
Environmental Factors
Environmental conditions significantly impact the longevity and accuracy of a map sensor. Extreme temperatures, both high and low, can alter the sensor’s internal components, leading to inaccurate readings. Exposure to moisture, humidity, and corrosive substances can also contribute to the degradation of the sensor’s internal wiring and circuitry. Dust and debris accumulation can impede the sensor’s ability to function properly, especially in harsh environments.
- High Temperatures: Prolonged exposure to excessive heat can cause the sensor’s internal components to warp or melt, resulting in inaccurate readings or complete failure. For instance, a vehicle parked in direct sunlight for extended periods can experience significant temperature fluctuations that damage the sensor.
- Low Temperatures: Conversely, extreme cold can affect the sensor’s ability to function optimally. The internal components might become brittle or lose their elasticity, leading to inaccurate readings or failure. This is especially common in vehicles operating in very cold climates.
- Moisture and Corrosive Substances: Exposure to moisture, humidity, and corrosive substances like road salt can lead to corrosion of the sensor’s internal components and wiring, disrupting its ability to transmit accurate data to the engine control unit (ECU). Vehicles driven in areas with high humidity or salt-laden roads are more prone to this issue.
- Dust and Debris: Accumulation of dust and debris can impede the sensor’s ability to function properly. This physical obstruction can prevent the sensor from accurately measuring the air pressure, leading to miscalculations in the engine’s fuel delivery. Vehicles used in dusty environments or off-road are more vulnerable to this type of damage.
Mechanical Issues
Mechanical factors can also contribute to map sensor failure. Improper installation or damage during repair can compromise the sensor’s functionality. Vibration and shock, common in certain driving conditions, can also lead to internal component damage. Furthermore, damage to the wiring harness or connectors associated with the sensor can lead to faulty readings.
- Improper Installation: A poorly installed map sensor can lead to a faulty connection, affecting its ability to communicate with the ECU. Incorrect tightening of mounting bolts can also cause damage to the sensor.
- Damage During Repair: A map sensor can be damaged during repair procedures. For example, improper handling or the use of excessive force during the repair process might cause cracks or internal component damage.
- Vibration and Shock: Constant vibration and shock, such as those experienced during off-road driving or on rough roads, can cause internal components of the sensor to loosen or break, leading to inaccurate readings or failure.
- Wiring Harness Damage: Damage to the wiring harness connected to the map sensor can interrupt the signal transmission to the ECU, causing the sensor to fail. This can be due to physical damage from road debris or wear over time.
Usage Patterns
Certain usage patterns can also contribute to map sensor failure. Frequent starting and stopping, especially in cold weather, can place additional stress on the sensor. Driving at high speeds for extended periods or subjecting the vehicle to high loads can lead to increased heat and stress on the sensor. Moreover, a failure to properly maintain the vehicle can affect the sensor’s overall lifespan.
- Frequent Starting and Stopping: Frequent starting and stopping, especially in cold weather, can place additional stress on the sensor. The repeated cycles of heating and cooling can accelerate the deterioration of the sensor’s internal components, increasing the likelihood of failure.
- High-Speed Driving: Driving at high speeds for extended periods can lead to increased heat buildup in the sensor, which can cause internal damage and lead to inaccurate readings or failure.
- High Load Conditions: Subjected to high loads, like towing heavy objects or hauling a significant amount of cargo, the sensor can be subjected to higher-than-normal temperatures and stress levels, accelerating potential damage.
- Lack of Maintenance: Neglecting proper maintenance can negatively impact the sensor’s lifespan. Regular cleaning and inspection can help identify potential issues and prevent significant problems.
Diagnostic Procedures

Troubleshooting a malfunctioning map sensor requires a systematic approach. Incorrect readings from the sensor can lead to erratic engine performance, fuel inefficiency, and potentially serious drivability issues. A proper diagnostic procedure ensures you isolate the problem and restore optimal engine function.
Electrical Connection Checks
Thorough inspection of the electrical connections is crucial. Faulty wiring or loose connections can mimic a failing sensor, leading to wasted time and resources. Inspect all wiring harnesses, connectors, and terminals associated with the map sensor for any signs of damage, corrosion, or loose connections.
- Visual inspection for damage:
- Tighten or replace connectors:
- Inspect sensor ground connection:
Examine the wiring harness and connectors for frayed wires, exposed insulation, or signs of overheating. Look for any signs of corrosion on terminals. Check for damaged or broken clips on the connector. Loose or broken wires can cause intermittent issues, making diagnosis challenging.
Ensure all connections are secure. If any connectors are loose, tighten them. If damage is significant, replace the damaged connectors.
A poor ground connection can affect the sensor’s accuracy. Inspect the ground wire and terminal for corrosion, looseness, or damage.
Using Diagnostic Tools
Diagnostic tools provide valuable data to pinpoint the issue. A scan tool can read sensor data in real-time, allowing for analysis of sensor output under various operating conditions. Using a scan tool can provide information on sensor readings across various engine speeds and loads.
- Data logging:
- Sensor readings analysis:
- Calibration and validation:
Data logging with a scan tool records sensor readings over a period of time, enabling observation of trends and patterns. This is crucial in detecting intermittent issues that may not be apparent during a single test. Analyze the recorded data for consistent fluctuations or spikes in sensor readings.
Compare the recorded readings to the manufacturer’s specifications. Significant deviations from the expected range could indicate a failing sensor. Analyze the data graph to detect specific patterns in sensor readings and their correlation to engine conditions.
Calibration procedures and validation checks can help to determine if the sensor’s readings are within the expected parameters. This is crucial for accurate comparison with recorded readings from a scan tool.
Diagnostic Procedure Table
| Step | Procedure | Tools |
|---|---|---|
| 1 | Visually inspect wiring harness and connectors for damage. | Visual inspection |
| 2 | Tighten or replace loose or damaged connectors. | Screwdrivers, pliers |
| 3 | Inspect sensor ground connection for corrosion or looseness. | Visual inspection |
| 4 | Connect scan tool and initiate data logging. | Scan tool, data logging software |
| 5 | Monitor sensor readings under various operating conditions. | Scan tool, data logging software |
| 6 | Compare recorded readings to manufacturer’s specifications. | Scan tool, data logging software, reference manual |
| 7 | Analyze recorded data for trends or patterns. | Scan tool, data logging software, analysis software (optional) |
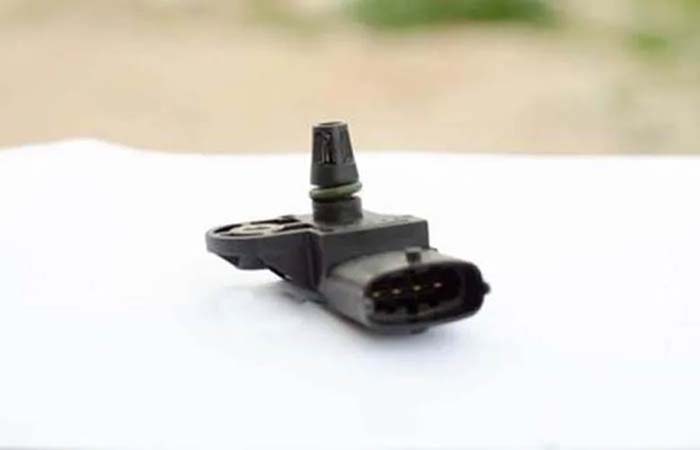
Cleaning a Map Sensor
Cleaning a map sensor is a crucial maintenance task for ensuring optimal engine performance. A dirty map sensor can lead to inaccurate readings, resulting in poor fuel efficiency, rough idling, and even engine misfires. This detailed guide will walk you through the process of safely cleaning your map sensor, from preparation to reinstallation.
Safety Precautions
Before beginning any repair work, prioritize safety. Disconnect the battery terminals to prevent electrical shock. Work in a well-ventilated area, and wear appropriate safety gear, such as gloves and eye protection. Always handle the sensor with care to avoid damage.
Cleaning Solutions and Tools
A proper cleaning solution is essential for effective map sensor cleaning. Using the wrong solution can damage the sensor’s delicate components. Mild, non-abrasive cleaners are recommended, such as isopropyl alcohol or specialized electronic contact cleaner. Avoid harsh chemicals or solvents. For cleaning, you’ll need a soft-bristled brush, a clean microfiber cloth, and a container for the cleaning solution.
Tools Required
- Screwdriver (appropriate size for the sensor mounting screws)
- Soft-bristled brush
- Microfiber cloth
- Isopropyl alcohol (90% or higher)
- Electronic contact cleaner (optional)
- Container for cleaning solution
- Gloves
- Eye protection
- Work surface
Cleaning Solution Chart
This table details the appropriate cleaning solutions and their recommended uses:
| Cleaning Solution | Appropriate Use |
|---|---|
| Isopropyl Alcohol (90% or higher) | General cleaning of the sensor’s surface and connections. |
| Electronic Contact Cleaner | For cleaning intricate components and connections, or when a more aggressive cleaning is needed. |
| Water | Avoid using water directly on the sensor. Only use water to rinse the brush after use with cleaner. |
Removing and Reinstalling the Sensor
Carefully remove the map sensor from its mounting location. Consult your vehicle’s repair manual for specific removal instructions, as procedures may vary. Be mindful of any electrical connections or clips. Once the sensor is removed, clean the mounting area to ensure a secure reinstallation. Reinstall the sensor, ensuring proper alignment and secure connection.
Step-by-Step Cleaning Procedure
- Disconnect the negative battery terminal.
- Locate the map sensor and carefully disconnect any electrical connectors.
- Use a soft-bristled brush to remove loose dirt and debris from the sensor’s surface.
- Apply a small amount of isopropyl alcohol or electronic contact cleaner to the brush.
- Gently scrub the sensor’s surface and connections, paying attention to any accumulated deposits.
- Wipe the sensor clean with a microfiber cloth. Avoid using excessive pressure.
- Reconnect the electrical connectors.
- Reinstall the sensor.
- Reconnect the negative battery terminal.
Replacing a Map Sensor: Clean A Map Sensor
Replacing a faulty map sensor is a critical automotive repair. A malfunctioning map sensor can lead to significant performance issues, reduced fuel efficiency, and even engine misfires. Proper replacement, including careful installation and attention to detail, is crucial for restoring optimal engine function.Replacing a map sensor isn’t a rocket science but requires precision. Understanding the steps and potential pitfalls will significantly increase your chances of a successful repair.
This guide details the procedure, important installation techniques, common mistakes to avoid, and a step-by-step process for a smooth replacement.
Procedure for Replacing a Faulty Map Sensor
The replacement procedure for a map sensor involves disconnecting the old sensor, removing it from the engine, installing the new sensor, and reconnecting the electrical connections. Each step demands meticulous care to prevent damage to the engine or other components.
Importance of Proper Installation Techniques
Proper installation techniques are essential for the accurate operation of the map sensor. This ensures that the sensor correctly transmits data to the engine control module (ECM). Incorrect installation can lead to performance problems, potentially causing costly repairs later. Ensuring the sensor is seated correctly in its mounting location is paramount.
Cleaning a map sensor can be a real pain, but it’s crucial for a smooth driving experience. Speaking of things that are crucial for smooth driving, did you hear about Car Seat Headrest announcing a new song to benefit the transgender law center? This fantastic initiative really highlights the importance of supporting causes we care about.
Anyway, back to map sensors – it’s all about those tiny details for optimal performance.
Common Mistakes to Avoid During Replacement
Several common mistakes can hinder a successful map sensor replacement. For instance, failing to disconnect the electrical connectors properly can result in damage to the wiring harness. Also, improper seating of the sensor can lead to inaccurate readings. Another common pitfall is neglecting to torque the sensor mounting bolts to the manufacturer’s specifications. Ignoring these details can compromise the sensor’s function.
Demonstrating the Map Sensor Replacement Process
Imagine the engine compartment, with the map sensor located near the intake manifold. The sensor will be connected via a wiring harness and a few bolts. A crucial step is to carefully remove the sensor harness and disconnect the electrical connectors. The sensor is likely attached to the manifold with a few bolts, which need to be removed.
After removing the old sensor, carefully inspect the mounting area for any debris or corrosion.
Step-by-Step Guide for Replacing the Sensor
- Disconnect the negative battery terminal. This is a safety precaution to prevent electrical shock.
- Locate the map sensor. Identify the map sensor’s location on the intake manifold. Refer to your vehicle’s repair manual for precise location.
- Disconnect the electrical connectors. Carefully disconnect the wiring harness from the map sensor, ensuring you don’t damage any wires. Use your hands or appropriate tools to prevent any strain on the wires. Take pictures of the connection.
- Remove the mounting bolts. Use the appropriate wrench size to loosen and remove the mounting bolts that secure the map sensor to the intake manifold. Carefully store these bolts in a safe place.
- Remove the old map sensor. Carefully pull the old sensor out of its housing, taking care not to damage the surrounding components.
- Inspect the mounting area. Check for any debris, corrosion, or damage. Clean the mounting surface if necessary.
- Install the new map sensor. Align the new sensor with the mounting holes, ensuring it’s properly seated. Use the appropriate wrench size to tighten the mounting bolts. Follow torque specifications provided in your vehicle’s repair manual. Ensure that the sensor sits flush.
- Reconnect the electrical connectors. Carefully reconnect the wiring harness to the new map sensor, ensuring a secure connection. Verify the connections against the original.
- Reconnect the negative battery terminal. Reconnect the negative battery terminal.
- Test the system. Start the engine and monitor the vehicle’s performance for any abnormalities. This is critical to confirm the sensor is working as expected.
Parts Required for Replacement
| Part | Description |
|---|---|
| New Map Sensor | A replacement map sensor specific to your vehicle model. |
| Wrench Set | A set of wrenches or sockets for removing and tightening the mounting bolts. |
| Torque Wrench | A torque wrench is crucial to ensure the mounting bolts are tightened to the correct specifications. |
| Electrical Connectors | If the connectors are damaged during removal, you may need to replace them. |
| Gloves | Protective gloves are important to avoid contamination and potential hazards. |
| Repair Manual | A comprehensive repair manual for your vehicle model provides detailed instructions and torque specifications. |
Preventing Map Sensor Failure
Keeping your engine’s map sensor in tip-top shape is crucial for optimal performance and longevity. A healthy map sensor ensures accurate readings, leading to efficient fuel consumption, reduced emissions, and a smoother driving experience. Proactive maintenance can significantly extend the lifespan of this vital component.
Cleaning a map sensor can be a real pain, but it’s crucial for optimal performance. Speaking of performance, I had a blast watching le1f absolutely nail their set of Gomorrah at Pitchfork’s unofficial CMJ event at Villain last week. Seriously, check out the video here watch le1f perform gomorrah at pitchforks unofficial cmj event at villain last week.
Getting back to the sensor, proper cleaning ensures your car runs smoothly, just like the killer set I saw last week.
Preventative Maintenance Techniques
Proper preventative maintenance is key to avoiding map sensor issues. Regular inspections and checks, combined with maintaining optimal vehicle operating conditions, can greatly reduce the risk of sensor failure. This proactive approach saves you money in the long run by preventing costly repairs.
Importance of Regular Inspections and Checks
Regularly checking the map sensor’s connections and surrounding components is vital. Inspecting for any signs of damage, corrosion, or loose connections is critical. A visual inspection should include checking for physical damage to the sensor itself and the wiring harness. Look for signs of water ingress, especially in areas prone to moisture accumulation, as this can lead to corrosion.
This simple visual inspection can often identify potential problems before they escalate into major issues.
Maintaining Optimal Vehicle Operating Conditions
Maintaining optimal vehicle operating conditions is essential for the health of the map sensor. This includes adhering to the manufacturer’s recommended maintenance schedule, using the correct type and grade of fuel, and avoiding extreme driving conditions, such as prolonged high-speed driving or driving in harsh weather conditions. Extreme temperatures can significantly impact the sensor’s performance and reliability.
Recommended Preventative Maintenance Steps
Regular maintenance is critical to a long-lasting map sensor. Here are some recommended preventative maintenance steps:
- Regular Visual Inspections: Conduct visual checks for physical damage, corrosion, or loose connections to the sensor and wiring harness. Pay close attention to areas susceptible to moisture.
- Fuel Quality: Using the correct type and grade of fuel as specified by the vehicle manufacturer is essential. Using inferior fuel can negatively impact sensor performance.
- Adherence to Maintenance Schedule: Following the manufacturer’s recommended maintenance schedule for your vehicle helps ensure that all critical components, including the map sensor, receive necessary attention and care.
- Avoid Extreme Driving Conditions: Prolonged high-speed driving or driving in harsh weather conditions can negatively impact the sensor’s ability to function properly.
- Proper Cleaning of the Air Intake System: A clean air intake system ensures the map sensor receives accurate air pressure readings, preventing unnecessary stress on the sensor.
Comparison of Preventative Maintenance Strategies
The effectiveness of different preventative maintenance strategies can vary. A table below summarizes these strategies and their impact.
| Preventive Maintenance Strategy | Effectiveness | Explanation |
|---|---|---|
| Regular Visual Inspections | High | Early detection of potential issues (corrosion, damage) |
| Proper Fuel Use | Moderate | Minimizes stress on the sensor and associated components |
| Adherence to Maintenance Schedule | High | Ensures critical components are serviced at recommended intervals |
| Avoiding Extreme Driving Conditions | Moderate | Reduces the strain on the sensor during demanding driving situations |
| Cleaning Air Intake System | High | Ensures accurate readings and avoids sensor stress from debris |
Troubleshooting Common Issues

Troubleshooting map sensor problems involves a systematic approach to identify and resolve electrical, mechanical, and calibration issues. Understanding the symptoms and potential causes, as well as the diagnostic procedures, is crucial for accurate and effective repairs. Proper troubleshooting can save time and money compared to replacing the sensor unnecessarily.Effective troubleshooting relies on a combination of diagnostic tools, careful examination, and a methodical process.
It’s essential to isolate the specific problem area to avoid costly and unnecessary replacements. This involves checking for electrical faults, mechanical malfunctions, and potential calibration errors.
Electrical Problems
Electrical problems are a common cause of map sensor malfunctions. These issues often manifest as intermittent or complete sensor failure. Identifying the specific electrical fault is crucial for a correct diagnosis and repair.
- Inspecting Wiring: Examine the wiring harness connecting the map sensor to the engine control module (ECM) for any signs of damage, such as frayed wires, exposed conductors, or loose connections. Ensure proper connections at the sensor and ECM connectors. Damaged wires often lead to intermittent issues. For example, a cracked wire insulation might only cause a problem under specific conditions, like during high engine load.
- Testing Power and Ground: Verify the voltage and ground connections to the sensor using a multimeter. Incorrect voltage or ground readings can cause the sensor to malfunction. A voltage reading outside the expected range indicates a possible electrical issue within the wiring or power supply.
- Checking the ECM Connections: Examine the connections between the ECM and the wiring harness for the map sensor. Corrosion, damaged pins, or loose connections can lead to intermittent or consistent sensor failures. A faulty ECM could also be responsible for improper signal processing, leading to incorrect map sensor readings.
Mechanical Problems
Mechanical issues can also affect the accuracy of the map sensor readings. These problems can arise from physical damage or improper installation.
- Sensor Housing Damage: Inspect the sensor housing for any signs of physical damage, such as cracks, dents, or deformation. Physical damage to the housing can affect the sensor’s ability to accurately measure pressure or other parameters. A damaged sensor housing may not properly seal against the intake manifold, leading to inaccurate pressure readings.
- Incorrect Installation: Ensure the map sensor is installed correctly according to the vehicle’s specifications. Incorrect installation can lead to a misaligned sensor, resulting in inaccurate readings. Incorrect tightening of the mounting bolts can also affect the sensor’s functionality.
- Obstructions: Check for any obstructions that might impede the sensor’s ability to measure the intake manifold pressure. Foreign objects or debris can cause inaccurate readings. For example, a buildup of dirt or debris within the intake manifold could restrict air flow and lead to an inaccurate pressure reading.
Calibration Issues, Clean a Map Sensor
Map sensor calibration involves adjusting the sensor’s output to match the vehicle’s specifications. Inaccurate calibration can lead to various performance problems.
- Incorrect Calibration Procedure: Follow the correct calibration procedure Artikeld in the vehicle’s service manual. Deviation from the prescribed procedure can lead to inaccurate calibration and potentially affect the sensor’s readings. Failure to reset the calibration after maintenance procedures can also affect the sensor’s output.
- Calibration Tool Malfunction: If using a calibration tool, ensure its functionality. Malfunctioning calibration tools can produce inaccurate readings. Ensure the calibration tool is compatible with the specific vehicle model and sensor type.
Diagnostic Trouble Codes (DTCs)
Diagnostic Trouble Codes (DTCs) provide valuable information about potential map sensor issues. Understanding the meaning of these codes is crucial for diagnosing and repairing the problem effectively.
- Interpreting DTCs: Consult the vehicle’s diagnostic manual to understand the specific meaning of each DTC related to the map sensor. Different codes indicate different problems, such as a faulty sensor, wiring issues, or ECM malfunctions. For example, a code related to an intake manifold pressure issue may suggest a problem with the map sensor itself or its associated components.
- Using Diagnostic Tools: Utilize a scan tool to retrieve and interpret the DTCs. This will help determine the exact nature of the map sensor problem. Diagnostic tools can also provide valuable information about the sensor’s readings and functionality.
Final Thoughts
In conclusion, maintaining a clean and functional map sensor is vital for vehicle performance. This guide has provided a detailed overview of map sensors, their functions, and troubleshooting procedures. From understanding the symptoms of a failing sensor to mastering the cleaning process, you now have the tools to address this crucial component effectively. Remember, preventative maintenance is key to avoiding costly repairs and maximizing your vehicle’s lifespan.